Staging Table
Staging tables are used to store data temporarily while it is being imported into the Data Vault. Each staging table is associated with a single data package.

To manage the staging tables for a particular data package, follow these steps:
-
Click the button ‘Staging tables’ under the column with the same name for the source system that you wish to explore and/or edit.
-
The following buttons are available for managing the staging tables:
-
Create a new staging table (provided that you selected the data package under which the staging table must be created (2).
-
Edit an existing staging table (3).
-
Delete a staging table (4).
-
Create a staging table
When you click the “Create a new Staging Table” button, a pop-up window will appear.
This window includes the following options:
-
Import an SQL script: This radio button allows you to create a table directly by writing a SQL statement or by importing one.
-
Import a file (CSV, Excel): This button allows you to create a table by importing a CSV or Excel file.
-
Use the manual creation wizard: This button allows you to use a wizard to create the table.
-
Use an existing table structure: This option can be used if the table already exists in the stg schema of the modeling environment's database, but is not yet mapped to any data package.

Once you have chosen how to create the staging table, the next button will become enabled and allow you to proceed to the next stage of the creation process.
Create a staging table by using a SQL script
When using the “Create table with SQL” option to create a staging table, you will need to provide the following information:
-
Table Name: mandatory — This field can only contain a maximum of 25 characters and a minimum of 2. The first character must be a letter or an underscore, and all subsequent characters can only be letters, numbers, or underscores.
-
Creation Type: mandatory — This field must be set to either “Table Creation” or “View Creation”.
-
Query Editor: mandatory — This field is used to write a SQL statement using the same SQL dialect as the modeling environment.
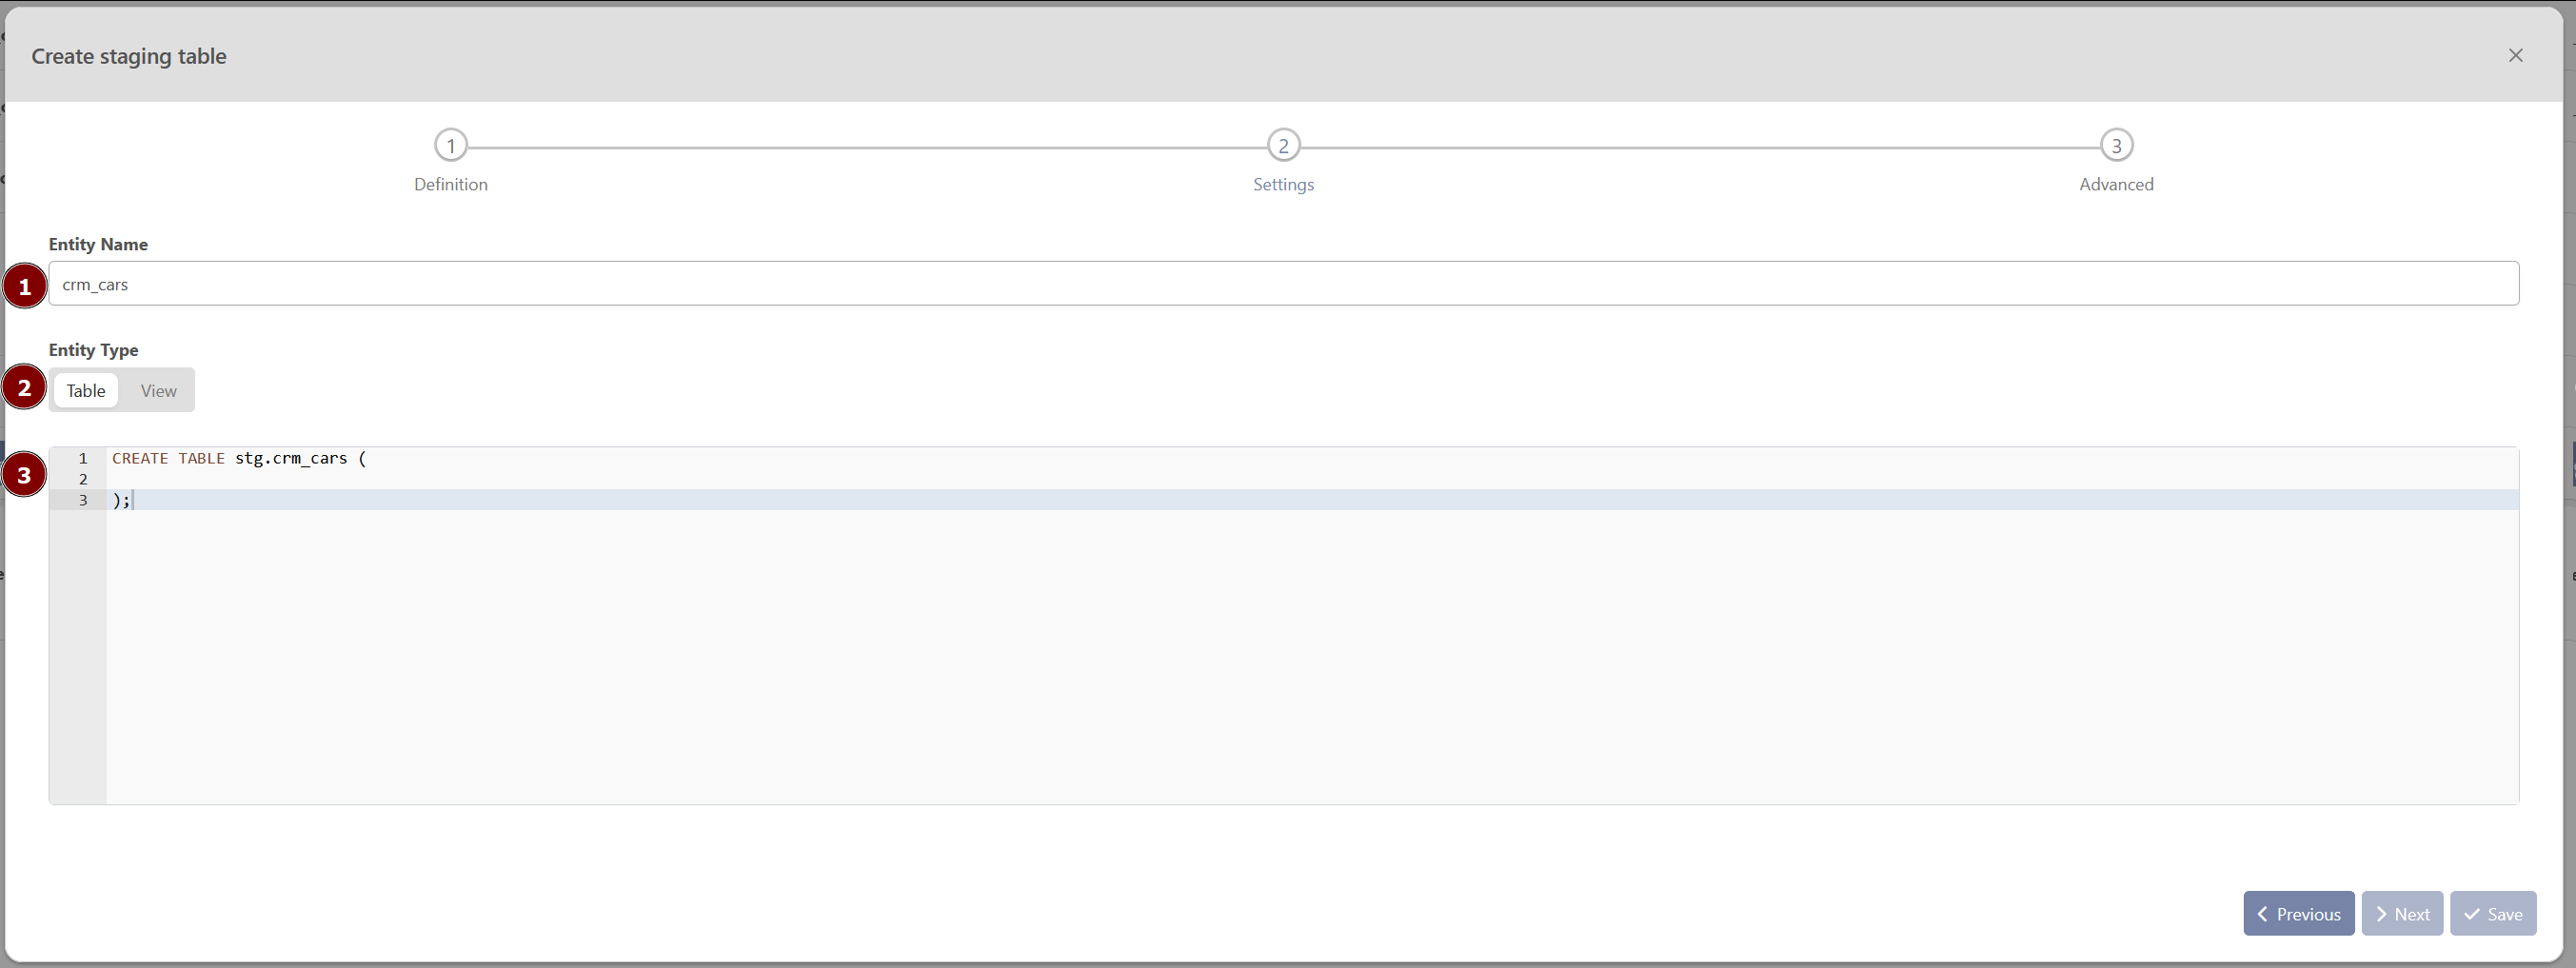
Once you have entered a valid table name and written a query, the “Save” button will become enabled and allow you to create the staging table.
The “Previous” button can be used to return to the previous screen and choose a different method for creating the staging table.
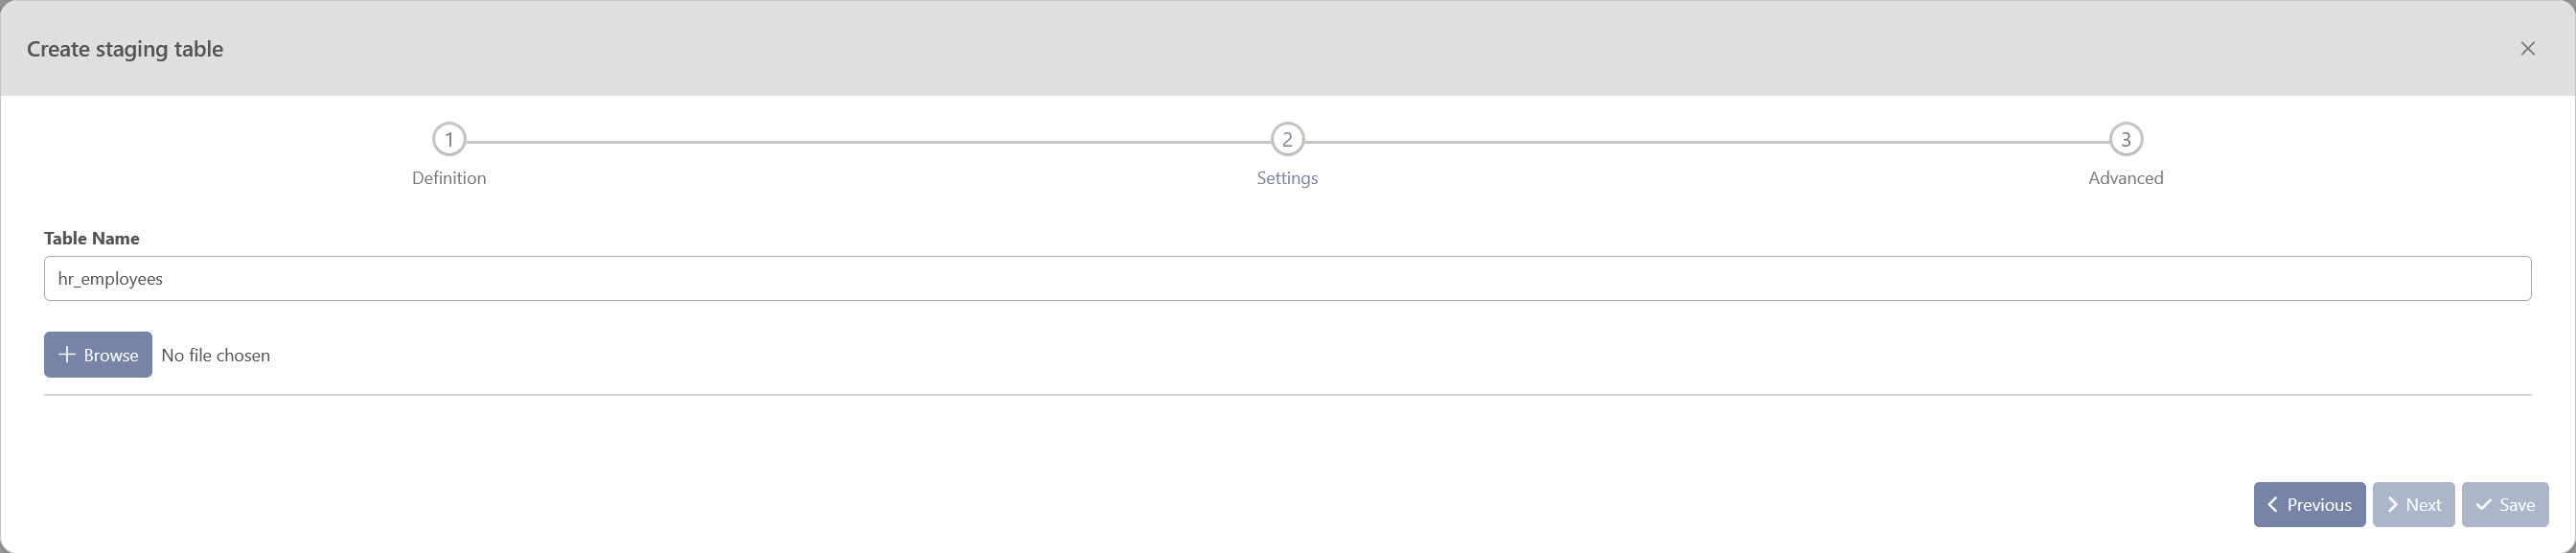
Creating a staging table by importing a file
When creating a staging table by importing a file, you will need to provide the following information:
-
Table Name: mandatory — Contains min 2 characters, max 25. The first character can only be an alphabetical character or an underscore. Every subsequent character can either be a letter, a number or an underscore.
-
Browse: mandatory — allows you to search on your computer for a file to import. The file must be either an Excel file or a CSV file, and must end with one of the following suffixes: .xlsx, .csv .xls.
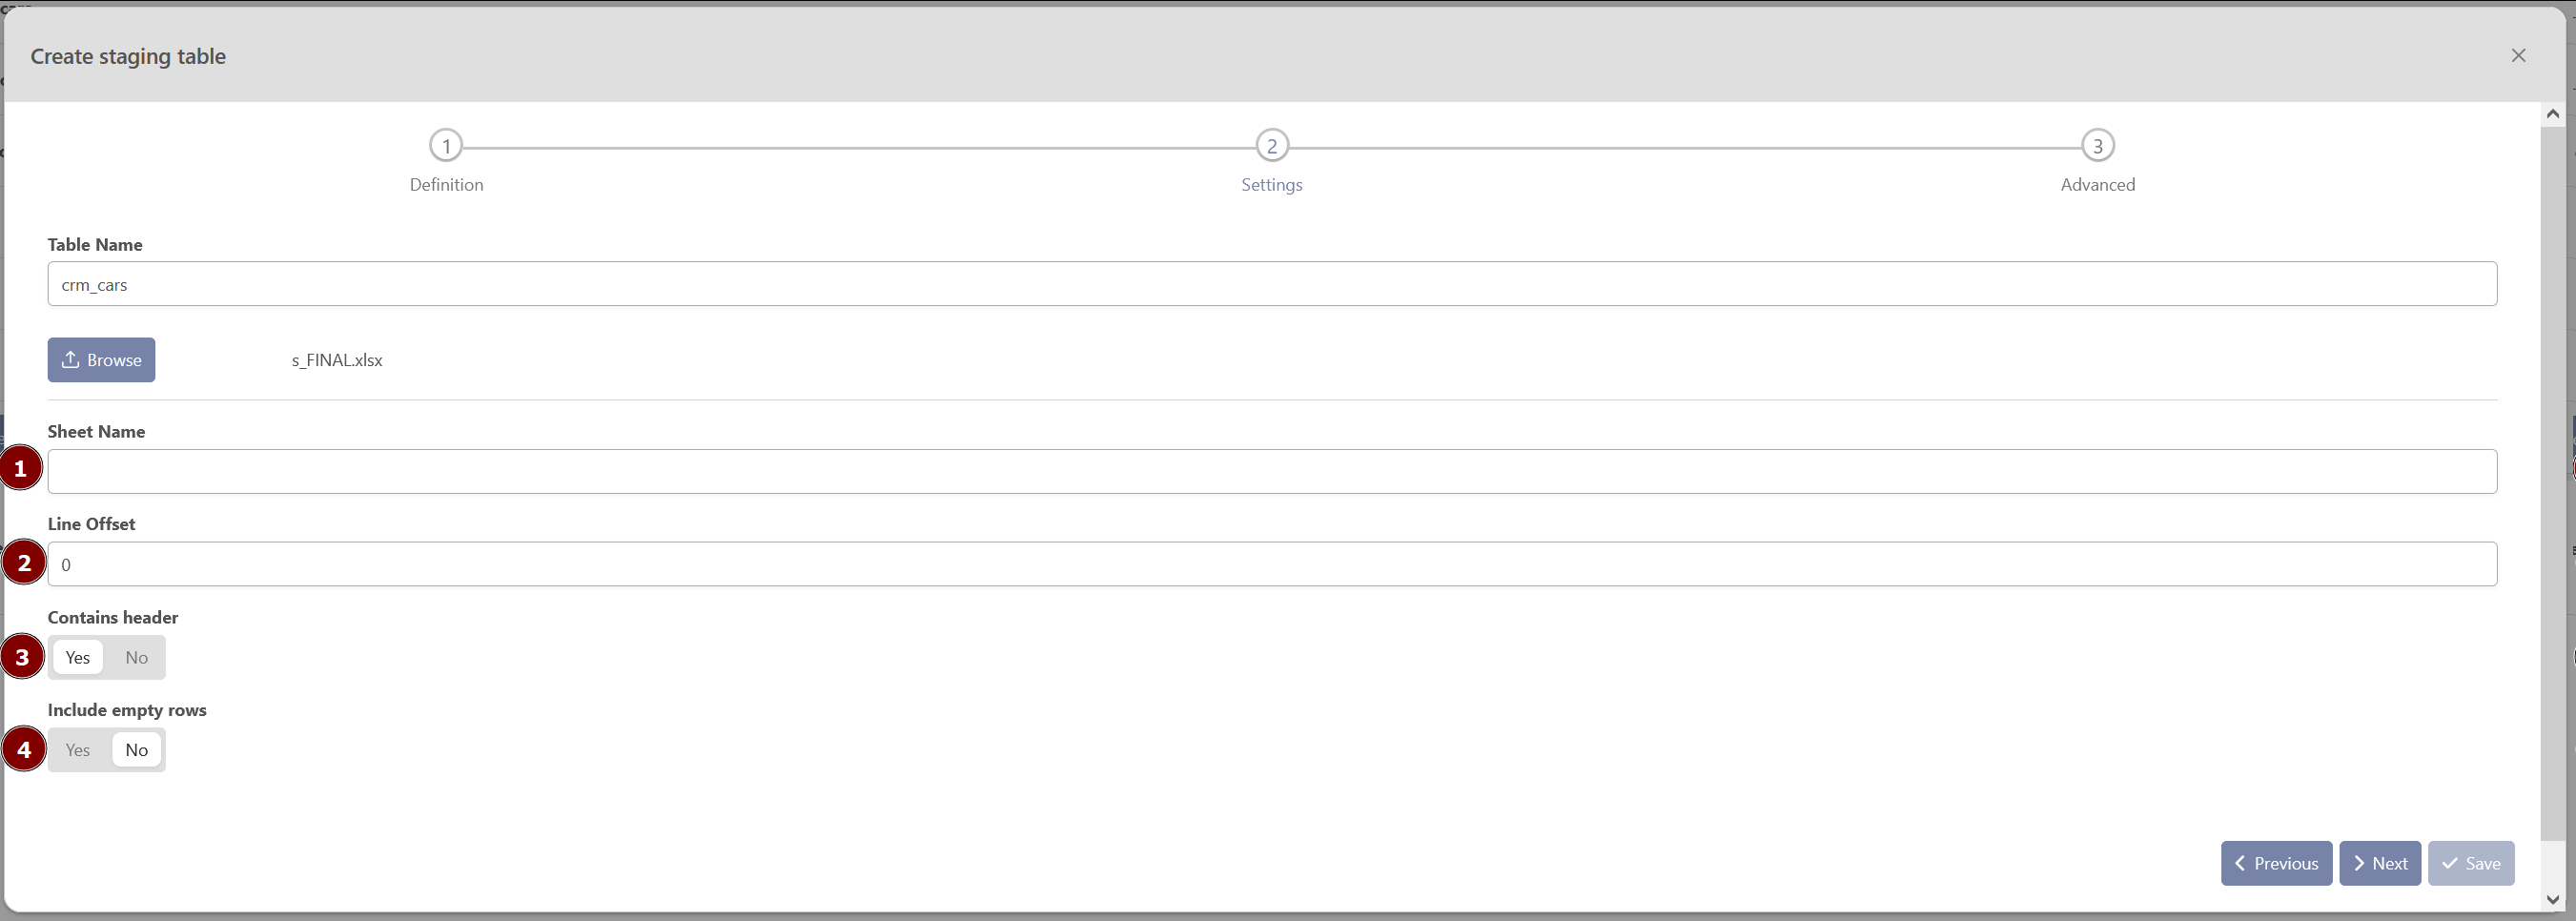
Excel file options
The Excel file options allow you to specify the sheet name, line offset, whether the file has a header row, and whether to include empty rows in the imported data.
-
Sheet name: mandatory — Name of a specific tab in your file.
-
Line offset: optional — Option that allows you to skip a certain number of rows at the beginning of the sheet.
-
Contains Header: mandatory — Option that specifies whether the first row of the sheet, or the first row after the line offset, should be used as column headers in the created staging table. If this option is not selected, the Excel column names (A, B, C, etc.) will be used as the column headers.
-
Include empty rows: mandatory — option that allows you to choose whether to include empty rows found at the end of the sheet in the imported data. This option is set to false by default.
CSV file option
The CSV file options allow you to specify .
-
Separator: mandatory — Character that is used to separate values in the CSV file. The default separator is a comma.
-
Line offset: optional — Option that allows you to skip a certain number of rows at the beginning of the sheet.
-
Contains Header: mandatory — Option that specifies whether the first row of the sheet, or the first row after the line offset, should be used as column headers in the created staging table. If this option is not selected, the Excel column names (A, B, C, etc.) will be used as the column headers.
-
Include empty rows: mandatory — option that allows you to choose whether to include empty rows found at the end of the sheet in the imported data. This option is set to false by default.

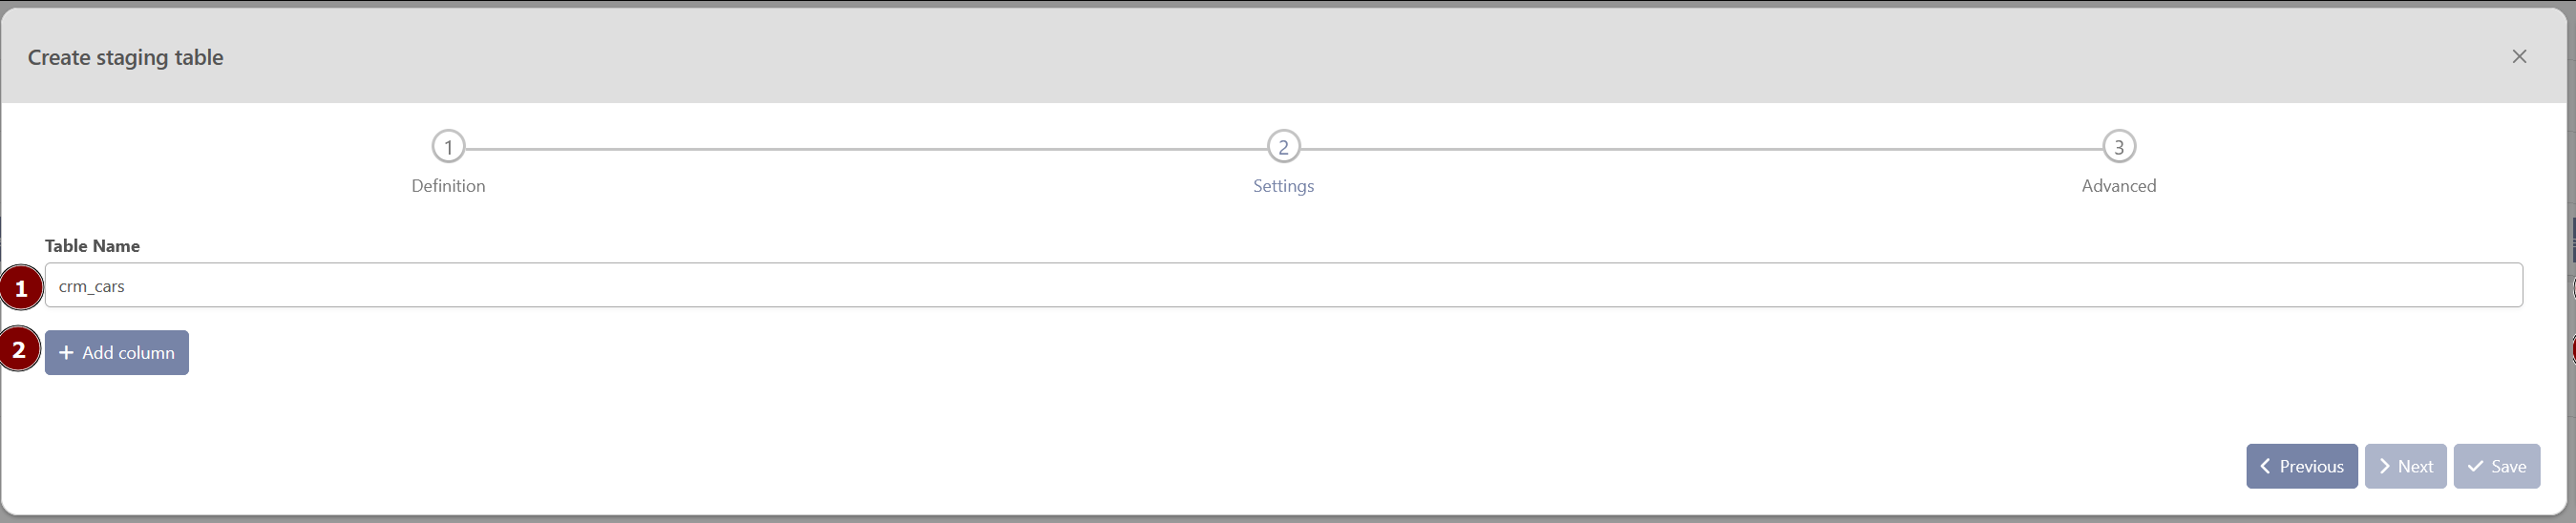
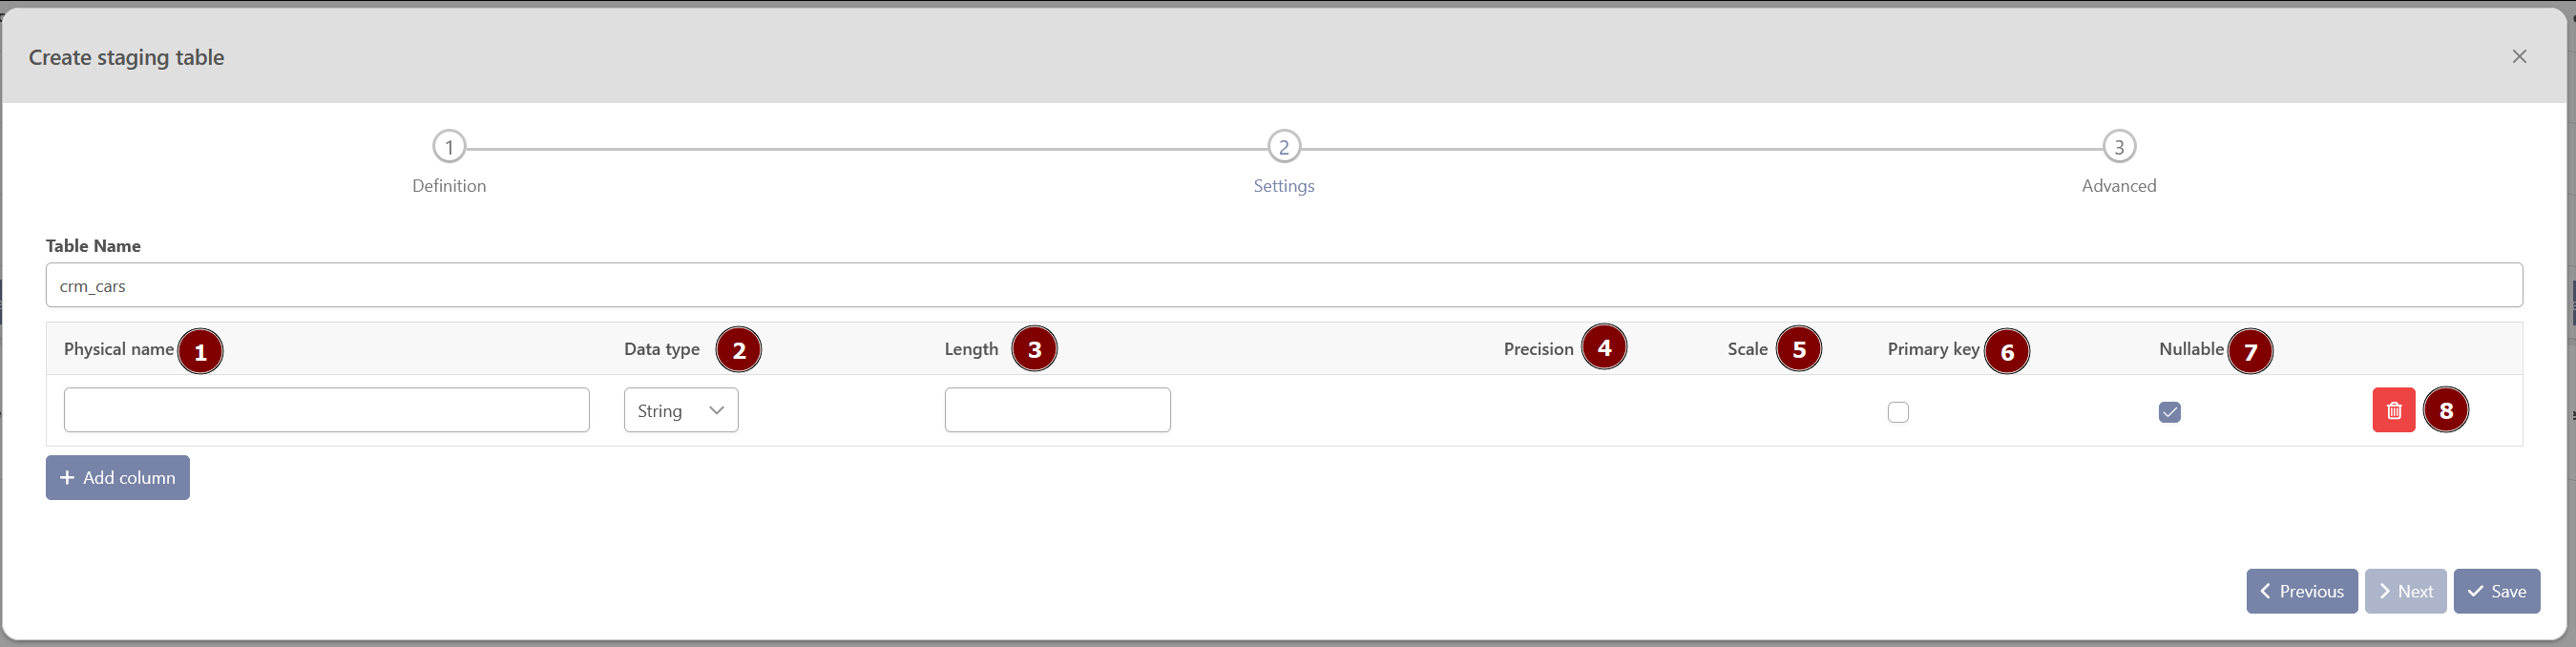
Creating a staging table using the manual creation wizard
The manual creation wizard for creating a staging table allows you to specify the table name and add columns to the table.
-
Table name: mandatory — must be at least two characters long and no more than 25 characters long. The first character must be an alphabetical character or an underscore, and every subsequent character can be a letter, number, or underscore.
-
Add Column: optional — option allows you to add columns to the staging table.
After adding a column, you can specify:
-
Physical Name: mandatory — Specifies the name of the staging column, which has a maximum length of 60 characters.
-
Data Type: mandatory — The data type of the column. If the type is a text type. Database types: Data Type correspondence
-
The length of the column: optionnal — This field will only be settable if the data type is a text type.
-
The precision of the column: optionnal : — This field will only be settable is the data type is a number type
-
The scale of the column: optionnal : — This field will only be settable is the data type is a number type
-
The Primary key: optionnal : — if this column is a primary key.
-
Nullable optionnal : — if the column is nullable. Note that a column set as a primary key cannot be nullable.
-
Delete button: optionnal : — deletes the temporary column
Creating a staging table by using an existing table structure
The option to create a staging table by using an existing table structure allows you to select a table from a dropdown list of all the tables present in the “stg” schema of the modeling environment databases. This will create a new staging table using the structure of the selected table.

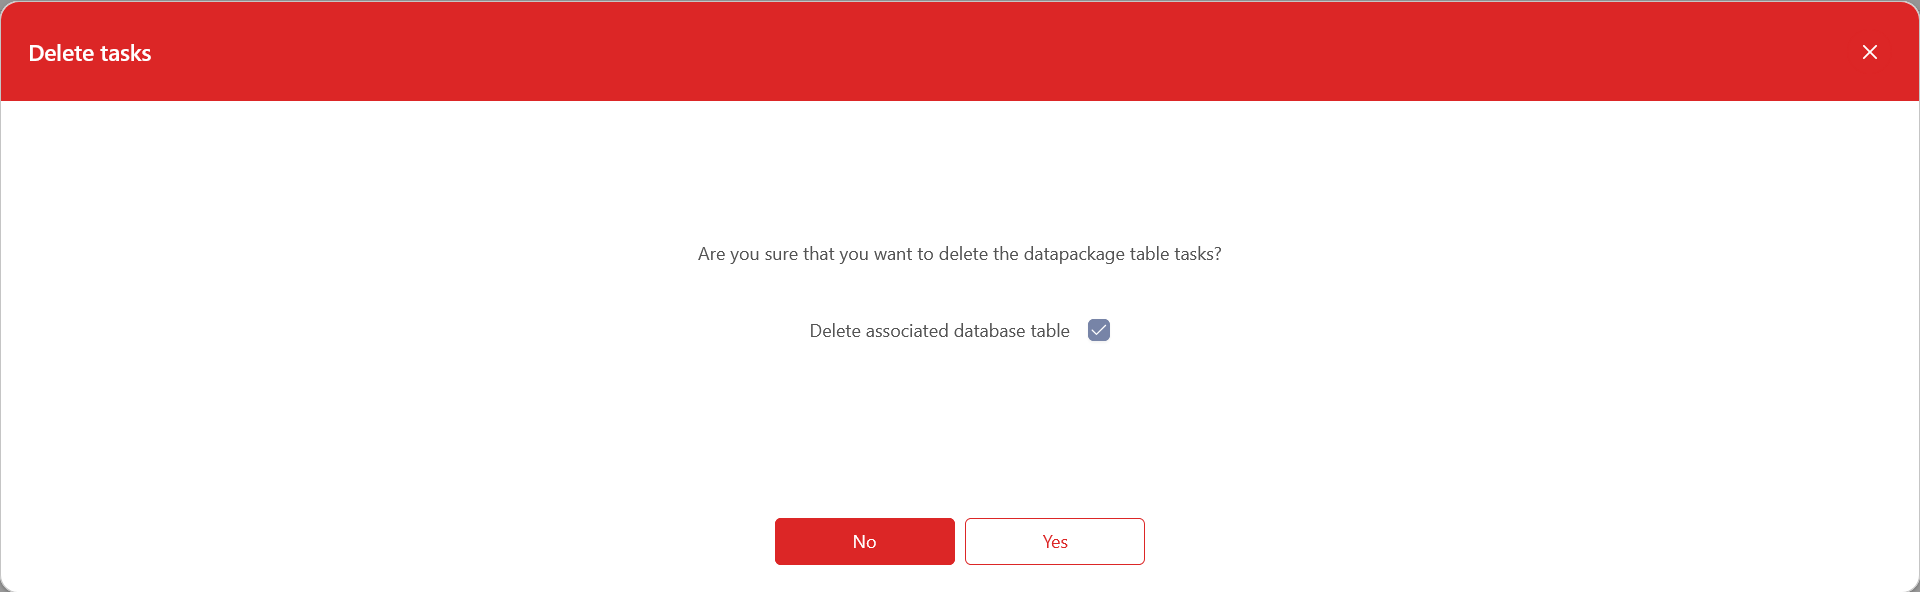
Delete a staging table
Please note that it is only possible to delete a staging table if none of its columns are mapped to a Data Vault entity. If any of the columns are mapped, the staging table cannot be deleted.
The option to delete a staging table also allows you to delete the corresponding table in the “stg” schema in the modeling environment database. If this option is not selected, only the reference to the table in the Meta Vault will be deleted, and the actual table in the database will remain.
Edit a staging table
The edition of an existing staging table can be done in the dynamic tab of the staging table. To open the tab of the staging table, the users can click on the ‘open in a new tab’ button next to it.
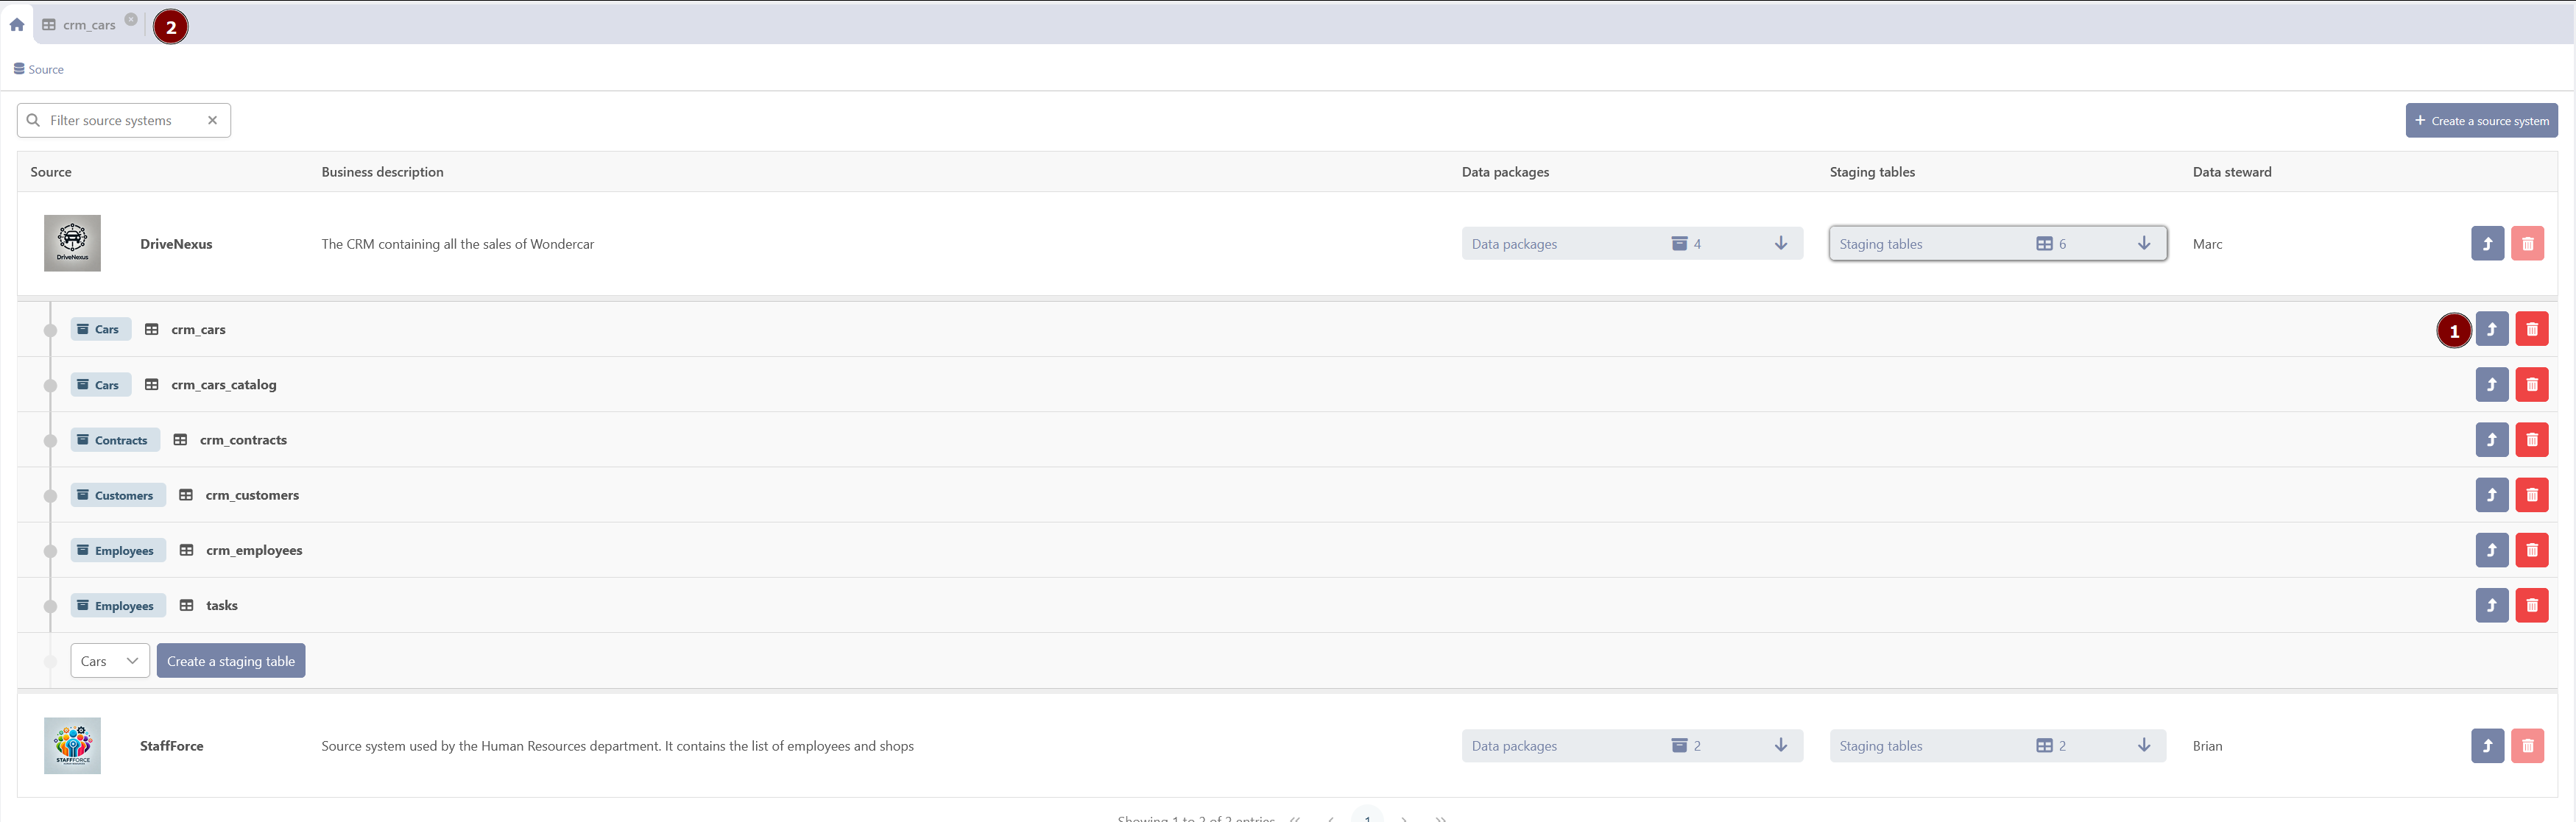
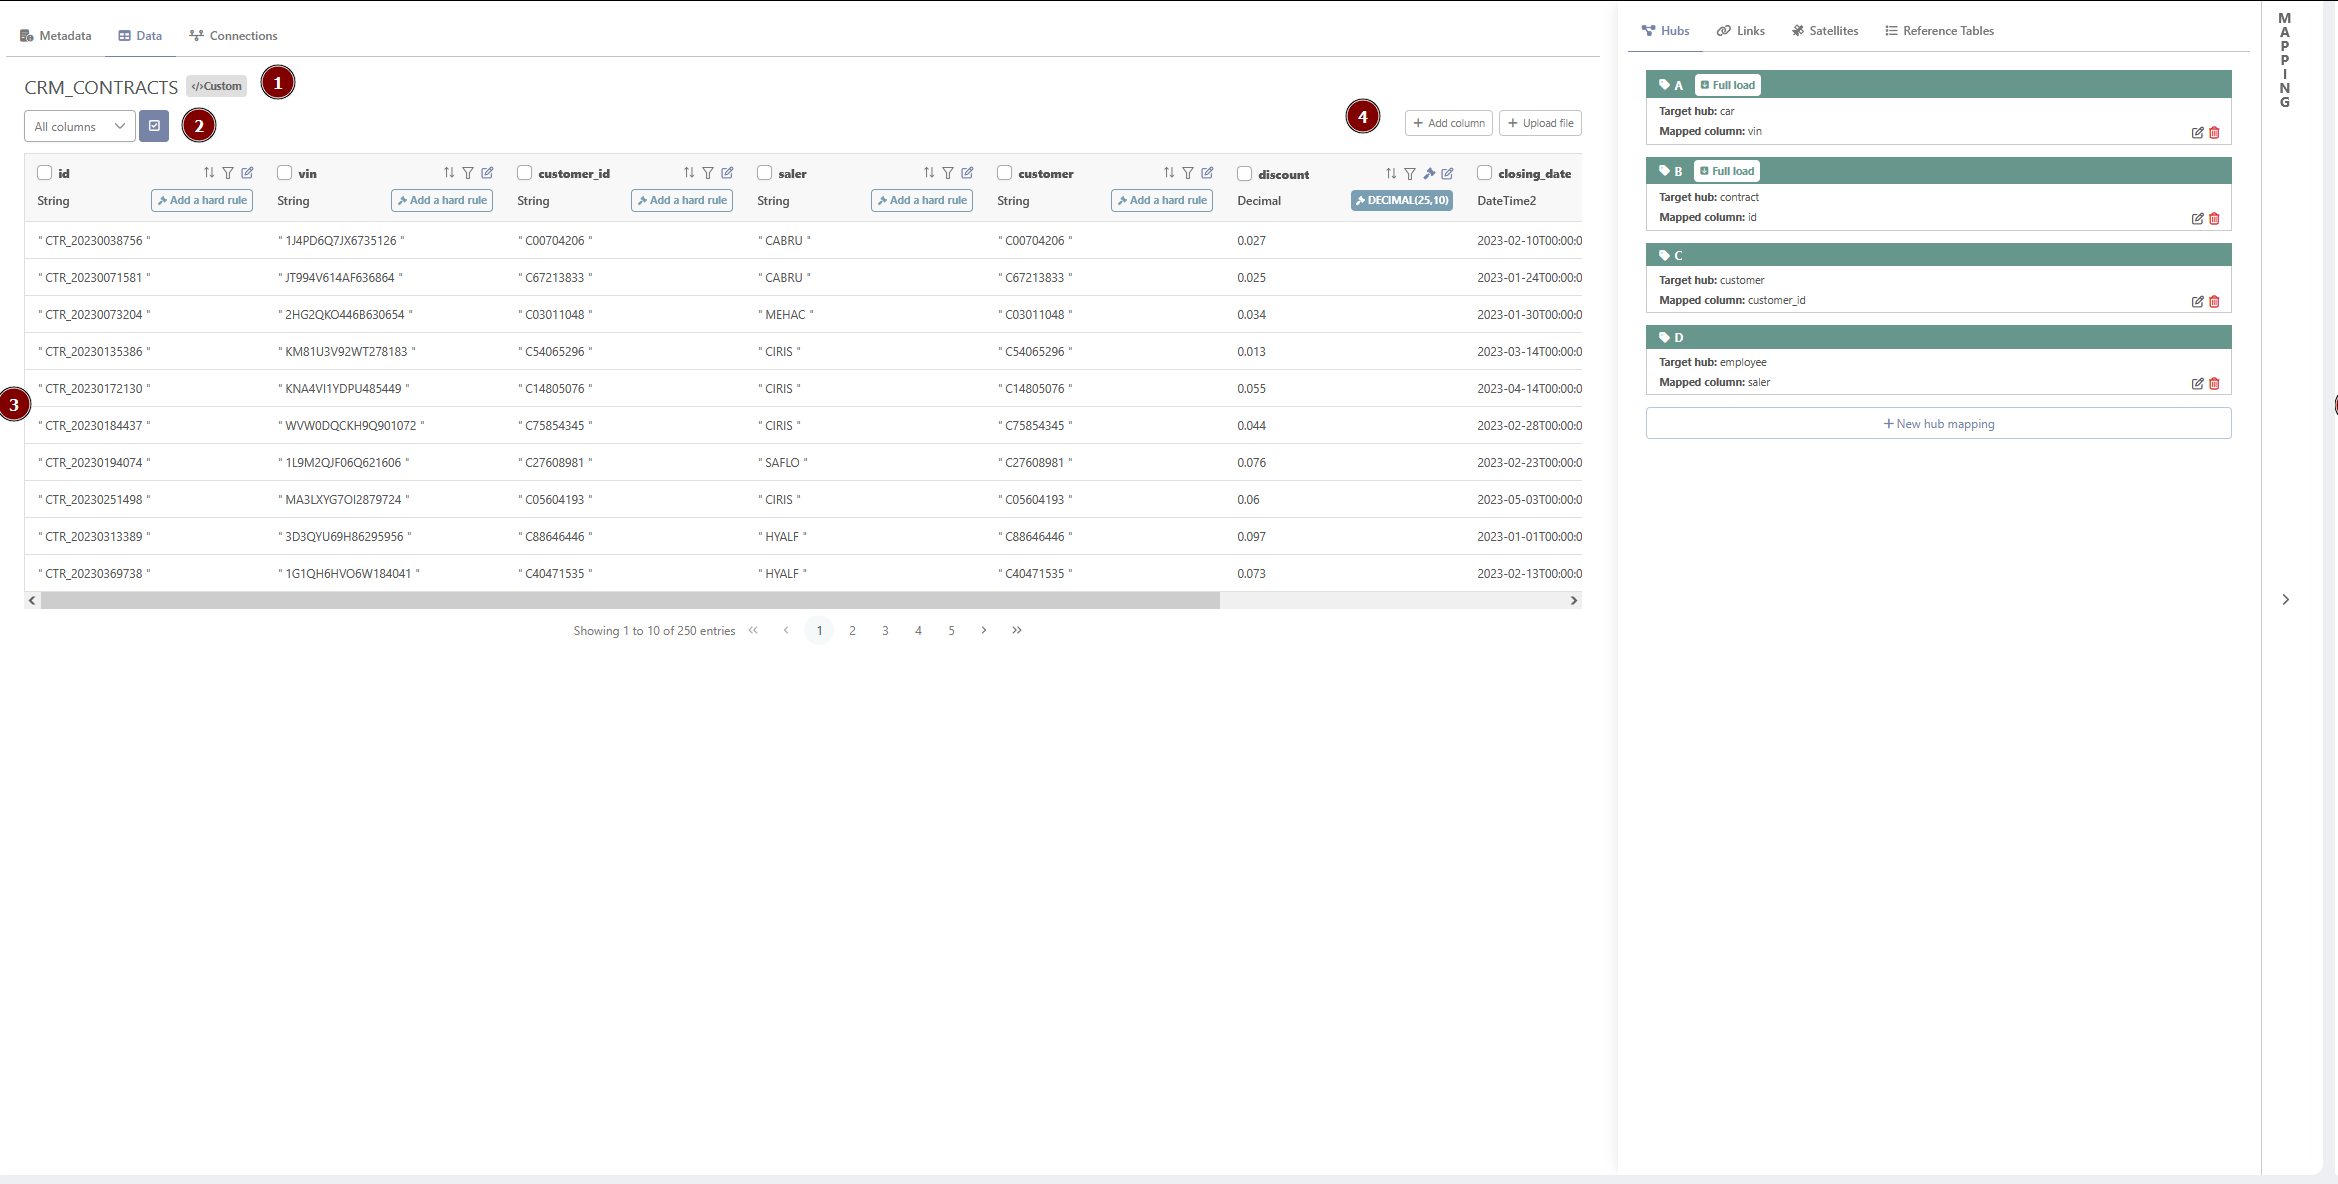
The staging table tab is divided in multiple sections:
-
Breadcrumbs: It gives context to the staging table, detailing in which source system and data package the user is working
-
Top bar menu: It is composed of 3 tabs (Metadata, Data, Connections). Each tab can be used to switch from one tab to another
-
Descriptive data : It contains the name of the staging table and its type
-
Metadata: The metadata of the staging table’s columns in the modeling environment
-
Action button: Those buttons allow the users to edit the staging table or to upload data in the modeling environment
-
Mapping: It contains the list of mappings between the staging table and the data Vault model (For Hubs, Links, Satellites, and Referential)
Metadata Tab

The metadata tab of the staging tables displays some information:
-
Descriptive data: It contains the name of the staging and its type
-
A multi-select: It allows users to select one/several columns to display
-
Columns Metadata: The metadata of the staging table’s columns in the modeling environment
-
Business Name: Usual name of the column. Does not need to follow some formatting rules
-
Business Description: Description for the business users
-
Technical Description: Description for the technical users
-
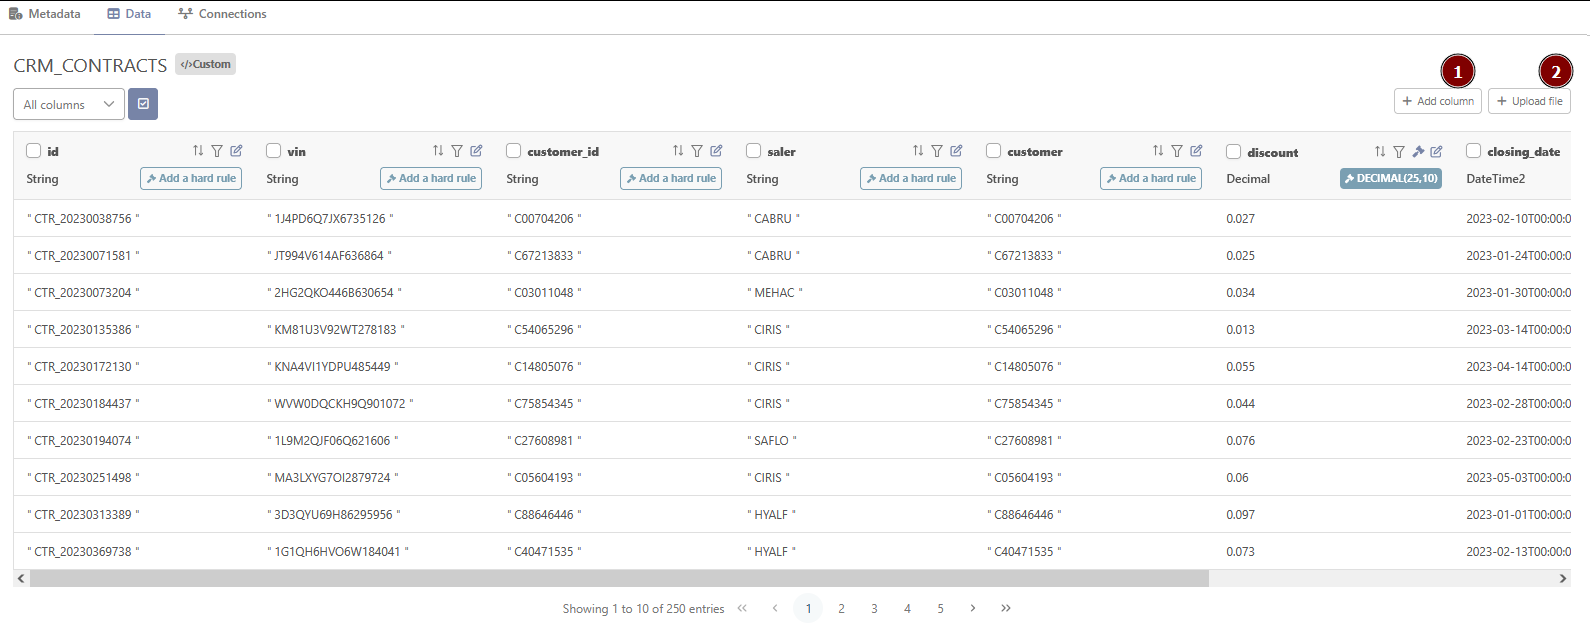
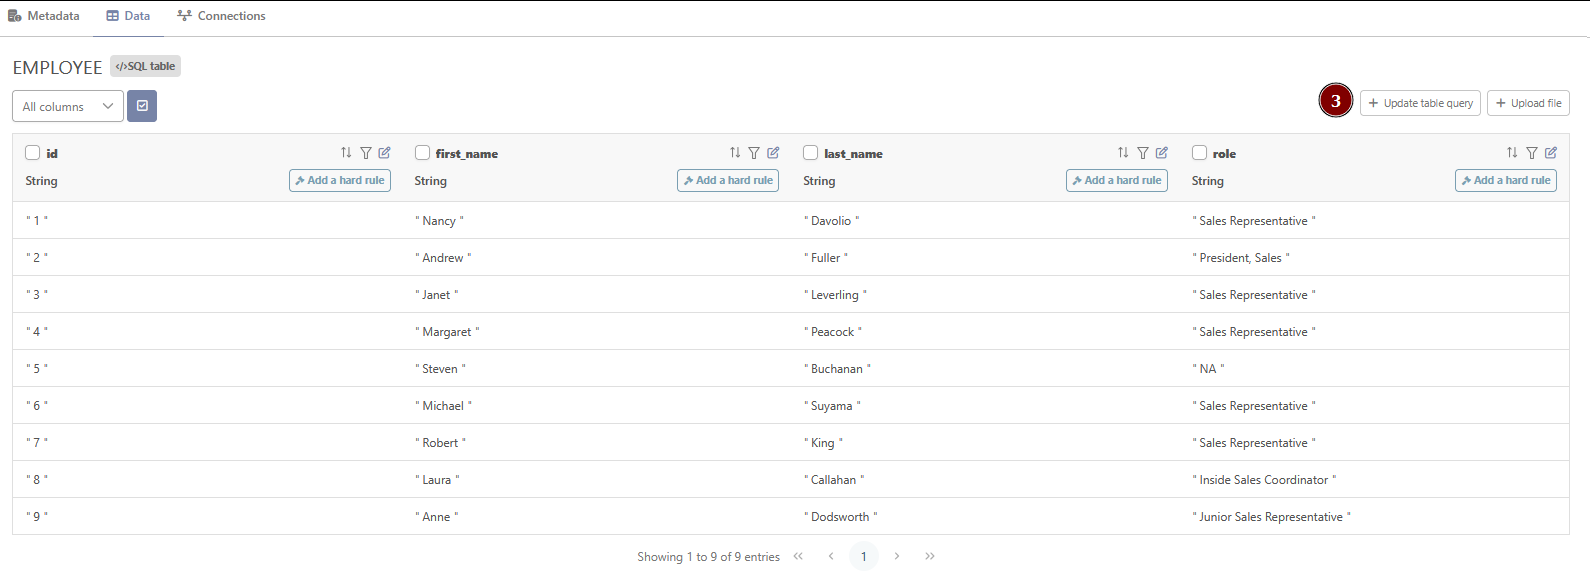
Data Tab
The data tab of the staging tables displays some information:
-
Descriptive data: It contains the name of the staging table as well as the source it’s coming from
-
A multi-select: It allows users to select one/several columns to display
-
Data Columns: The data stored in the different columns of the staging table
-
Editing Buttons: Specific button for editing
-
Add Column: Add a column to the staging table (not available for tables created from SQL script)
-
Update Table Query: Allows the user to modify the SQL script to create the table or the view. (only available for table created from a SQL script. CFR staging table creation)
-
Connections Tab
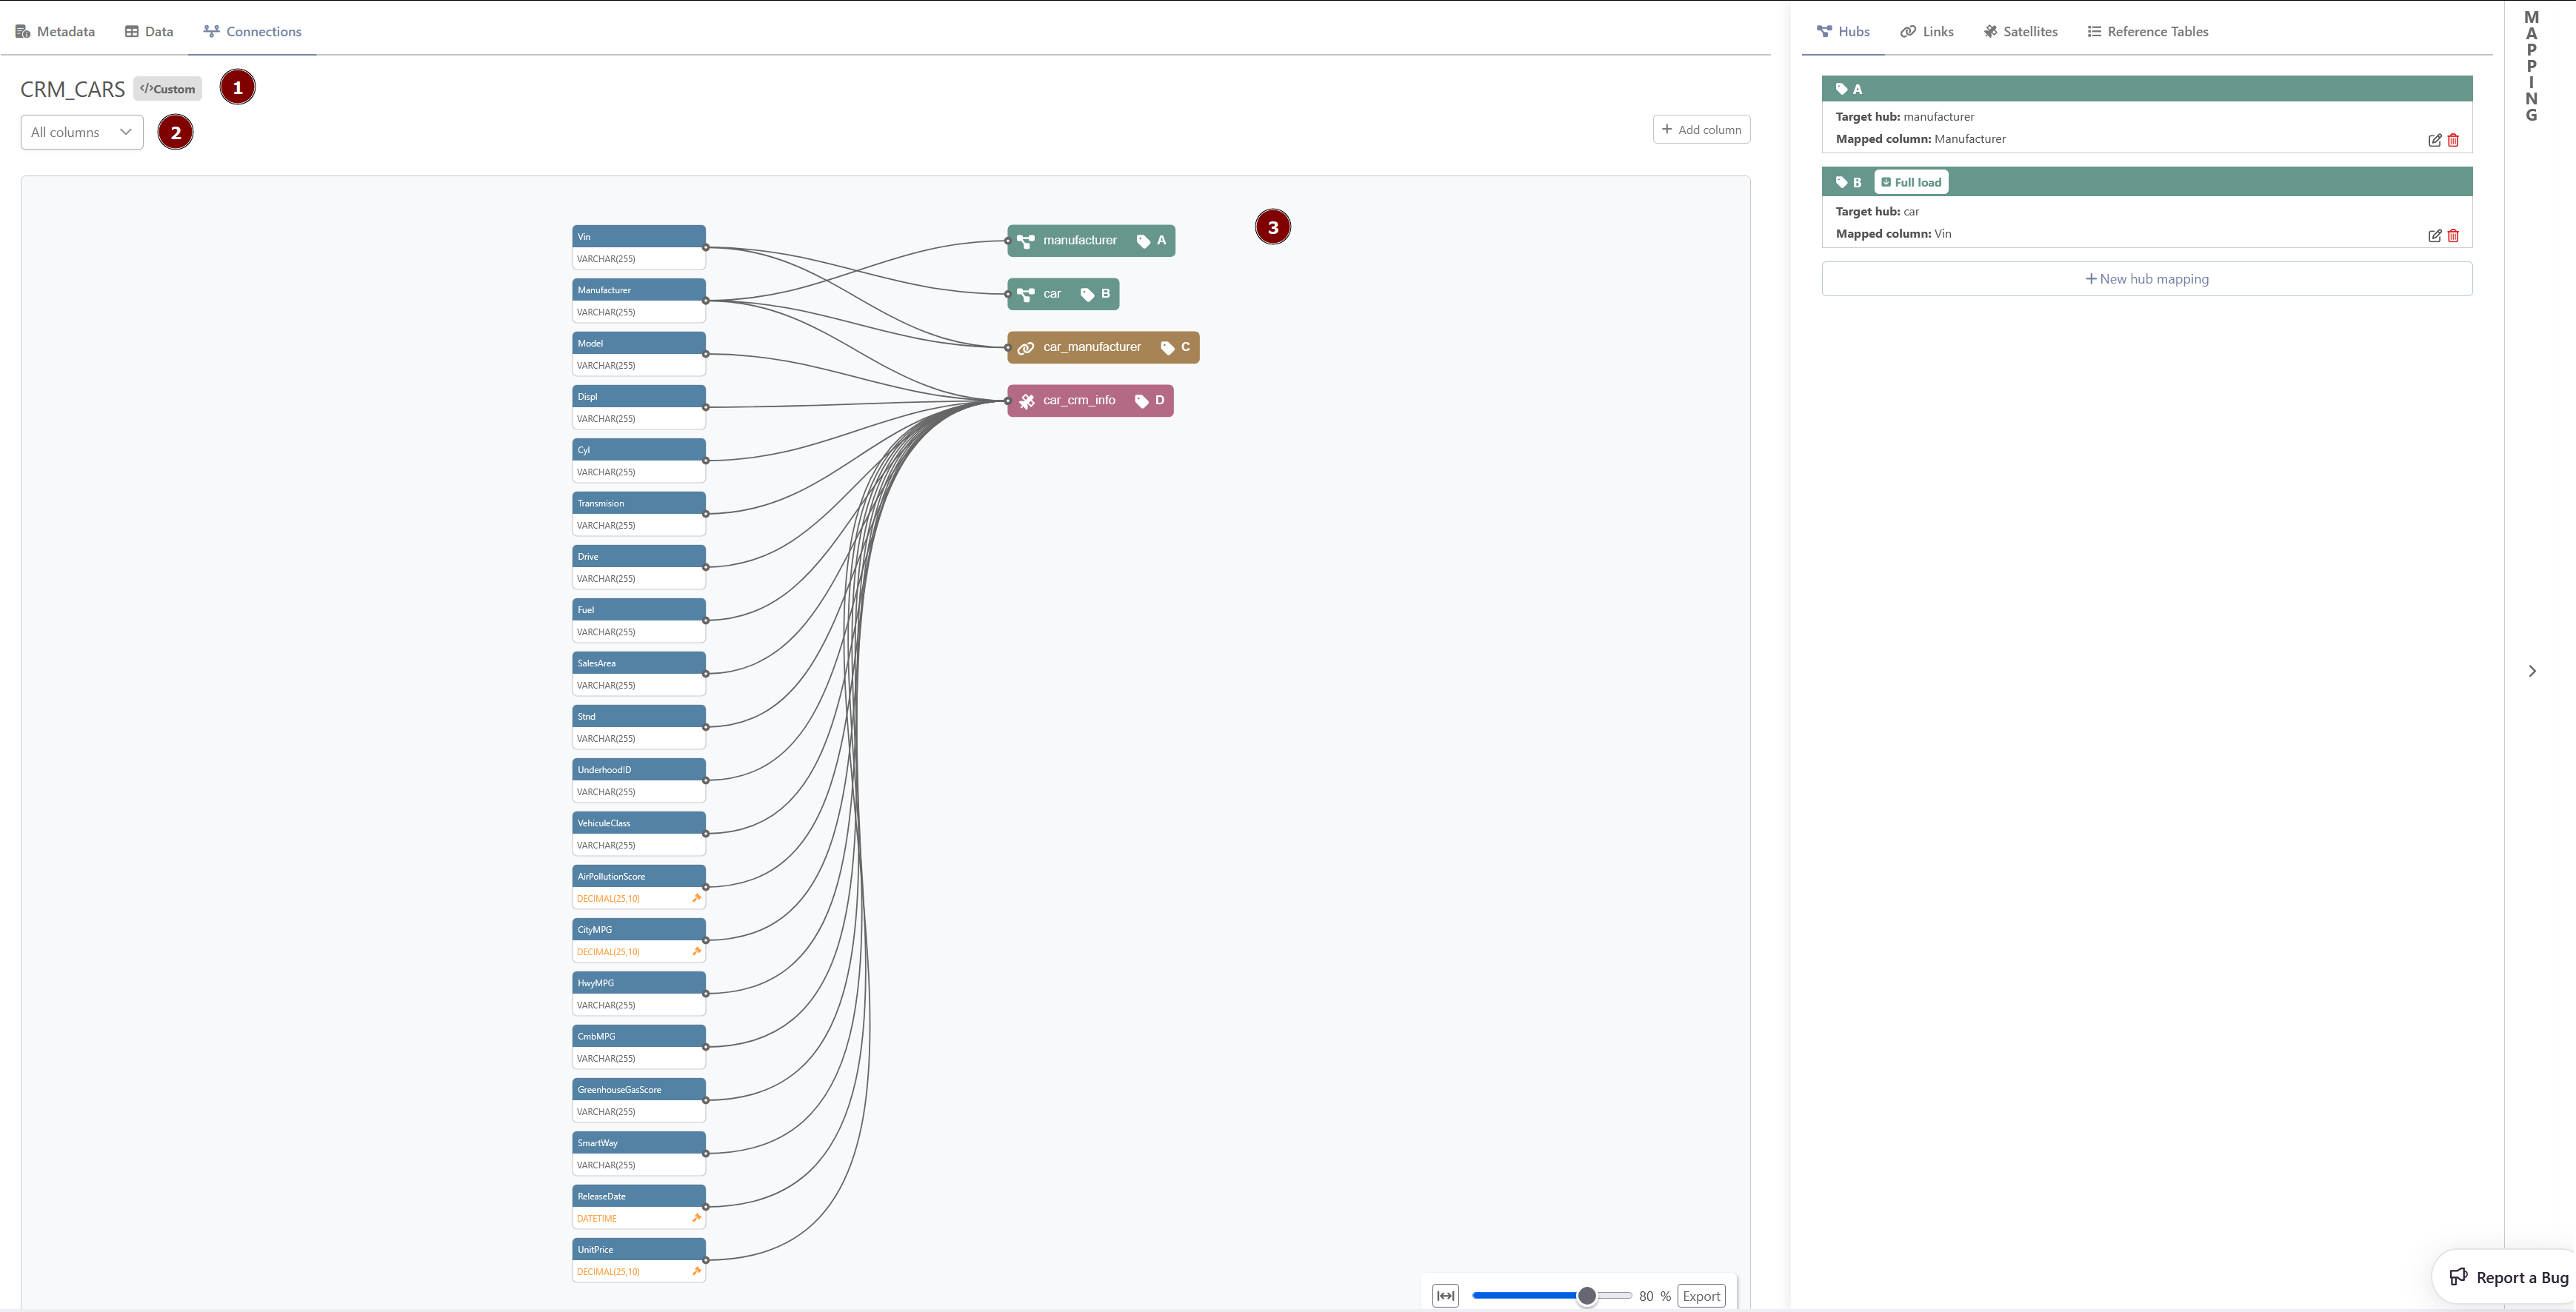
The connections tab of the staging tables displays some information:
-
Descriptive data: It contains the name of the staging table as well as the source it’s coming from
-
A multi-select: It allows users to select one/several columns to display
-
Data Lineage Graph: The graph representing the mapping of the different entities (each kind of entities defined by a specific color) within the staging table
Edit the staging table
In the top-right corner of the tab, the users can find some action buttons depending on the type of staging table it is.
-
Upload file : Allows the user to upload the data from either an Excel file or a CSV file into the staging table (not available for views)
-
Add Column : Add a column to the staging table (not available for tables created from SQL script)
-
Update Table Query: Allows the user to modify the SQL script to create the table or the view. (only available for table created from a SQL script. CFR staging table creation)
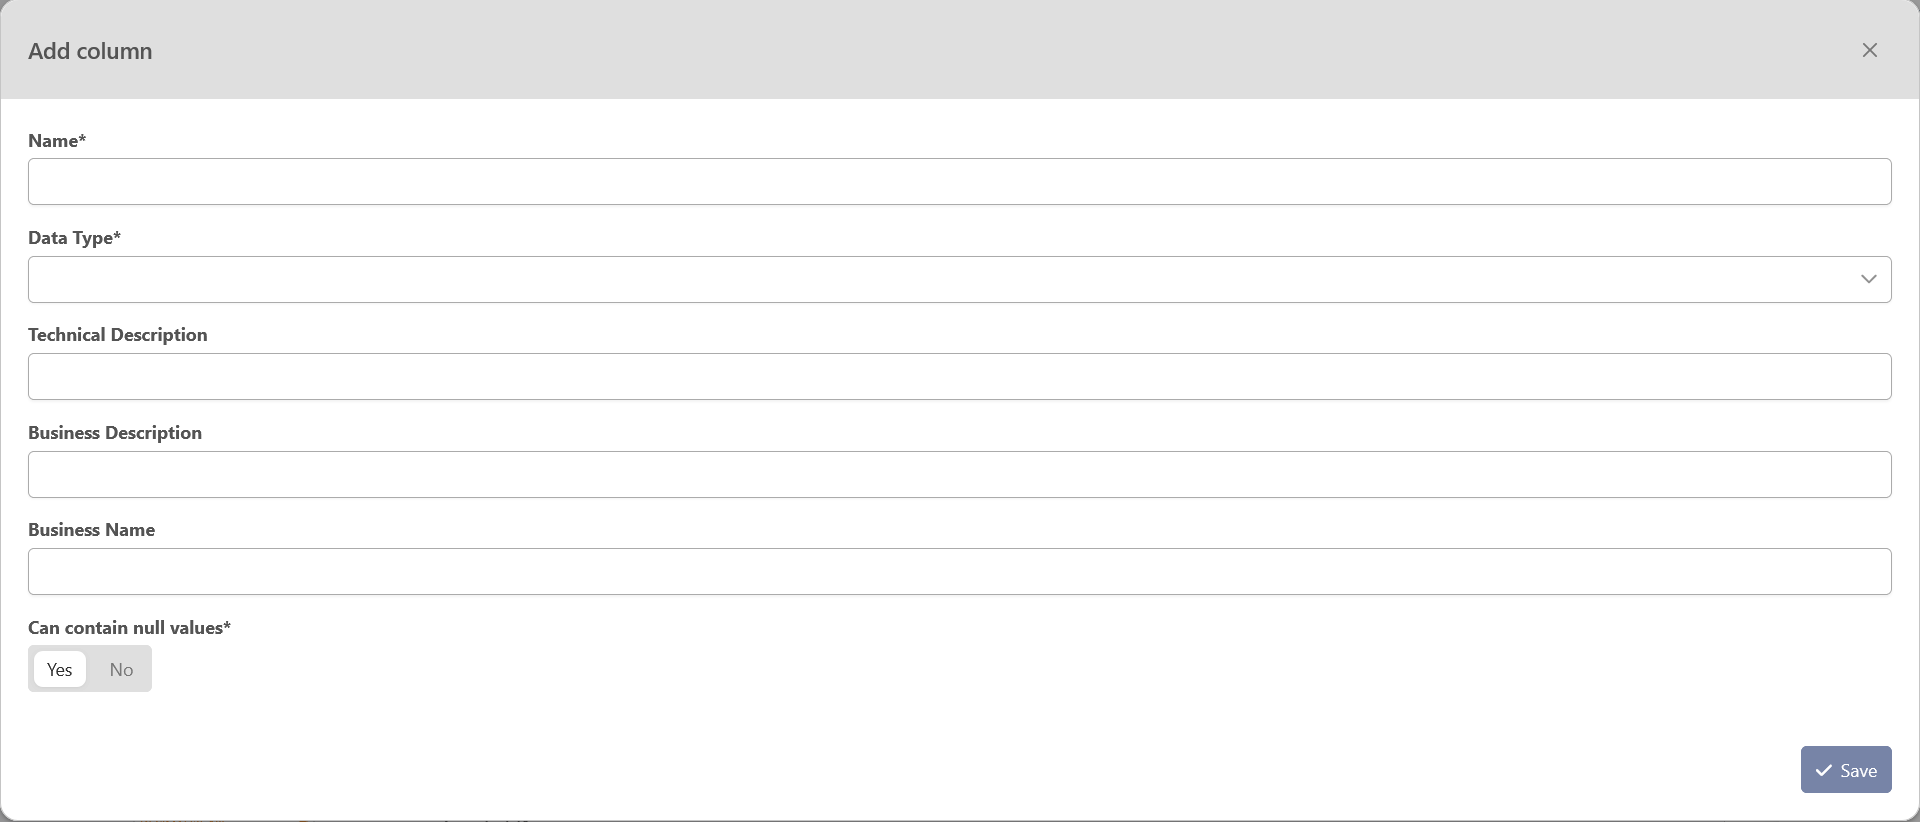
Add a column
The users can add a new column to the staging table by clicking on the “Add column” button. It opens a modal with the descriptive information the users need to fill in.
-
Name: MANDATORY — The name of the column. This name will be used in the database and therefore must comply with the type of the database of the environments of the project.
-
Data Type: — the type of the column in the database
-
-
Database types: Data Type correspondence
-
-
Technical description: — description for the technical users
-
Business Description: — description for the business users
-
Business name: — Usual name of the column. Does not need to follow some formatting rules.
-
Required: — Option to specify whether the column accepts null value or not
-
This option cannot be checked if there is already some data in the modeling environment
-
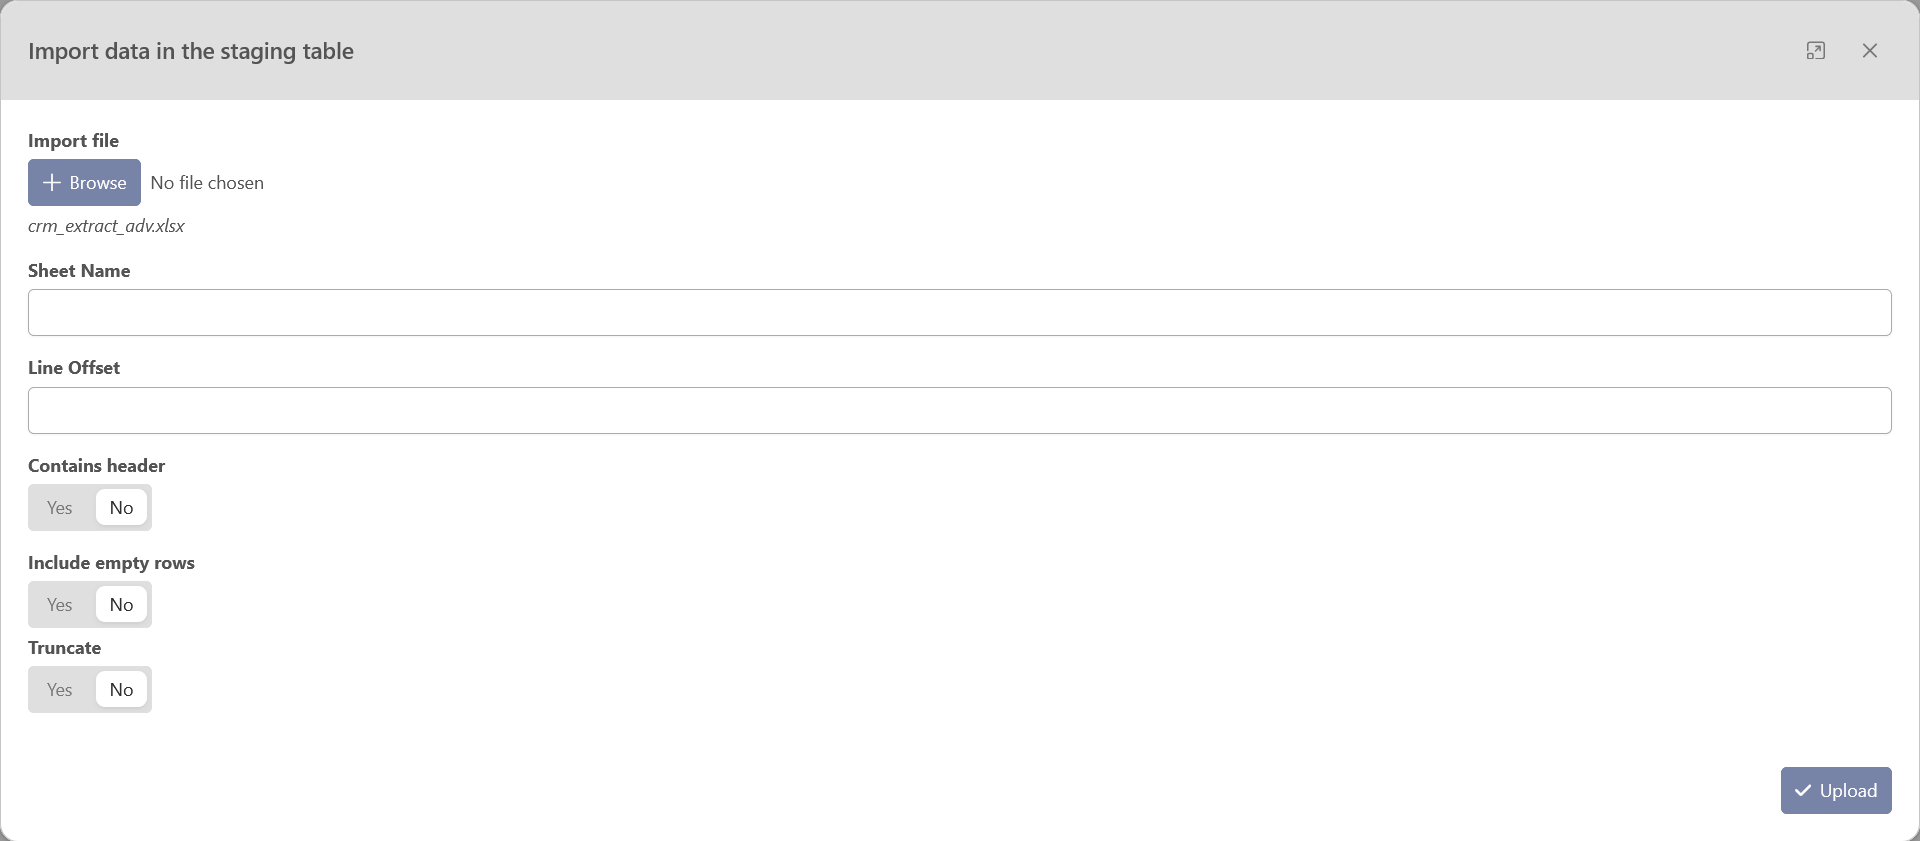
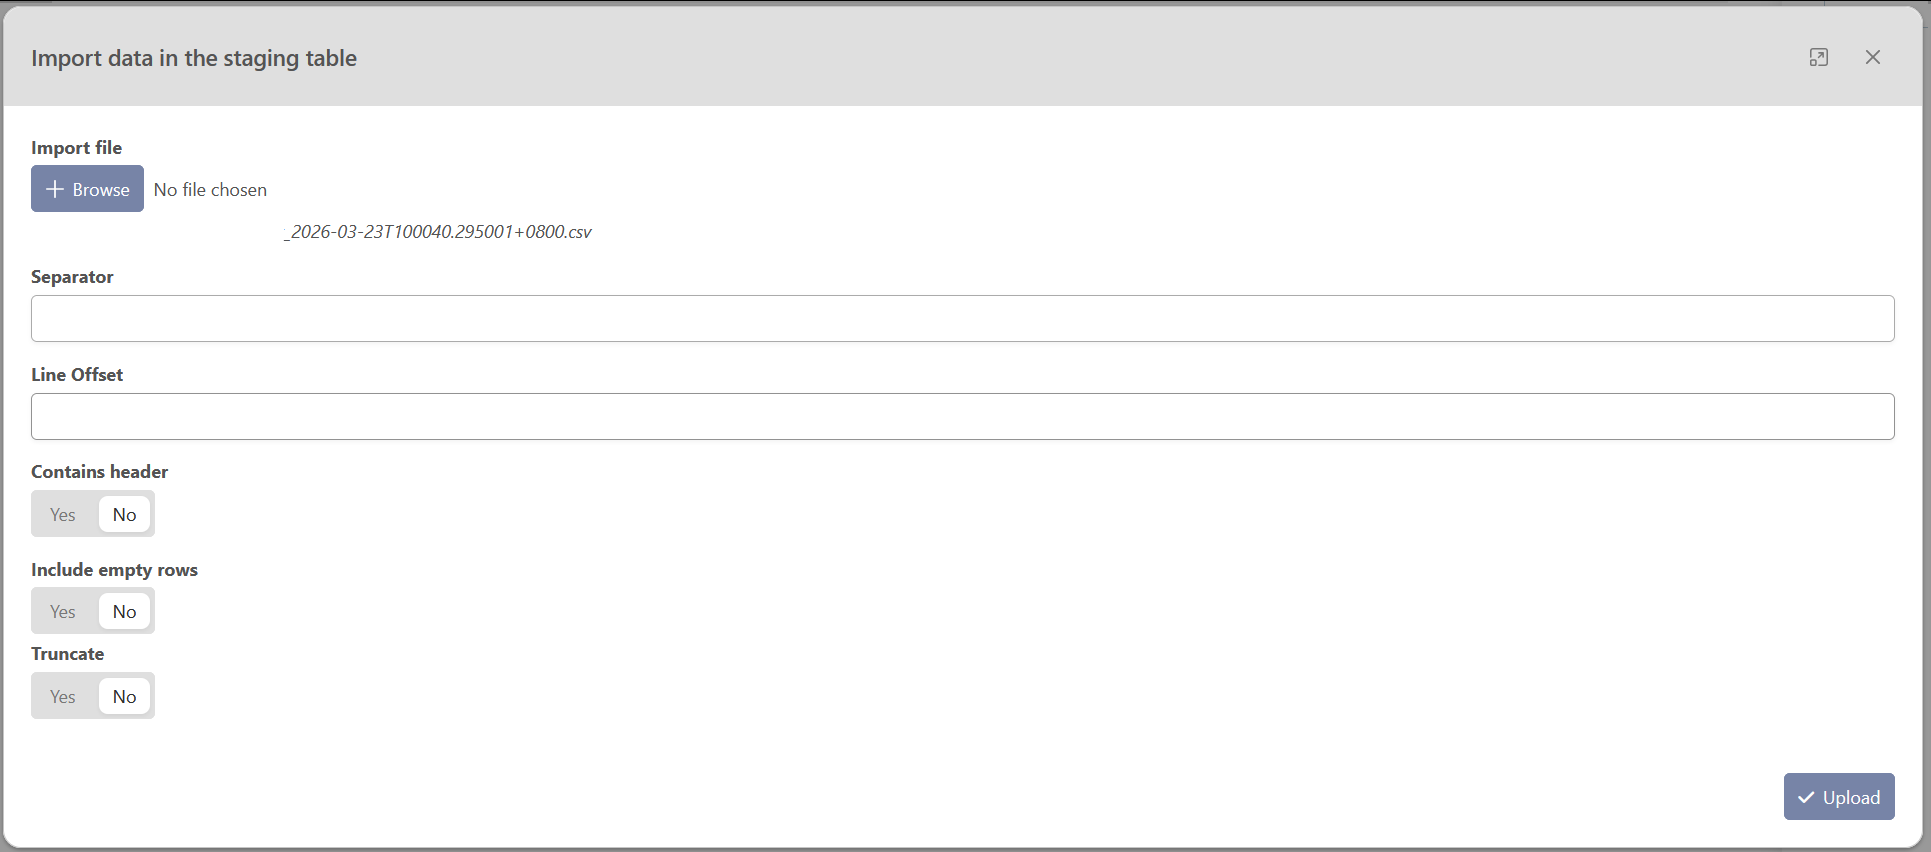
Upload a file
Clicking on the “Import File” button will open a modal where the users can upload a file (CSV, XLSX, XLS). The available option will then depend on the type of file uploaded.
XLSX, XLS
When uploading an XLS or XLSX file, the users need to specify
-
Sheet name: MANDATORY — Name of a specific tab in your file.
-
Line offset: OPTIONAL — Option that allows you to skip a certain number of rows at the beginning of the sheet.
-
Contains Header: MANDATORY — Option that specifies whether the first row of the sheet, or the first row after the line offset, should be used as column headers in the created staging table. If this option is not selected, the Excel column names (A, B, C, etc.) will be used as the column headers.
-
Include empty rows: MANDATORY — option that allows you to choose whether to include empty rows found at the end of the sheet in the imported data. This option is set to false by default.
-
Truncate: MANDATORY — option to truncate the table before inserting the new data. Checking this option will erase all the data from the staging table
CSV
When uploading a CSV, the users need to specify
-
Separator: MANDATORY — The separator field allows you to specify the character that is used to separate values in the CSV file. The default separator is a comma.
-
Contains Header: MANDATORY — Option that specifies whether the first row of the sheet, or the first row after the line offset, should be used as column headers in the created staging table.
-
Truncate: MANDATORY — option to truncate the table before inserting the new data. Checking this option will erase all the data from the staging table
Edit a column
To edit a column, the users need to click on the edit button of the column they want to change in the Data Tab or directly in the Metadata Tab.
Metadata Tab

Data Tab
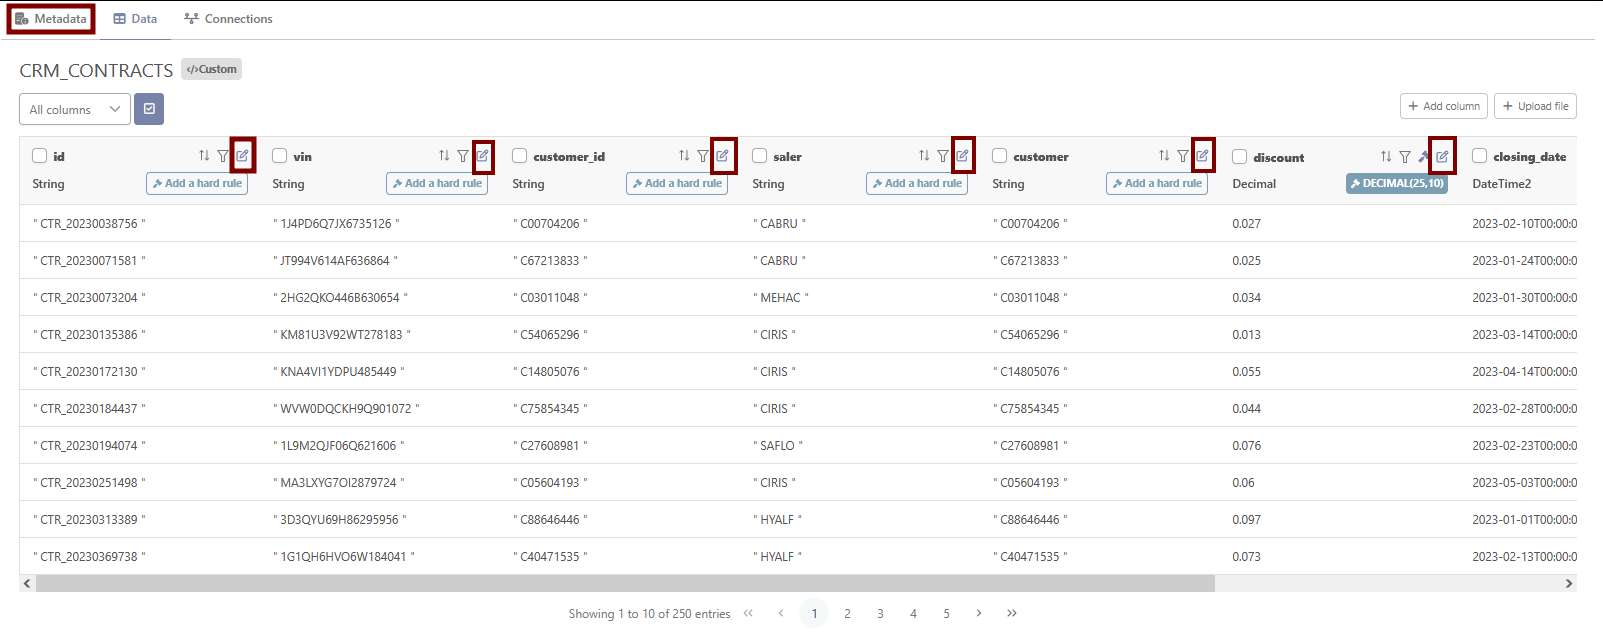

-
Data Type in staging: It is the type of column directly in the staging. This field cannot be updated.
-
Add a Hard Rule: Button to define a hard rule for the field
-
Technical description: description for the technical users
-
Business name: Usual name of the column. Does not need to follow some formatting rules.
-
Business Description: description for the business users
When You click on the button “Add a hard rule”, you will open a window that will allow you to define the hard rule you want:
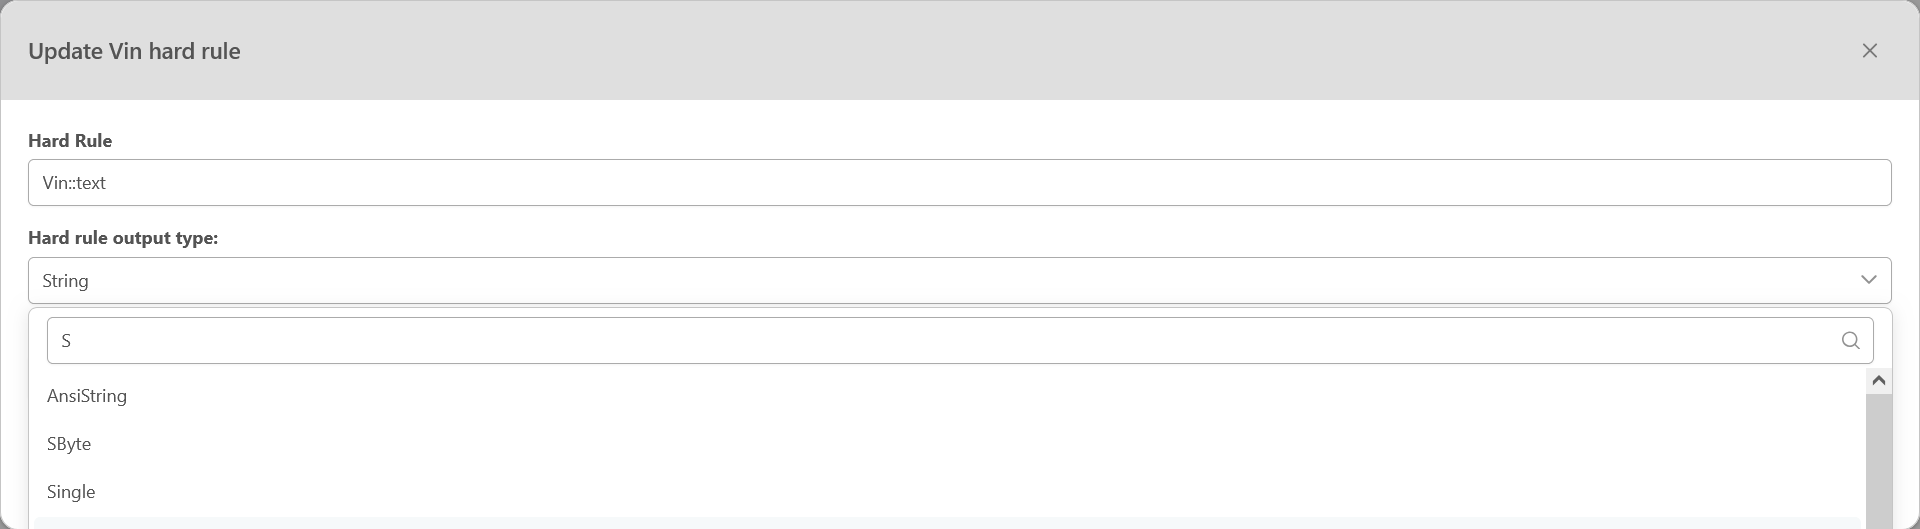
-
Hard Rule: SQL script to be applied on the column before being loaded in the data model. Hard rules should exclusively be used for formatting and casting the column to another type.
Example of hard rules in PostgreSQL:-
NULLIF(name,'')
-
is_valid::bool
-
(CASE WHEN is_valid = ‘Yes’ THEN TRUE WHEN is_valid = ‘No’ THEN FALSE ELSE NULL END)::bool
-
to_date(start_date, ‘YYYY/MM/DD’)
-
price::decimal(25,10)
-
-
Hard rule output type: destination type of the column. This type will be used as the type for the column’s satellite.
-
Hard rule output type options: options depending on the type selected for the output of the hard rule
Delete a column
To delete a column, the user can use the trash can button of the column to be removed that will appear once he has selected the column.
