The “Graph Editor” submodule is a part of the “Build” module in beVault. It allows users to create and manage the data model using the Data Vault methodology. When the user opens the page, they will see the previously saved data model. The page has several features that allow users to customize the model according to their needs.
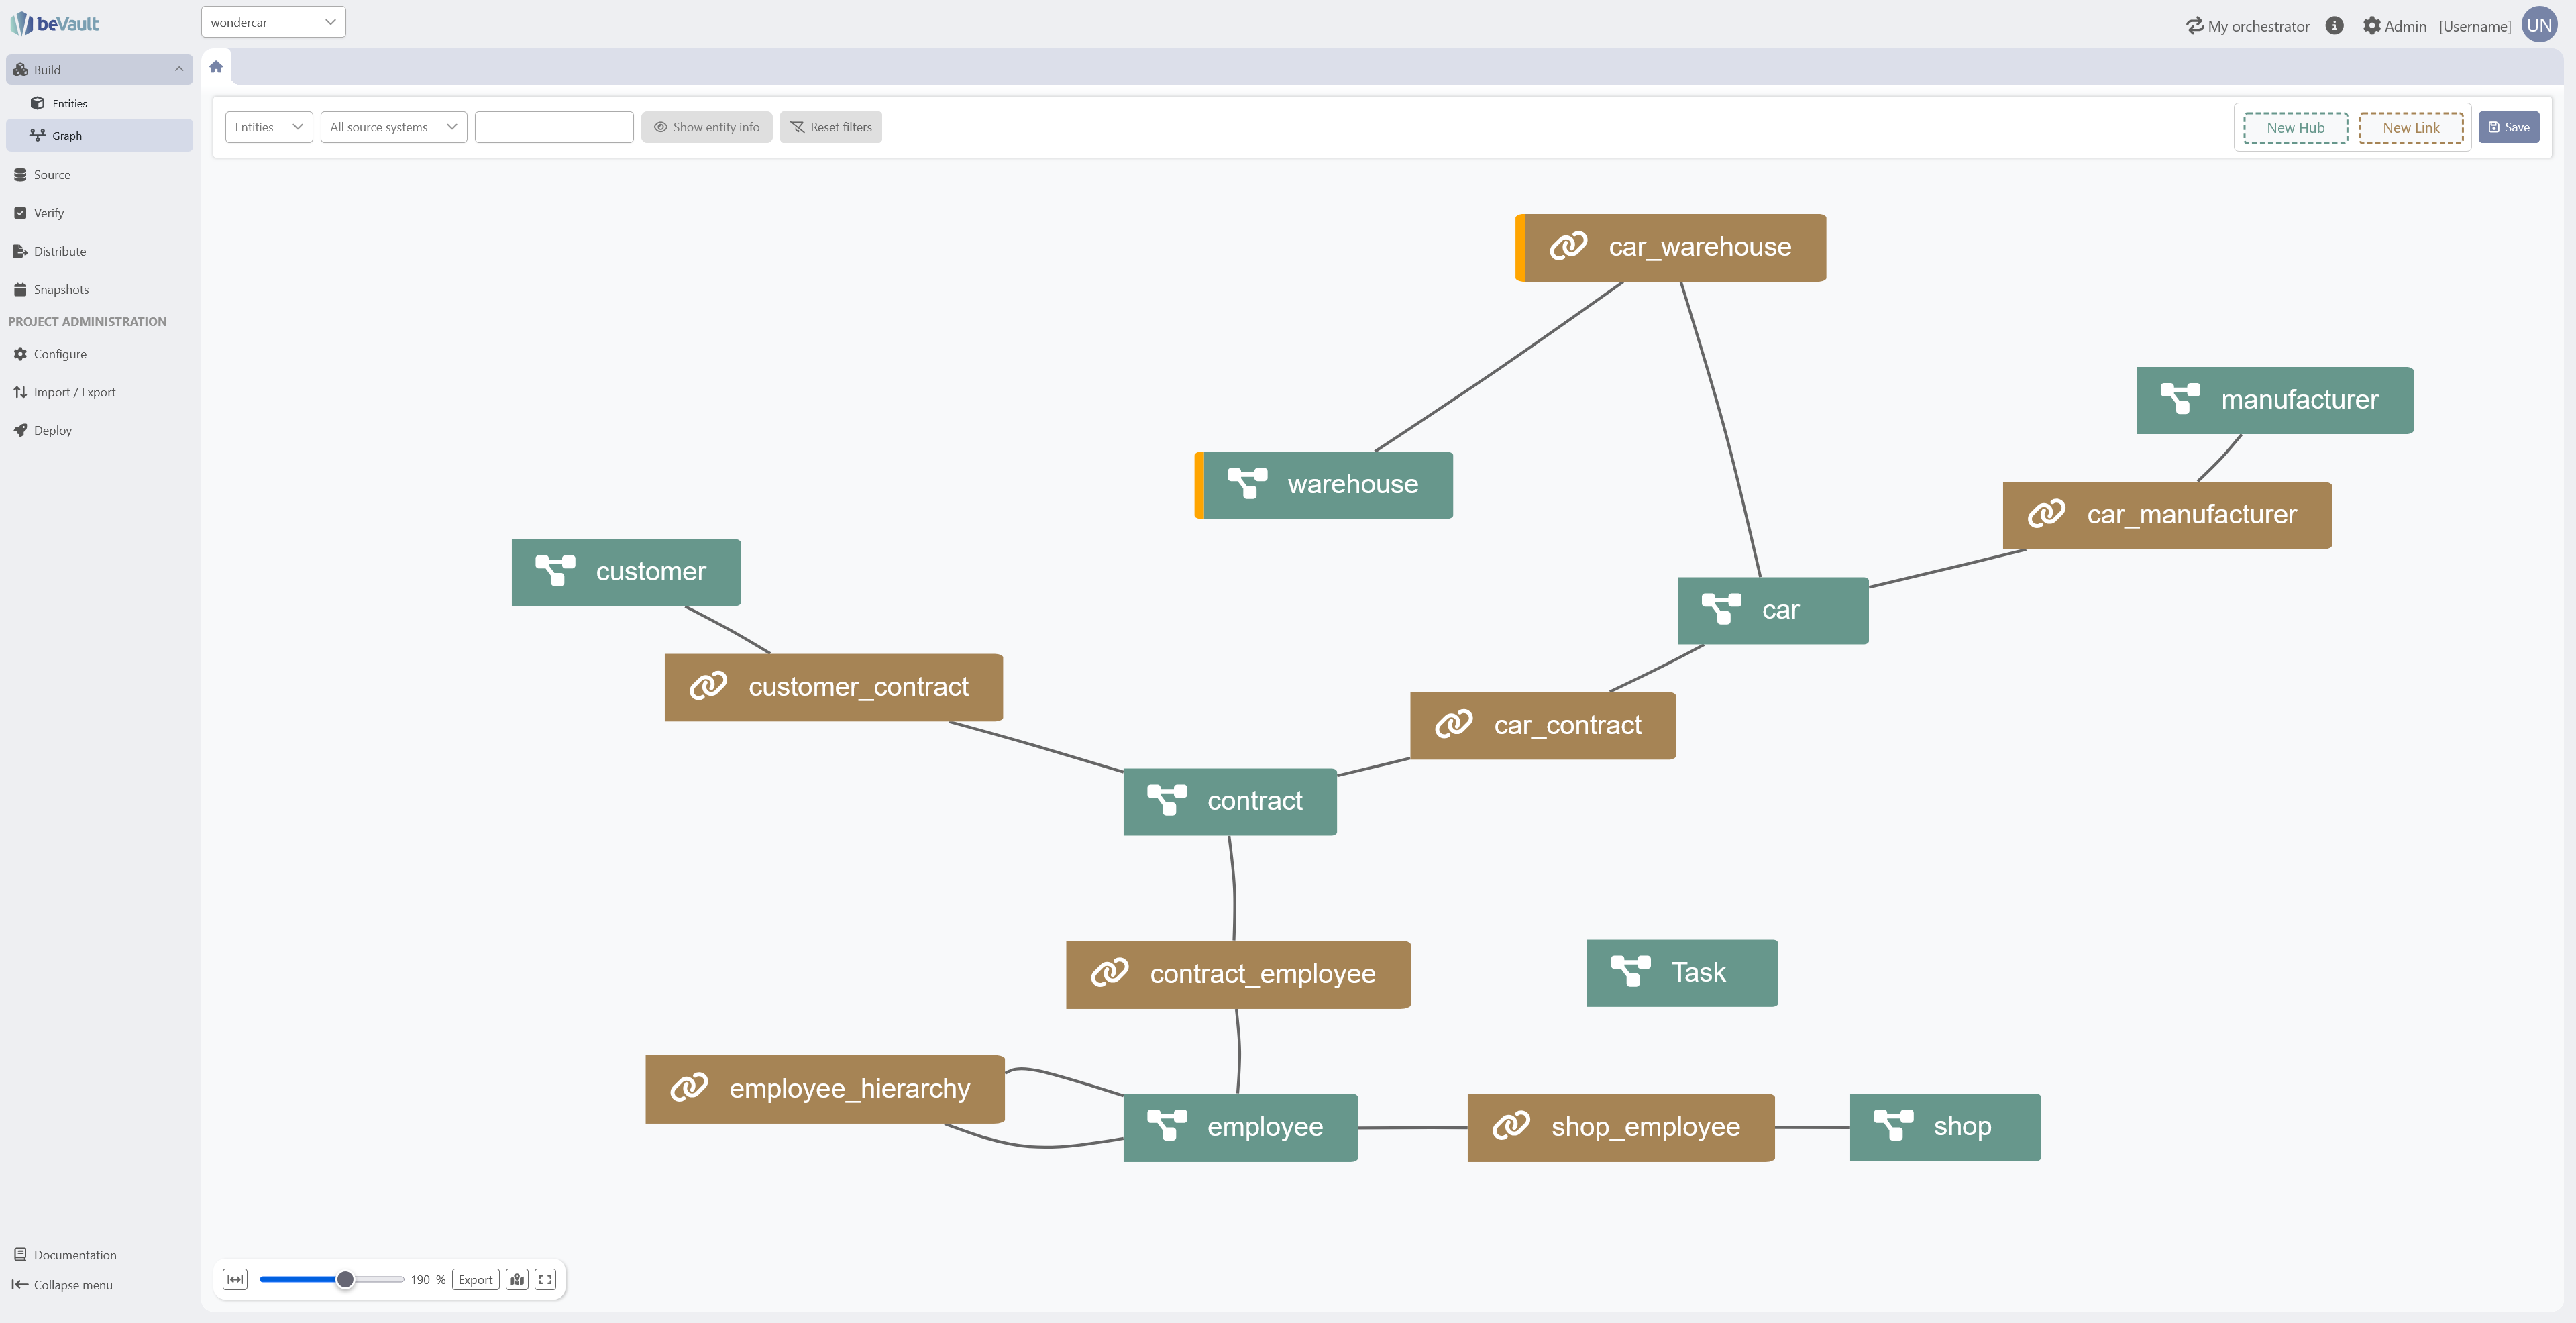
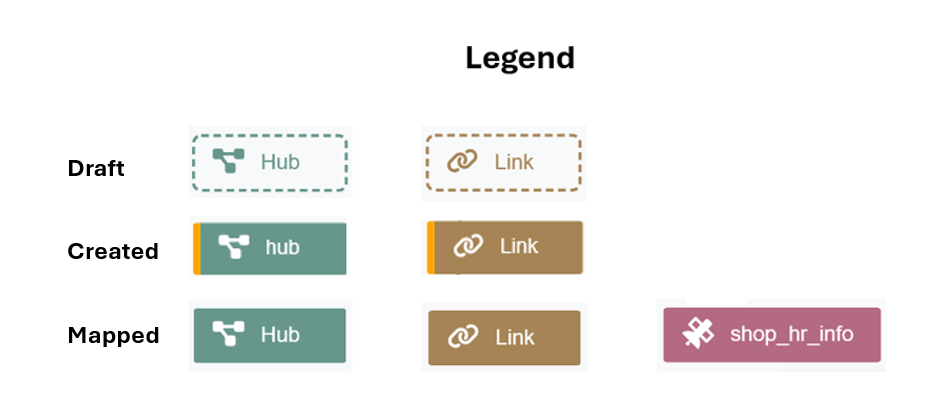
Each entity (hub, link, and satellite) has a state in this graph:
-
draft: The node is created in the graph to help the user to design the model. But the entity is not yet created. Meaning that the entity won’t be available outside this graph and will not be deployed.
-
created: The entity is created, available in other submodules and will be deployed with the next release of the data model
-
mapped: The entity is used and mapped to at least one source in the “Source” module
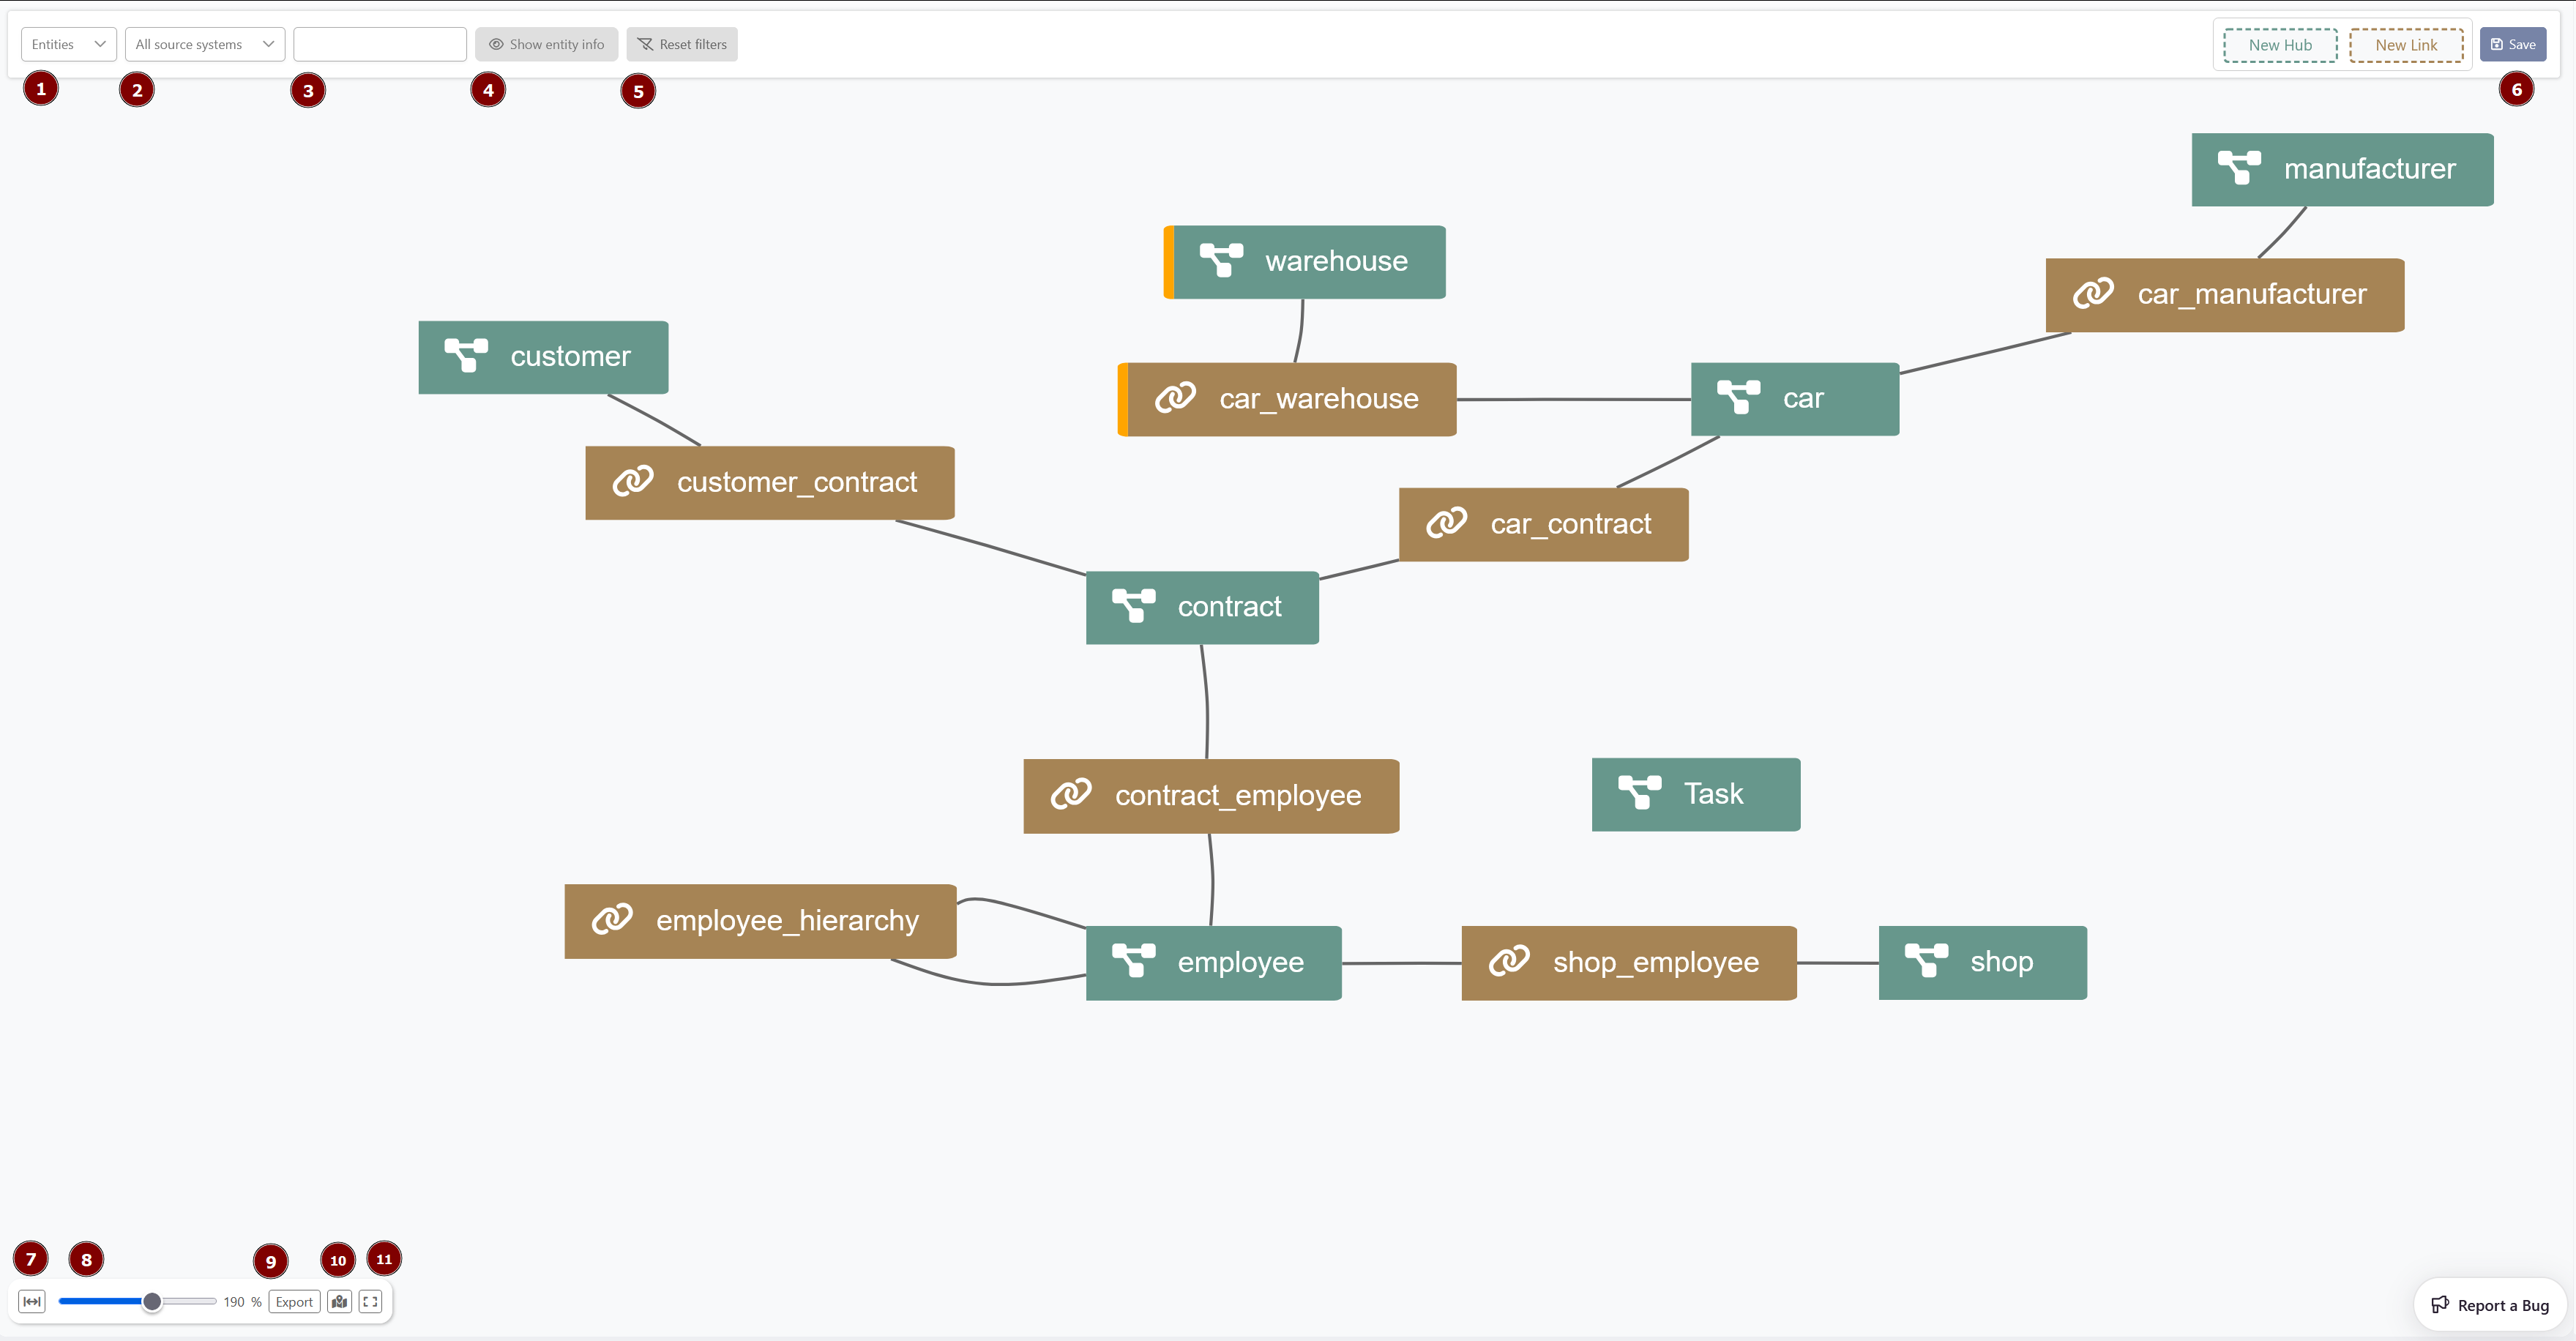
Graph navigation
-
Entities (dropdown list): Allows users to filter which types of entities—‘Hubs’, ‘Links’, ‘Satellites’, or ‘Reference tables’—are displayed on the graph
-
Source systems (dropdown list): Allows users to filter entities displayed on the graph based on their mapped source systems. (Note: Users can also choose to display only entities that are not mapped to any source system.)
-
Search bar: Allows users to filter entities by typing characters in the search field. The filter matches entities based on their names.
-
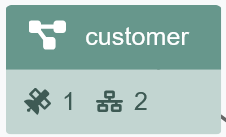
Show/hide entity info: Allows users to show or hide summarized information about the selected entity, including the number of attached satellites and the number of created mappings
-
Reset filters: Allows users to reset filters to their default settings, displaying all source systems and only the default entity types (‘Hubs’ and ‘Links’)
-
Save: When clicked on, allows users to save the position of each node
-
Adapt to screen: Allows users to automatically adapt the size of the graph to match the entire space available on the screen
-
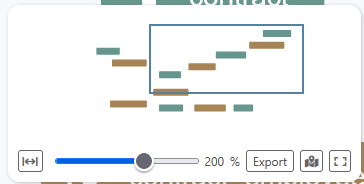
Zoom-in/Zoom-out: Allows the users to zoom-in and zoom-out
-
Export: Allows users to export the graph in its current state—including applied filters and displayed entity information—as a PNG or SVG file.
-
Mini-map: Allows users to display a miniature version of the graph to facilitate navigation, especially when zoomed in.
-
Fullscreen mode: Allows users to display the graph in fullscreen mode, expanding it to occupy the entire screen for enhanced visibility
Highlight entities
Users can highlight a specific entity and its related entities by hovering over them in the graph. For example, hovering over the hub ‘contract’ will highlight it along with its related entities.
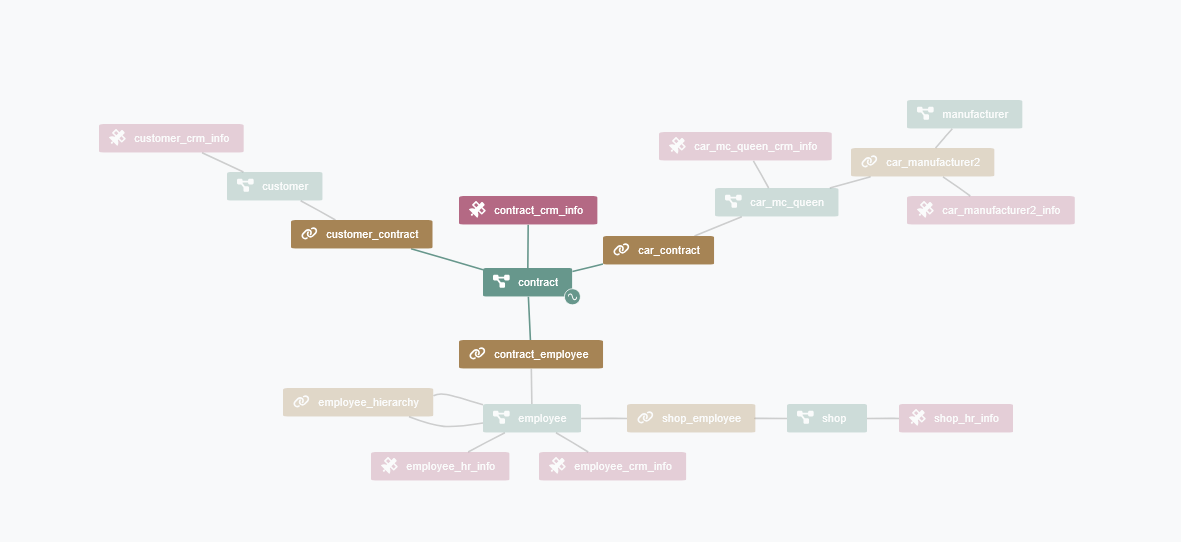
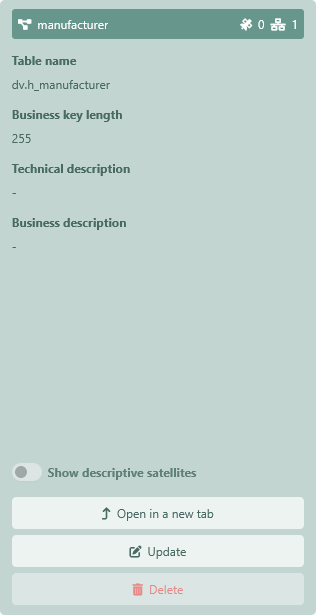
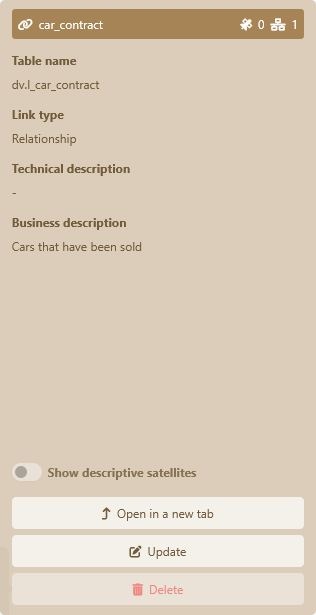
Entity information panel
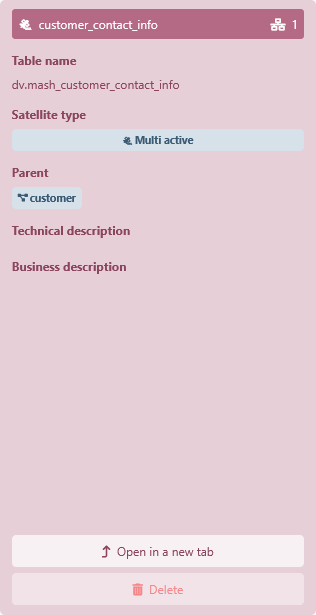
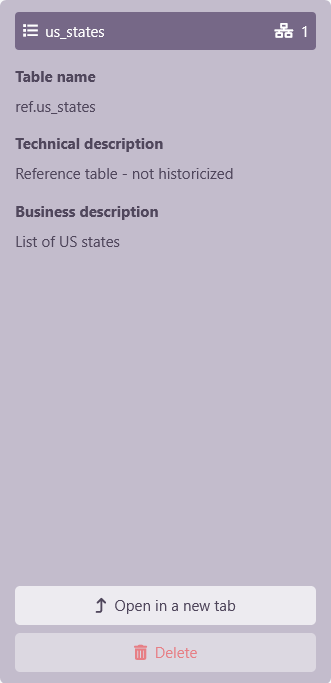
By clicking on an entity, users can view its descriptive information in a panel that appears on the right side of the graph. This panel includes:
-
The entity’s name in the upper bar, followed by the number of satellites and related mappings
-
The table name
-
The business key length (for hubs only)
-
The link type (for links only)
-
The satellite type (for satellite only)
-
The technical description
-
The business description
-
A short list of actions:
-
Show descriptive satellites (for hubs and links only)
-
Open the entity’s tab
-
Optionally, you can directly open the dynamic tab of an entity by holding the Ctrl key and clicking on the node in the graph
-
-
Update the entity (for hubs and links only)
-
Delete the entity
-
Contextual menu
-
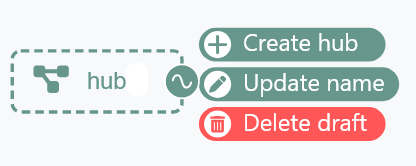
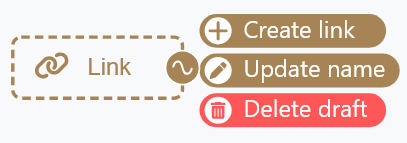
Clicking on a draft node opens a contextual menu with several options:
-
Create: This option is only available for draft entities. It opens a modal to create a hub or a link, depending on the type of entity. When the user saves the data in the modal, the hub/link is created and is no longer in draft state.
-
Update: This option opens a modal to edit the hub or link.
-
Delete: This option deletes the draft entity. It is only available for entities in a draft state.
-
-
By clicking anywhere else in the graph, the menu closes
Create an entity
To add a new entity to the graph, the user needs to click the 'New hub' or 'New link' button and, while holding down the mouse button, drag the block to the desired location before releasing it.

Create a hub
-
Dropping a ‘New hub’ block allows users to create a new hub in draft state.
-
Once drafted, users can open the contextual menu by clicking on the draft node and click on “Create”
-
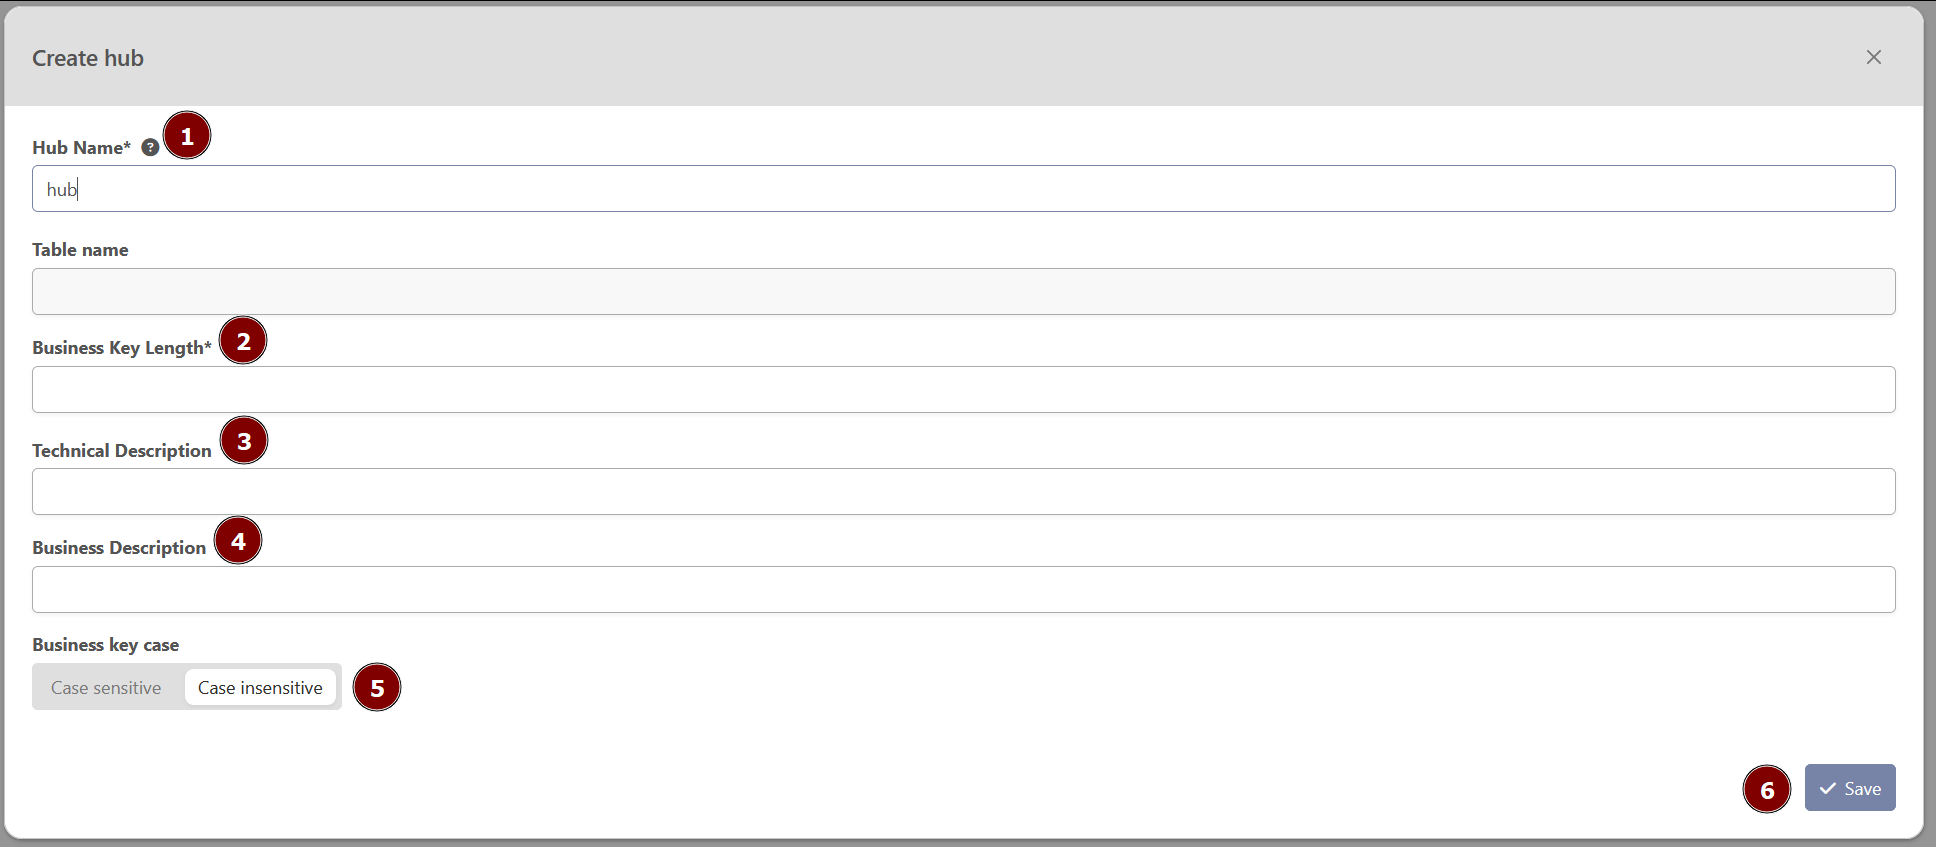
A modal with the descriptive information of the hub is displayed
-
Hub Name (mandatory): The name of the hub. It is pre-filled with the name of the draft node but the users can edit it
-
Business Key Length (mandatory): In beVault, the business keys are always of type varchar (or equivalent depending on the database it is deployed on). This is the length of the column in the database
-
Technical Description: A description for the technical users
-
Business Description: a description for the business users
-
Business key case: Choose whether the business key is case sensitive or not (the colour blue defines the chosen option)
-
Save: this button saves the entity and closes the modal
Create a link
-
Dropping the ‘New link’ block allows users to create a new link in draft state.
-
Once drafted, the users can create the link by clicking on the draft node and clicking on “Create” to open the link creation modal.
-
-
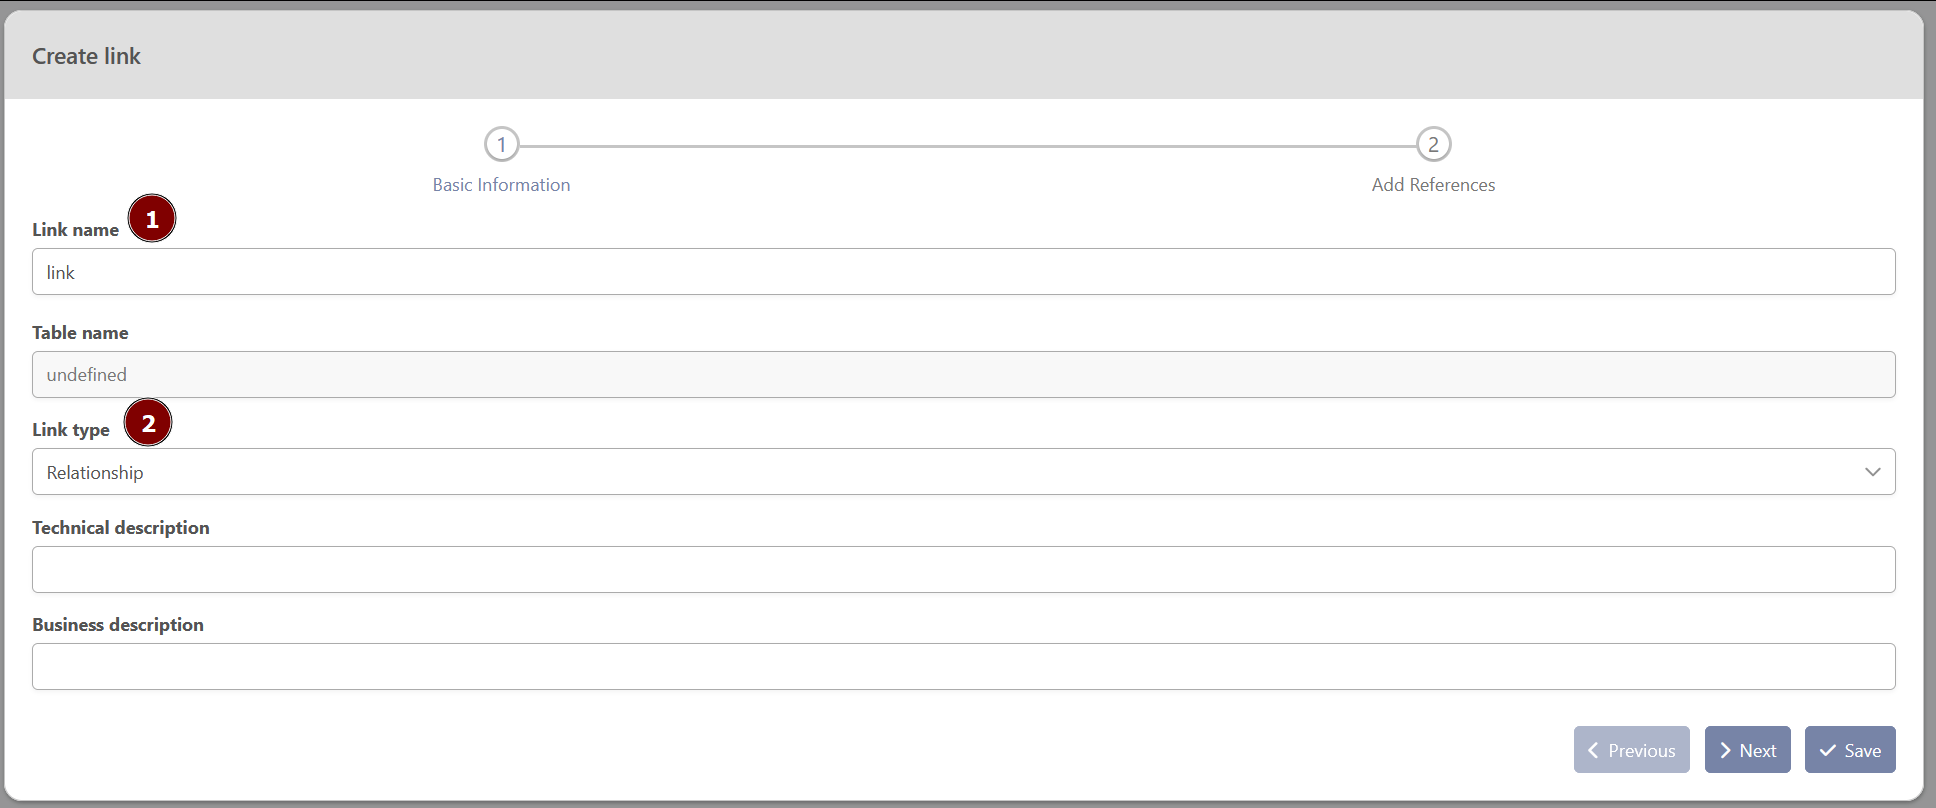
The link creation consists of a two-step modal with descriptive information about the link and its dependencies.
-
“Basic Information”
-
Link Name (mandatory): The name of the link. It is pre-filled with the name of the draft node but the users can edit it
-
Link Type (mandatory): The type of the link
-
Relationship: This type of link describes a basic relationships between two (or more) hubs. (e.g. the manufacturer of a car)
-
Same as: This type of link is mostly used to map two business keys of a same hub that represent the same business object.
-
Transactional (Non-historized): This type of link represent a relationship that will never change over time. Most of the time, it has a timestamp dependent child. (e.g. an accounting line)
-
Hierarchy: This type of link, as its name suggests, represent a hierarchy on the same hub. (e.g. A manager - employee relationship with only one hub “employee”)
-
-
-
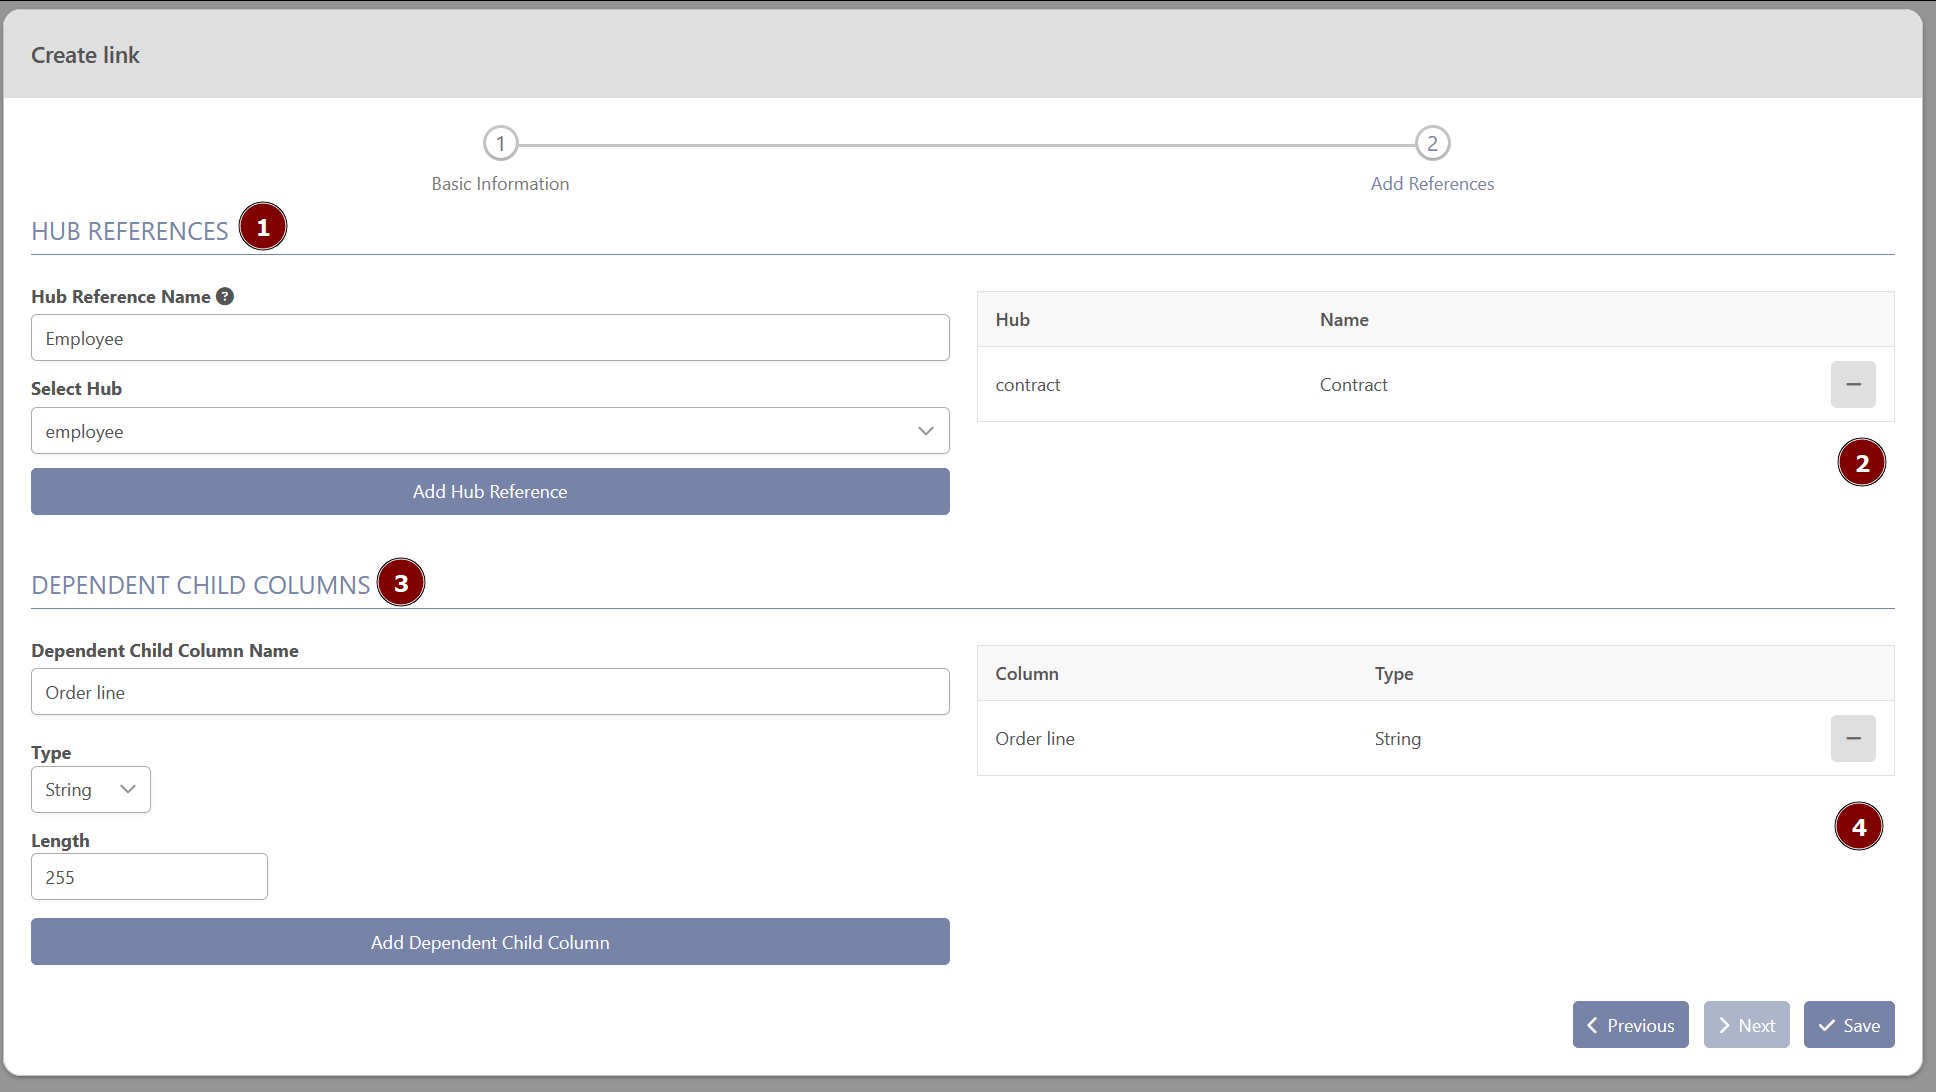
“Add References”
-
The hub references are pre-filled with the attached hubs when using the “Edge mode” feature
-
The users can add a new reference by filling in its name and selecting a hub
-
The users can remove a hub reference by clicking on the “-” button in the list of hub references
-
The users can add some dependent children by filling in its name and type
-
Additional information (lenght, scale and precision, …) may be required depending on the type selected
-
-
The users can remove a dependent child by clicking on the “-” button
-