This guide will walk you through the complete setup process to integrate the beVault MCP (Model Context Protocol) server with n8n, enabling AI-powered automation for your beVault data platform operations.
Overview
By the end of this guide, you'll have:
-
n8n running locally or on a server
-
beVault installed and accessible
-
beVault MCP server running and configured
-
An n8n AI agent workflow that can interact with beVault through the MCP server
Prerequisites
Before starting, ensure you have:
-
Docker and Docker Compose installed
-
Access to a beVault instance (or ability to install one)
-
An LLM provider account (e.g., Anthropic Claude, OpenAI)
Step 1: Install n8n (or use your instance hosted by n8n)
https://docs.n8n.io/hosting/installation/docker/
Step 2: Install beVault
Follow the official beVault deployment documentation based on your environment:
Make note of your beVault MetaVault URL (e.g., https://bevault.metavault.url.com) as you'll need it for the MCP server configuration.
Step 3: Get an API Key from beVault
-
Access the API Keys module:
-
Log into your beVault instance
-
Click on the Client Admin icon in the upper-right corner
-
Navigate to the API Keys submodule
-
-
Create a new API key:
-
Click the "+ Create API key" button
-
Fill in the required fields:
-
Name: Choose a descriptive name (e.g., "n8n-mcp-integration")
-
Type: Select "End user" or "Admin" based on your needs
-
Expiration date: Set an appropriate expiration date (max 1 year from today)
-
-
Click Save
-
-
Copy and securely store your API key: ⚠️ Important: This is the only time you'll see the complete API key. Copy it immediately and store it securely.
-
Assign project permissions:
-
Click the "Projects" button next to your newly created API key
-
Assign the appropriate read/write permissions for the projects and modules you want the MCP server to access
-
Configure environment access as needed (Read/Execute/Deploy permissions)
-
The AI agent will only have access to the projects and modules you assign on the api key
Step 4: Install the beVault MCP Server
https://github.com/depfac/bevault-mcp-server?tab=readme-ov-file#installation
-
Pull the MCP server image:
docker pull quay.io/dfakto_org/bevault_mcp -
Run the MCP server:
docker run -d \
  --name bevault-mcp \
  -p 8000:8000 \
  -e BEVAULT_BASE_URL=https://your-bevault-instance.com \
  -e REQUEST_TIMEOUT_SECONDS=30 \
  -e MCP_HOST=0.0.0.0 \
  -e MCP_PORT=8000 \
  quay.io/dfakto_org/bevault_mcp
Replace
https://your-bevault-instance.comwith your actual beVault MetaVault URL.
Step 5: Get an API Key from Your LLM Provider
For Claude (Anthropic)
-
Go to console.anthropic.com
-
Navigate to API Keys
-
Create a new API key and copy it securely
For OpenAI
-
Go to platform.openai.com
-
Navigate to API Keys
-
Create a new API key and copy it securely
Step 6: Configure n8n Workflow
n8n workflow sample
The following sample can be used in n8n to start the configuration: beVault AI Assistant - MCP Integration.json
Create a New Workflow
-
Access n8n at http://localhost:5678 (or your hosted instance)
-
Click "New workflow"
Add Chat Trigger
-
Add a new node and search for "When chat message received"
-
Configure the trigger node (defaults are usually fine)
Add AI Agent Node
-
Add an AI Agent node to your workflow
-
Connect it to the chat trigger
Configure Your LLM Model
-
In the Agent node, click on the Model section
-
Select your LLM provider (e.g., "Claude" or "OpenAI")
-
Create credentials:
-
For Claude: Enter your Anthropic API key
-
For OpenAI: Enter your OpenAI API key
-
Add Simple Memory
-
In the Agent node, scroll to the Memory section
-
Click "Add Memory"
-
Select "Window Buffer Memory" for basic conversation memory
Add MCP Client Tool
-
In the Agent node, scroll to the Tools section
-
Click "Add Tool"
-
Select "MCP Client Tool"
-
Configure the tool:
-
Endpoint:
http://host.docker.internal:8000/mcp(if n8n is in Docker) orhttp://localhost:8000/mcp(if running locally) or the url of your mcp server if you installed it in production -
Server Transport: Select "HTTP Streamable"
-
Authentication: Select "Header Auth"
-
Click "Create new credential"
-
Header Name:
Authorization -
Header Value:
ApiToken [your-bevault-api-key]
Replace
[your-bevault-api-key]with the API key you created in Step 3. -
-
Configure System Message
In the Agent node, update the System Message to provide instructions on how the agent should behave. Here are some recommended system prompts:
Basic System Prompt:
You are a beVault assistant that helps users manage their data platform.
You have access to beVault through MCP tools that allow you to:
- Search and manage data models (Hubs, Links, Satellites, Reference Tables)
- Manage source systems and data packages
- Create and manage information marts

Always confirm actions with the user before creating, updating, or deleting entities.
Provide clear explanations of what you're doing and what the results mean.
Advanced System Prompts:
For more sophisticated system prompts tailored to specific use cases, visit the beVault MCP System Prompts documentation
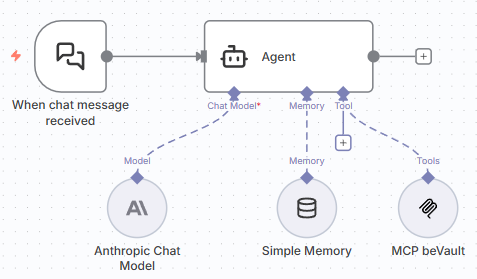
Your agent should look like this:
Step 7: Test your agent
-
Save your workflow (Ctrl+S or Cmd+S)
-
Activate the workflow by clicking the toggle switch in the top right
-
Test the chat:
-
Click on the "When chat message received" node
-
Click "Test workflow" or use the chat interface
-
Send a test message like:
-
"List all hubs in my project"
-
"Show me the available information marts"
-
"What source systems do we have?"
-
-
-
Verify the response:
-
The agent should use the MCP tools to query beVault
-
You should receive structured information back from beVault
-
Check the execution logs for any errors
-