In this submodule, the users can manage their information marts to use the raw data from the Data Vault for useful insight!

Information mart
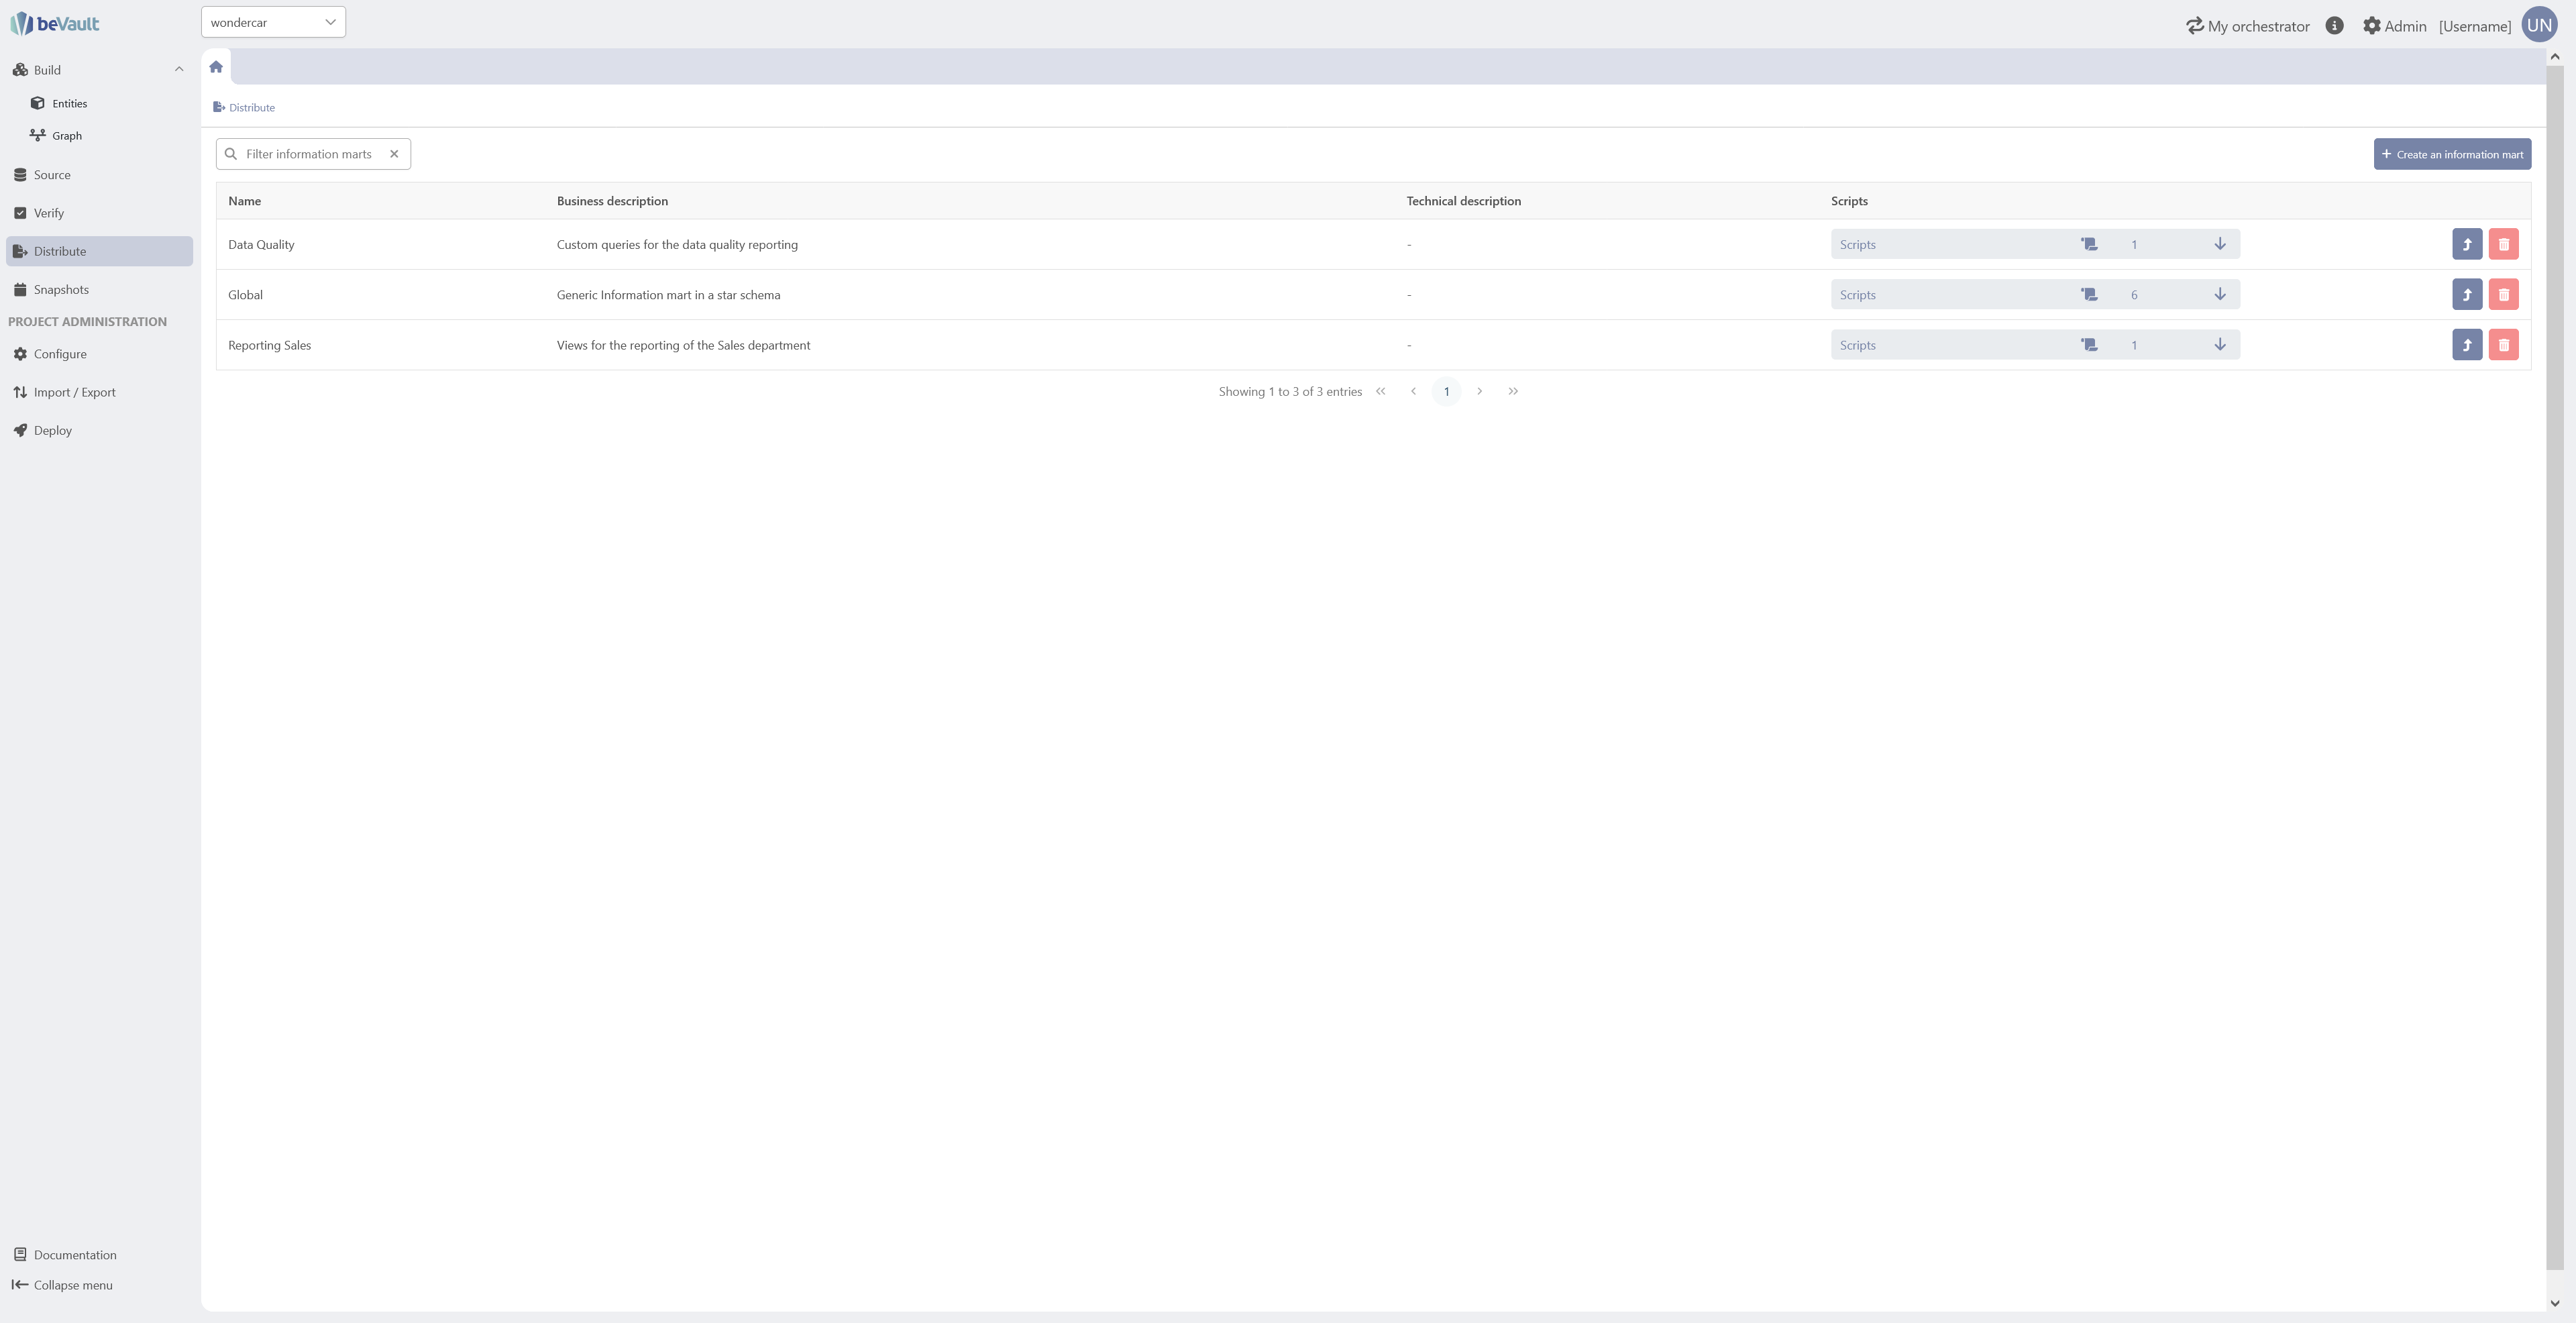
This section allows users to create, edit, and delete the information marts in which the key insights are built through a set of scripts that will be executed on the raw vault and/or the business vault.
Create an information mart
To create a new source, click on the “Create an information mart” button in the top-right corner of the interface. A pop-up wizard will appear, requiring you to enter several required and optional attributes.

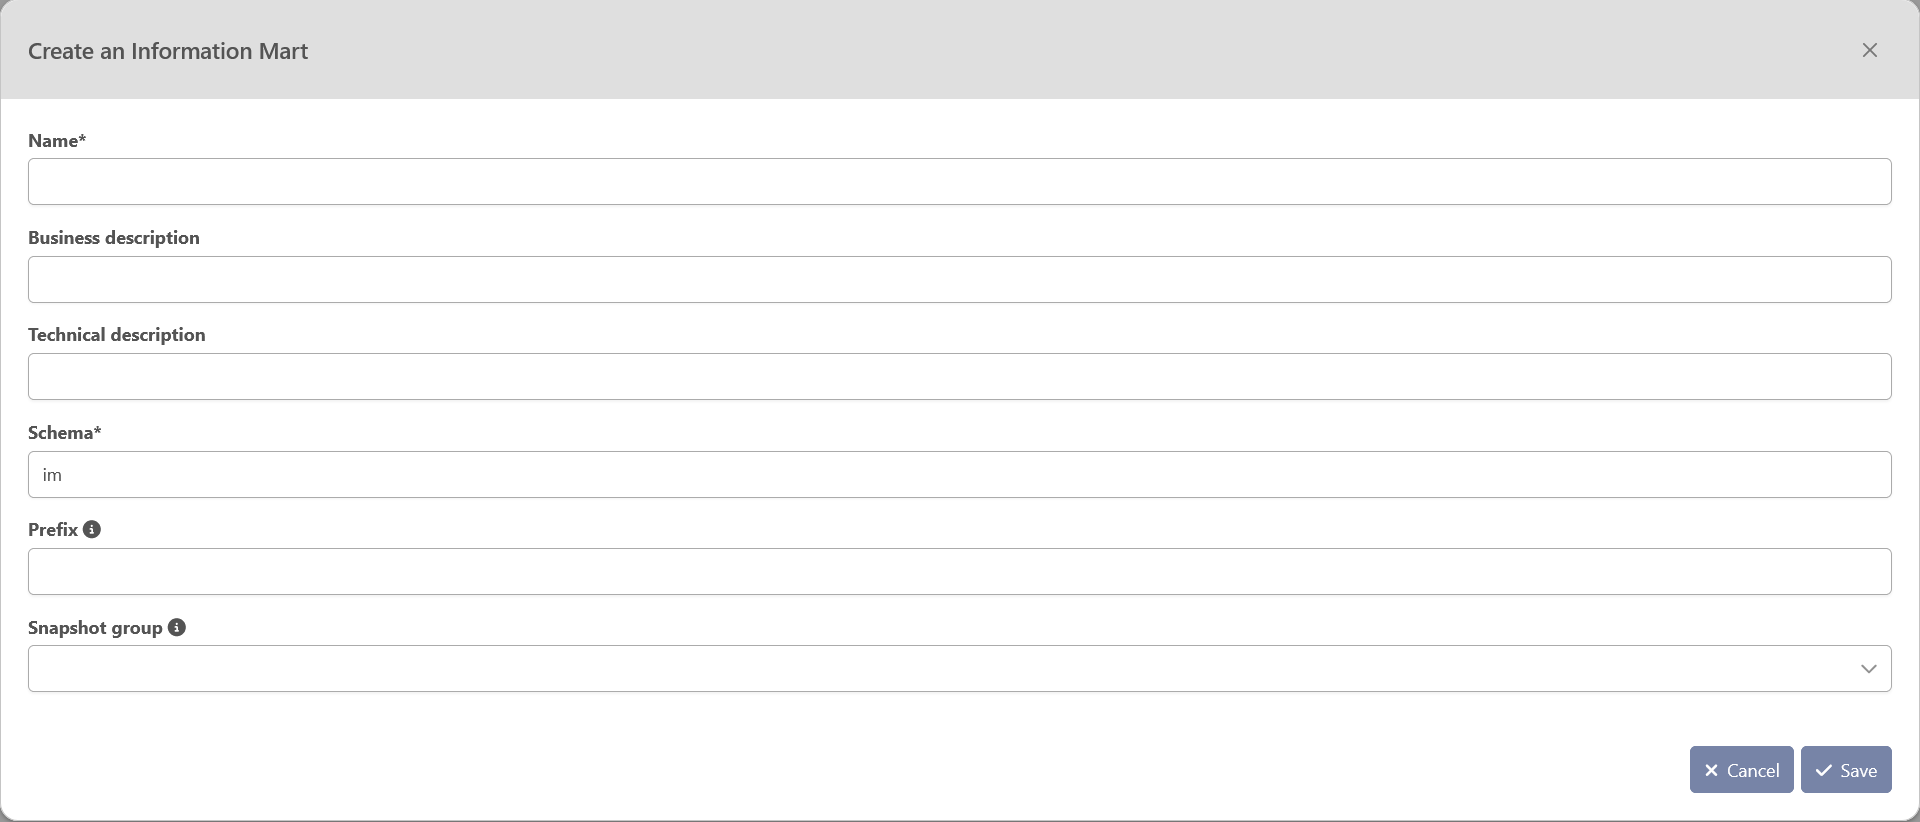
Specifically, you must provide:
-
Name: mandatory – The name of the information mart
-
Business Description: optional — Detailed information about the information mart from a business perspective.
-
Technical Description: optional — Any descriptive detail on the technical aspect of the information mart
-
Schema: mandatory – The schema in which the tables and views built through the set of scripts in the informtion mart should be created
-
Prefix: optional – Prefix for tables' name generated automatically
-
Snapshot group: mandatory – The group of snapshot for which the information in the tables of the information mart will be caculated/distributed
Once you have entered this information, click the “Save” button to create the new information mart.
If the information mart is successfully created, it will appear in the list of information marts.
If you would rather not create the information mart, click the “Cancel” button.
Modify an existing information mart
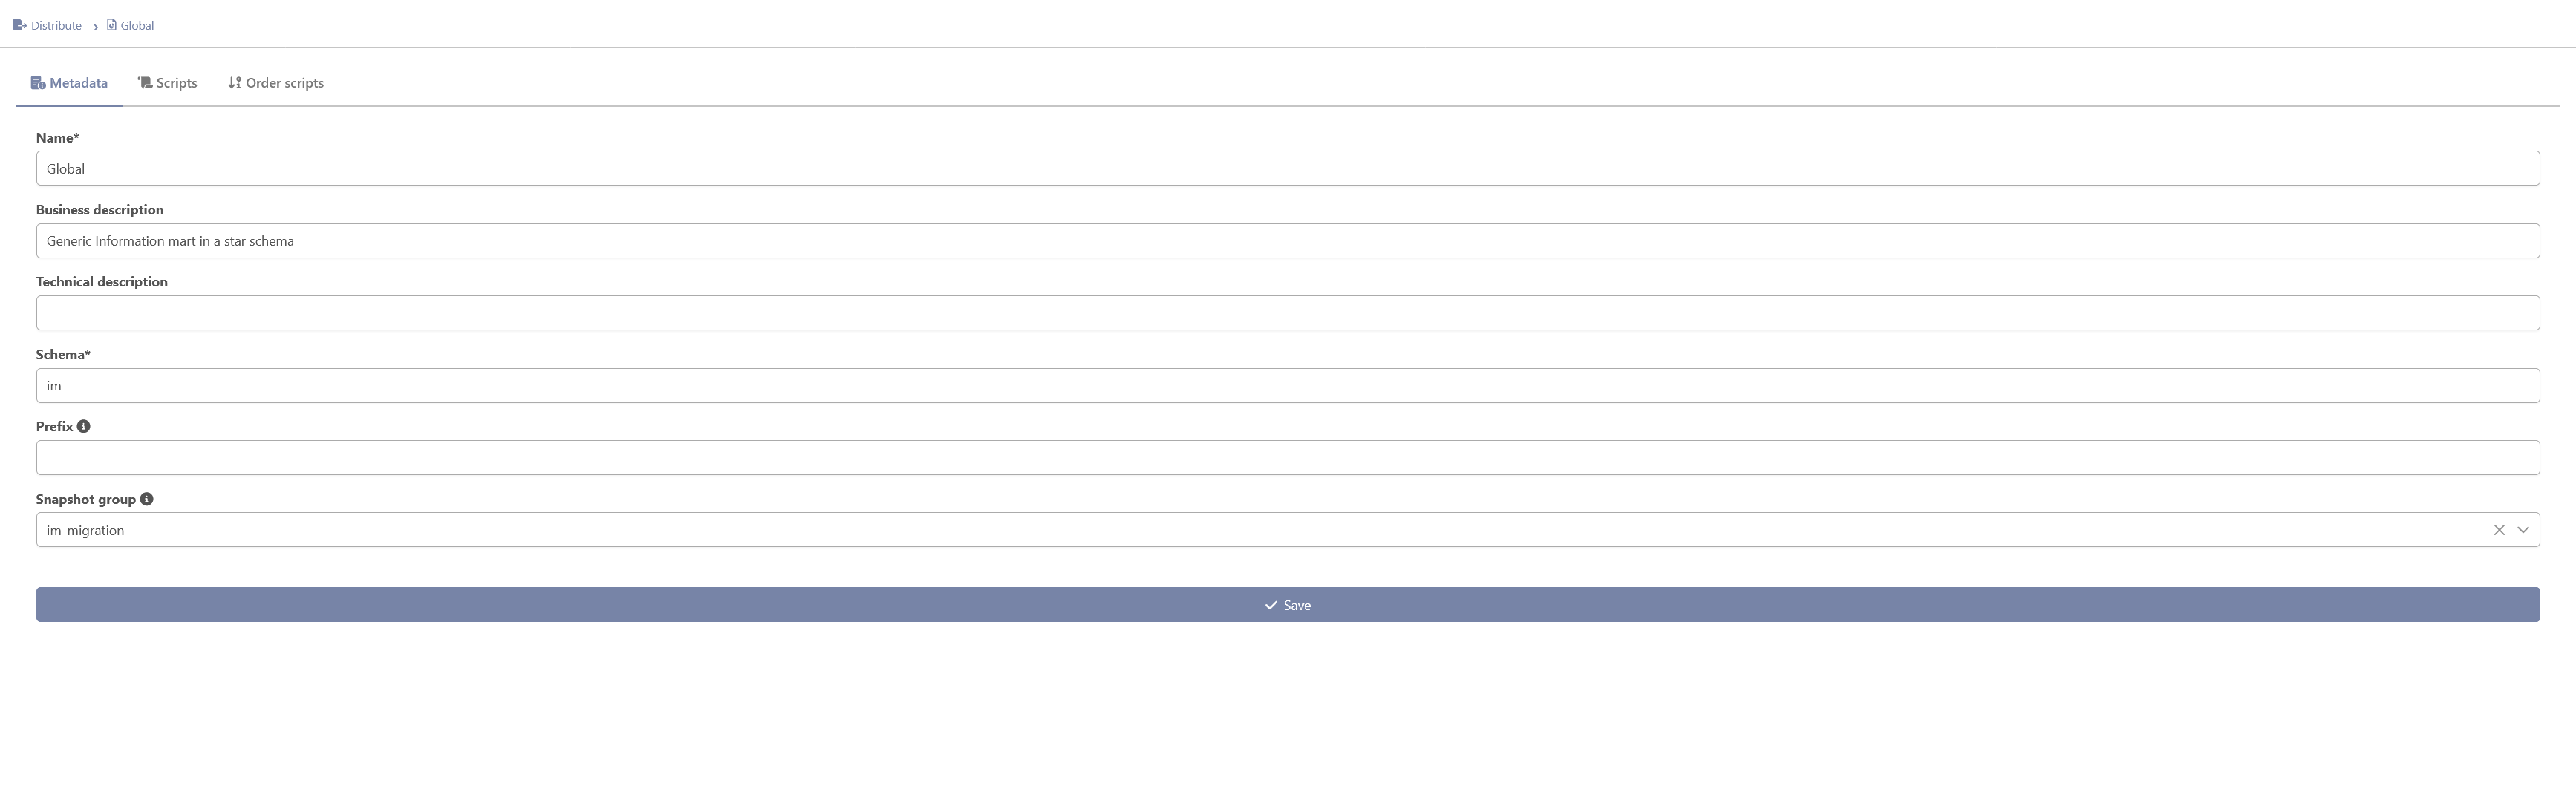
To modify an existing source, click the “Open in a new tab” button for the corresponding information mart.

A tab will appear, allowing you to edit the required and optional attributes (refer to the instructions for creating an information mart for more information) in a first section “Information mart metadata”.
Once you have made your changes, click the “Save” button to apply them. If you would rather not save your changes, close the tab without saving, and they will be discarded.

Note that, by clicking on the second button on the vertical menu on the left, a list of the scripts created under the information mart is displayed with the possibility to create, display in a new tab and edit or delete a script.

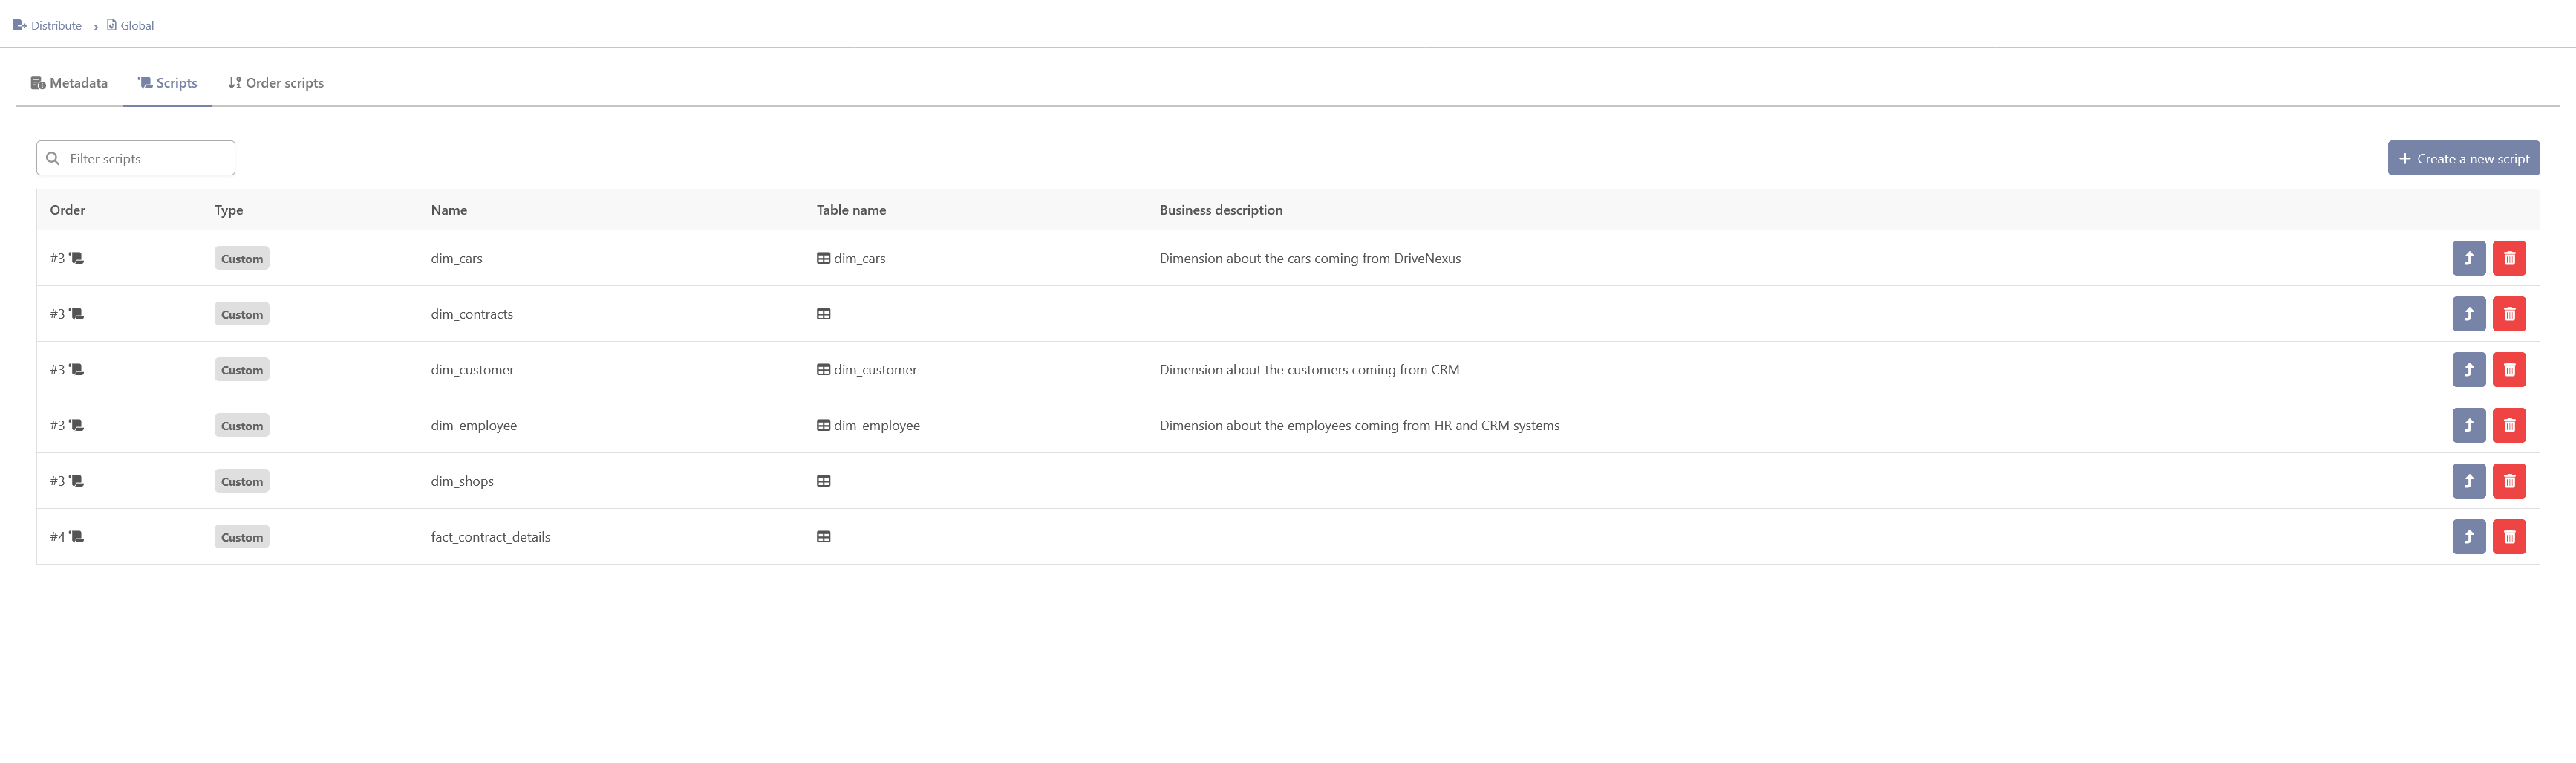
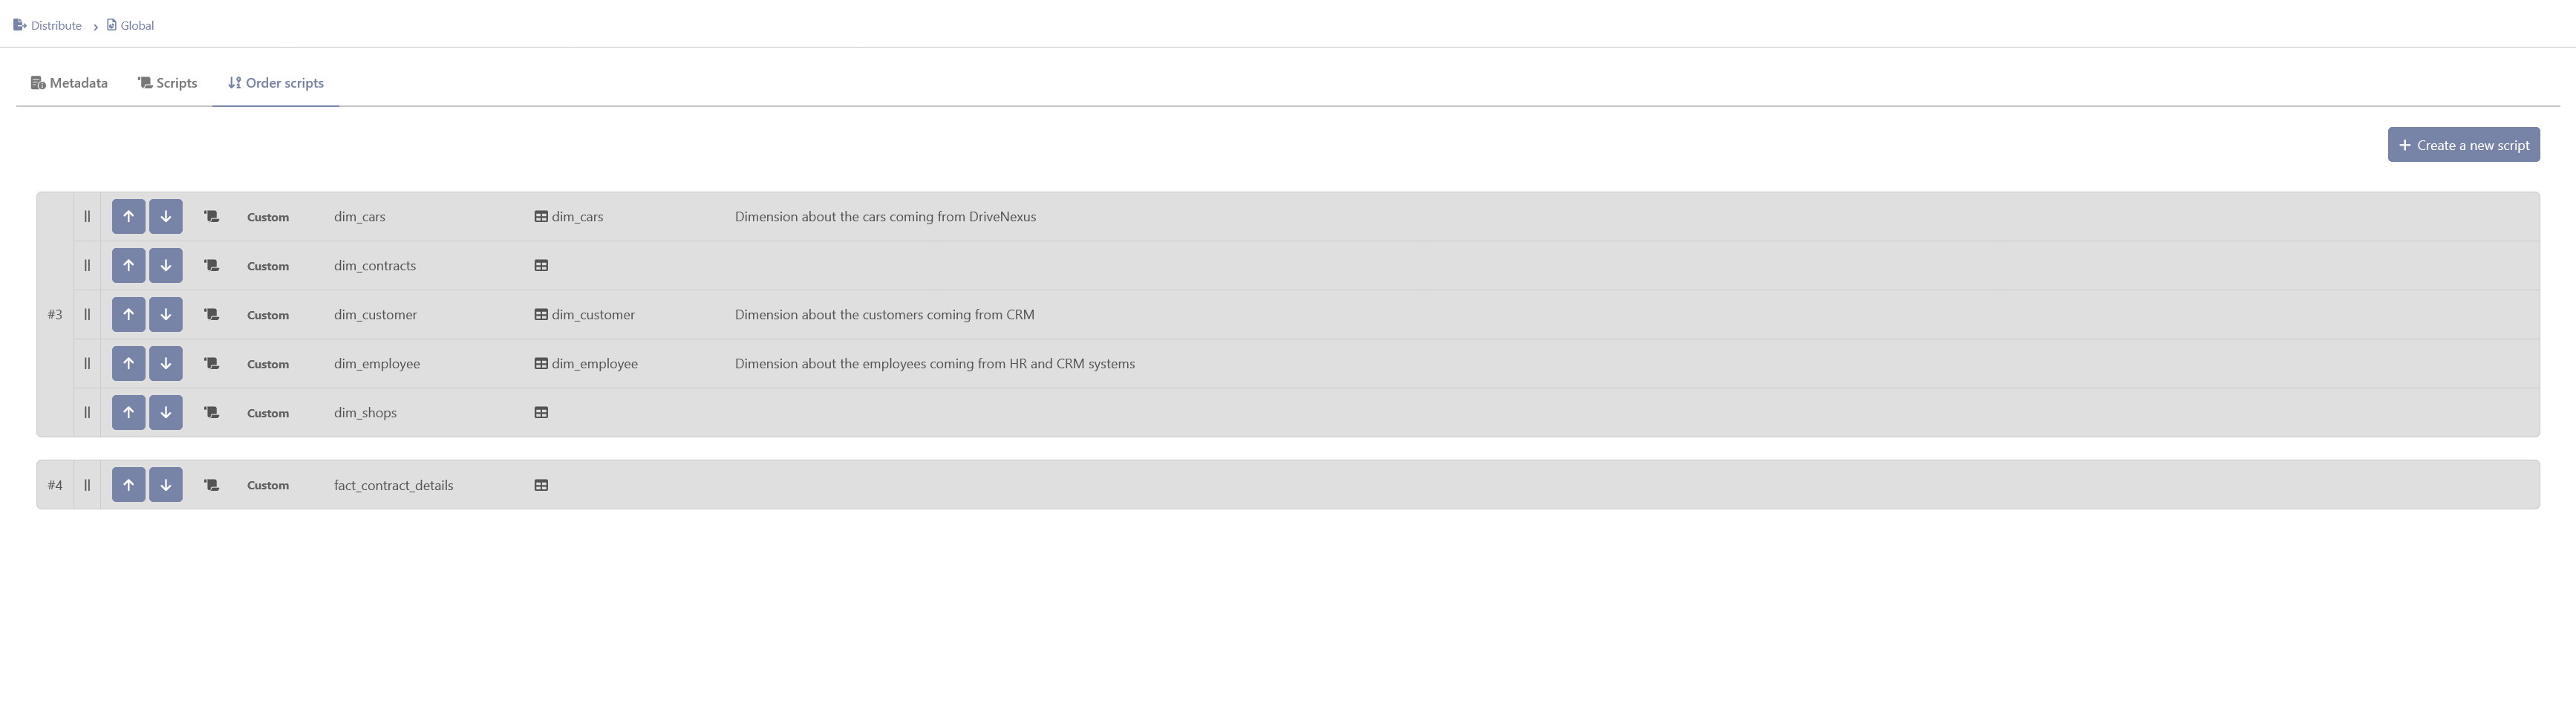
By clicking on the third one, a feature allowing to sort the script to define in which order they should be run during an execution of beVault. By using the arrow, scripts can be reorderd to be below, above or at the same level of another script (meaning that they will be run in parallel).

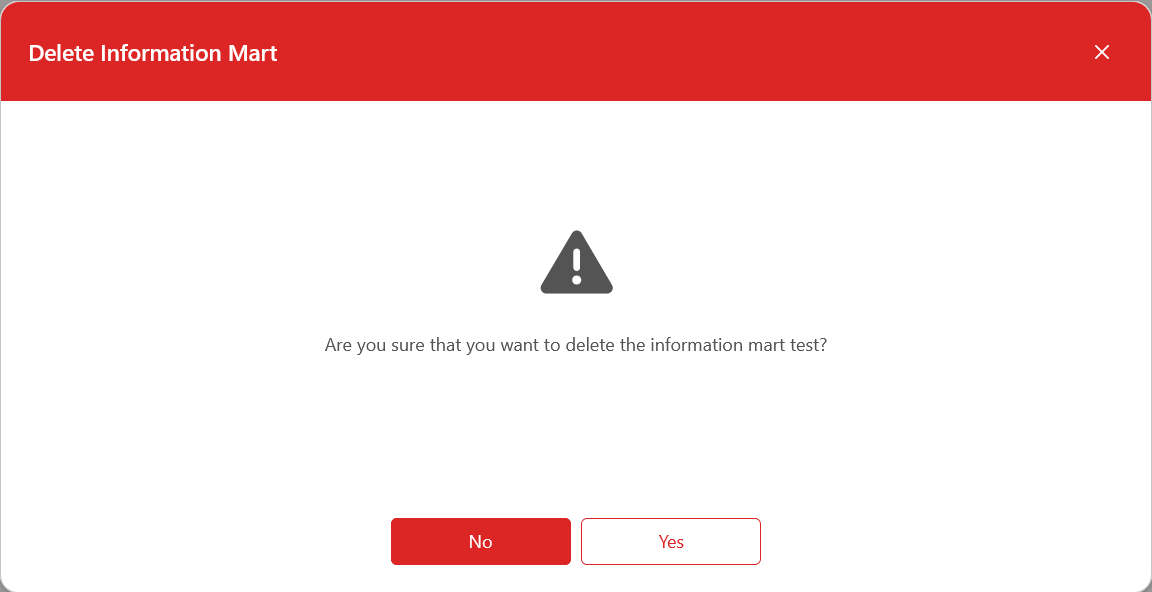
Delete an information mart
To delete an information mart, click the trash icon on the corresponding line. Please note that, if you delete a source system, any script within the information will be deleted.

Script
After creating an information, you can create one or more scripts that will gathered as a set within the information marts. Scripts allows you to define the output of your beVault project that will feed any visualization tool, AI agent, data hub,…
In order to display the scripts, click the button ‘Scripts’ under the column with the same name for the information mart that you wish to explore and/or edit.
The following buttons are available for managing scripts:

-
Create a new script
-
Modify an existing script
-
Delete an existing script
Create a new script
To create scripts, click on “Create a new script” and a pop-up wizard will open. You will need to provide the following information:

-
Name: mandatory – Name of the script. This name must be unique within the information mart, meaning that a single information mart cannot have two script with the same name.
-
Business Description: optional — Detailed information about the script from a business perspective (e.g.: its goal).
-
Technical Description: optional — Any descriptive detail on the technical aspect of the script
-
Table name: mandatory – Name of the table or view generated in the database
-
Execution time out: optional – Expected time for the query to be executed in the database. If filled in, this field will be used in the orchestrator to set up a timeout
-
Order: mandatory – Execution order of this script to generate the information mart. If multiple scripts have the same order, they will be executed in parallel. This information is used to generate a state machine in the orchestrator
After filling out the required and optional attributes for the script, click the “Save” button to create it. If the script is successfully created, it will appear in the list of scripts of the information mart.
Modify an existing script
To modify an existing script, click the “Open in a new tab” button for the corresponding script. The process is similar to creating a new script, with the same fields and rules. The fields that are already set will be pre-filled (refer to the instructions for creating a new script for more information).
A new tab in the module will appear, allowing you to edit the required and optional attributes for the data package (refer to see the “Create a new script” subsection for more information).

Once you have made your changes, click the “Save” button to apply them.
Please know that, by clicking on the second button on the vertical menu on the left, a list of columns is displayed with the possibility to define and edit or delete the definition of a column.
NB: The columns defined in this section are purely informational and allow you to give more details on the script that you are writing.

By clicking on the third one, the section ‘Script code’ is displayed. There, the SQL code of the script can be written, edited and saved. It is the code that will be executed in the database.

You can use double curly brackets {{ [variable] }} to add variables to your script. You will be to dynamically replace them with specific values in the orchestrator afterward.
If you need double curly brackets in your script, without them being replaced, please use {% raw %} and {% endraw %} at the beginning and the end of the query. This way, you query will not be interpreted and will be executed as it is
Delete a script
To delete a script, click the ‘Remove’ button with the trash icon on the corresponding line.

Use your scripts
The scripts created here are not directly applied to the databases.
To be able to use the script and execute them, you first need to create a new version and deploy it on an environment.
The script will then be available for the workers in States at that specific version. Meaning that you will be able to have version x of your script in a production environment and x+1 in the testing environment.
Once deployed, you can create a state machine in States and use and run the script on an environment.
State Machine to run the script
To use a script and execute it in a database, you need to create a state machine in State that uses the “ExecuteDataVaultQuery” worker. The worker takes the following parameters:
-
TimeoutSeconds
-
The maximum time the query can run before sending an error
-
Default: 2h
-
-
QueryType
-
Reader: The query will return the query result set in the output.
-
Nonquery: The query does not return values.
-
Scalar: Returns the first value of the first column of the result set.
-
-
QueryName
-
The name of the query in the Information Mart module
-
If the script has been created in the “Global” section, it should be prefixed by “Global/”
-
Example: “Global/myScript.sql”
-
-
If the script has been created in a Source System section, it should be prefixed by “SourceSystem/sourceCode/”
-
Example: “SourceSystem/crm/myScript.sql”
-
-
-
EnvironmentName
-
The name of the environment where the script is deployed
-
-
ProjectName
-
The technical name of the project of the script
-
-
Parameters
-
You can add as many additional parameters that will be used for the liquid script
-
Here is an example of the state machine to run the script test.sql for the project “default” in the environment “testenv”
{
"StartAt": "query",
"TimeoutSeconds": 3600,
"States": {
"query": {
"TimeoutSeconds": 3600,
"Type": "Task",
"Resource": "ExecuteDataVaultQuery",
"Parameters": {
"TimeoutSeconds": 1200,
"QueryType": "Reader",
"QueryName": "SourceSystem/sourceSystemCode/test.sql",
"EnvironmentName": "testenv",
"ProjectName": "default",
"param1" : "value1"
},
"End": true
}
}
}
Output
The output varies depending on the query type
{
{
"RecordsAffected": 0,
"Scalar": null,
"Result": []
}