Staging Tables
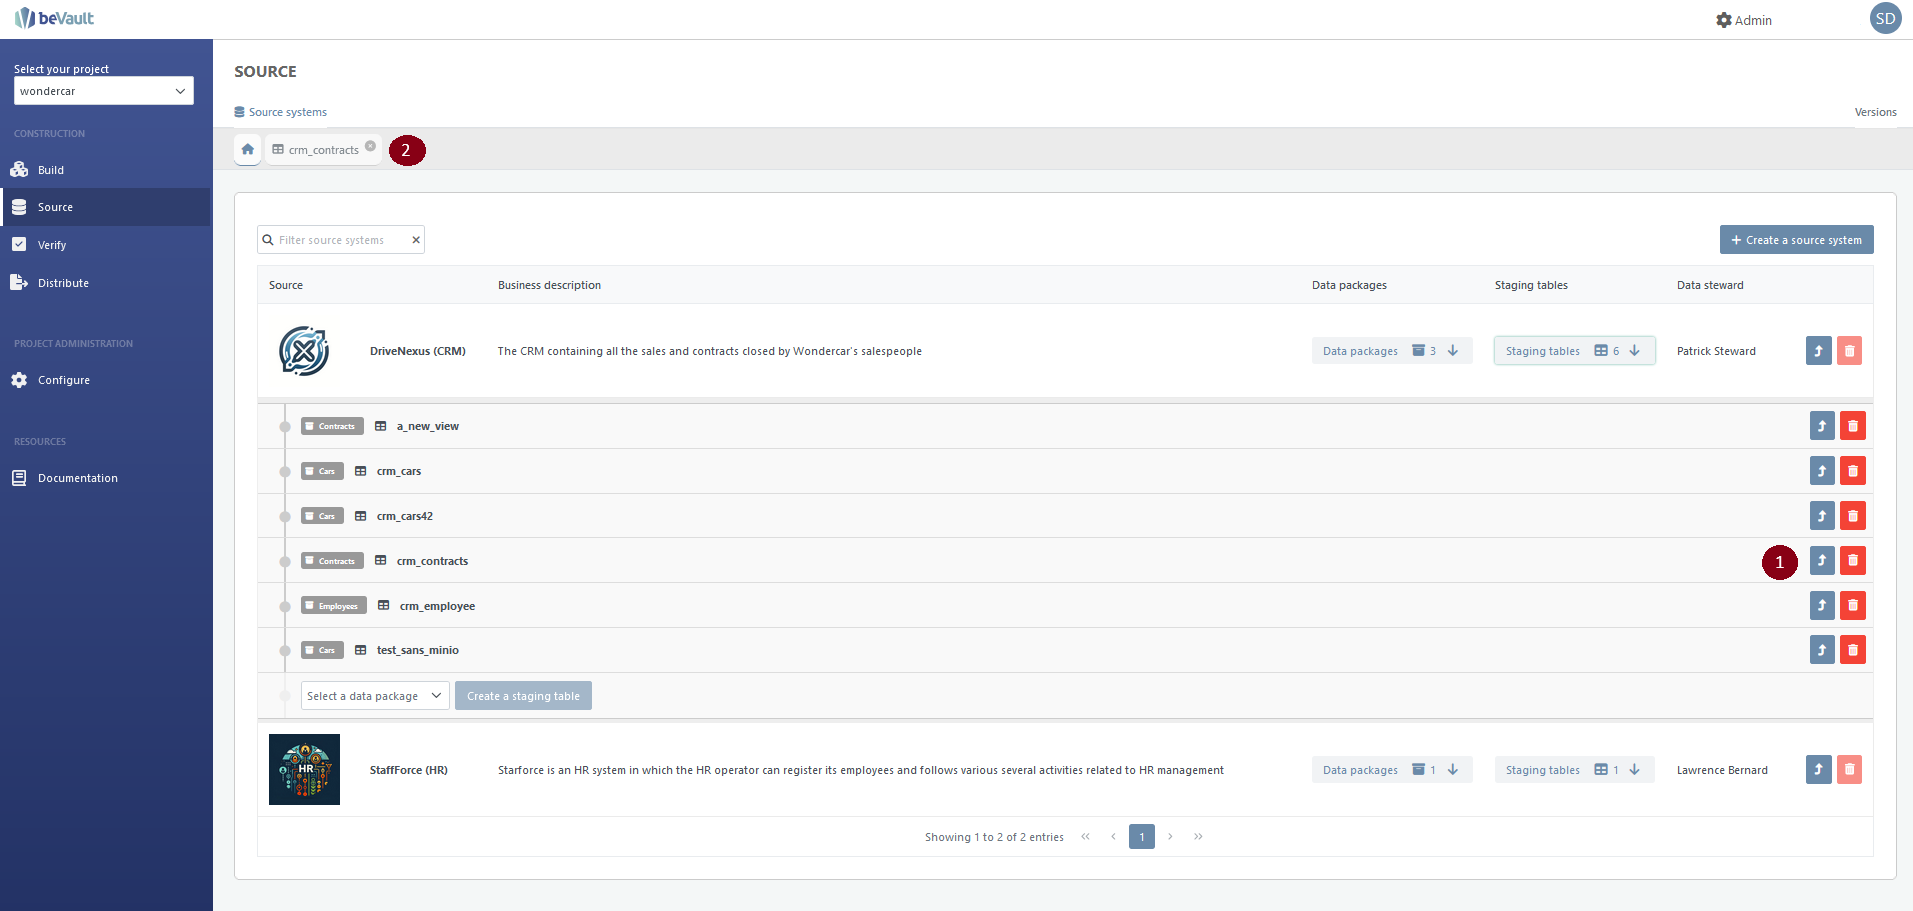
The users can open one or more staging tables from the “Source Systems” submodules. To do so, they need to click on the ‘Open in a new tab’ button, next to a staging table in the tree view.
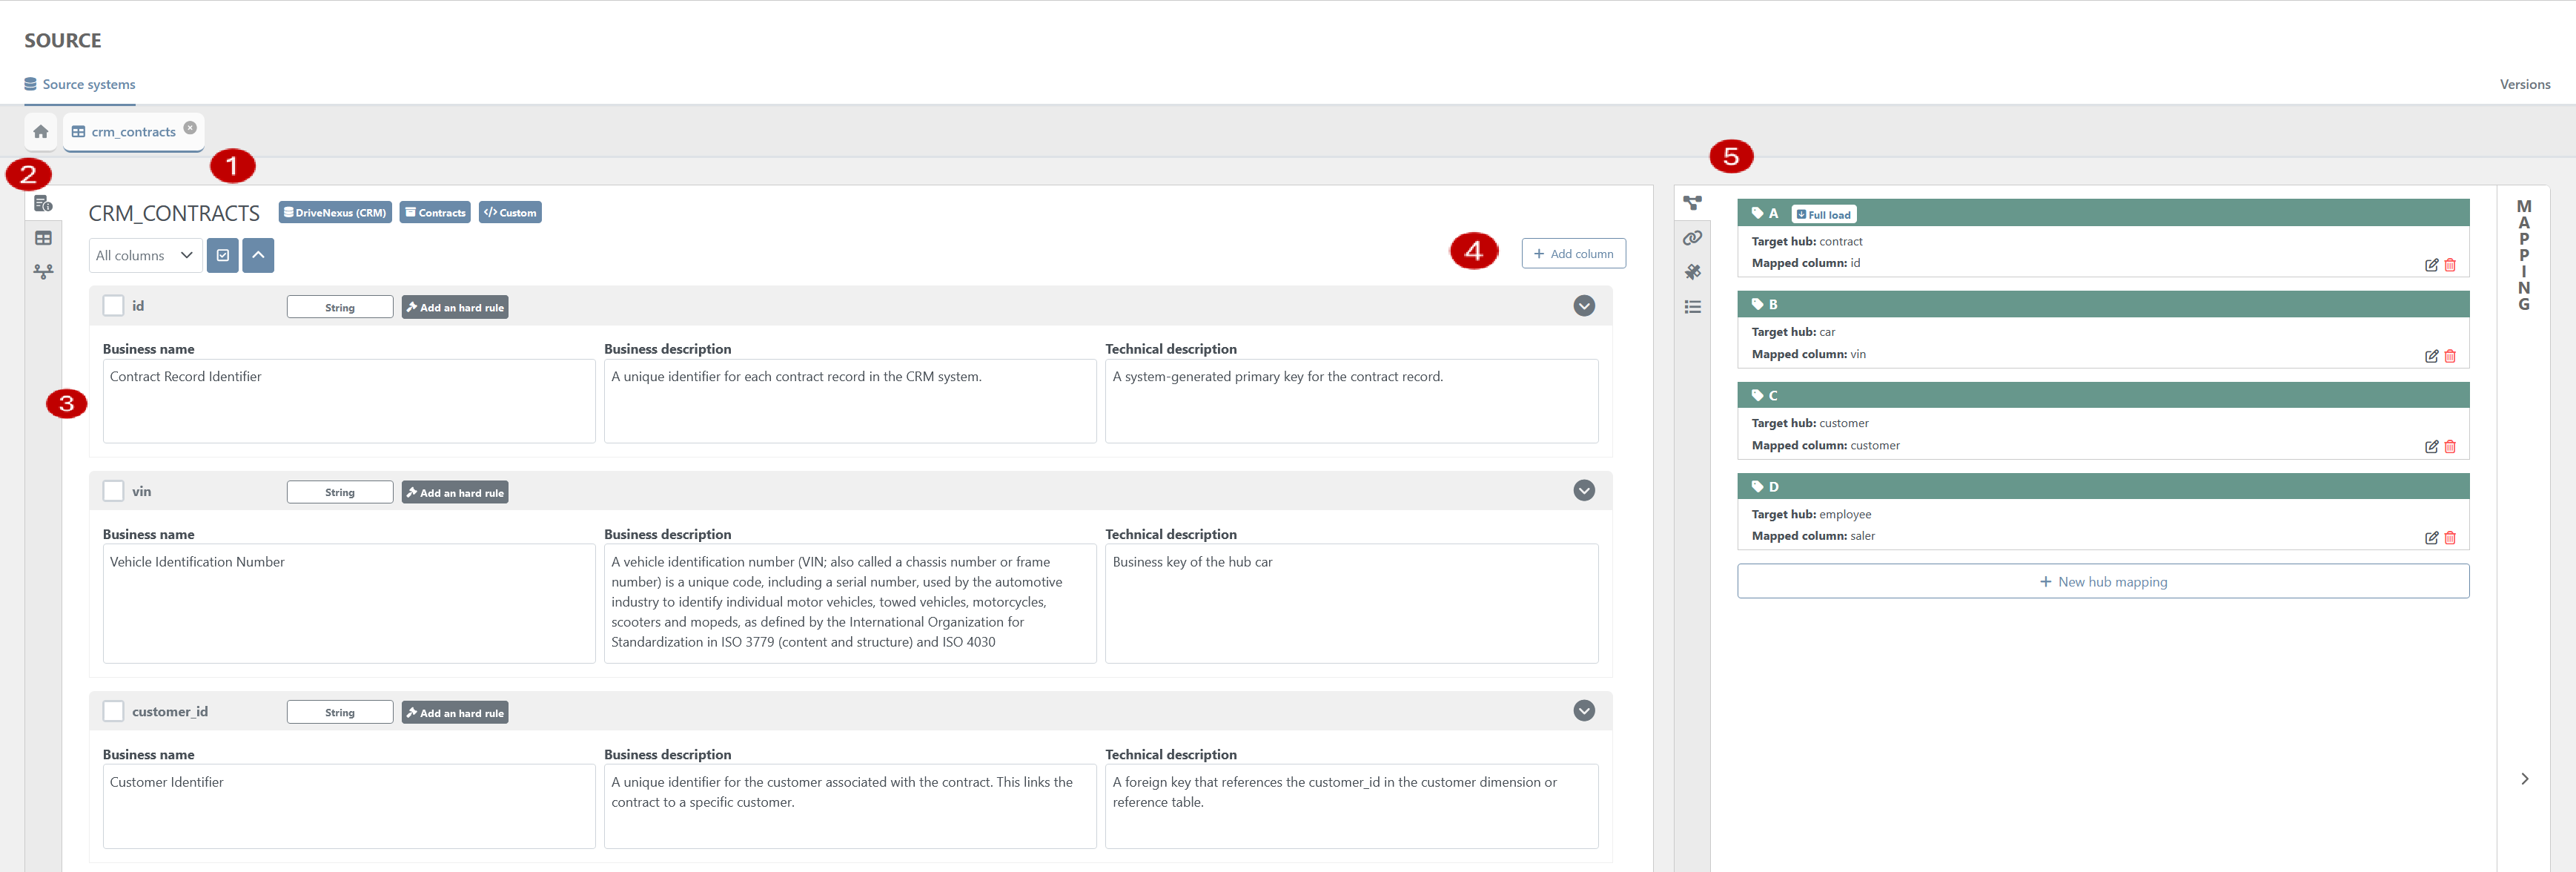
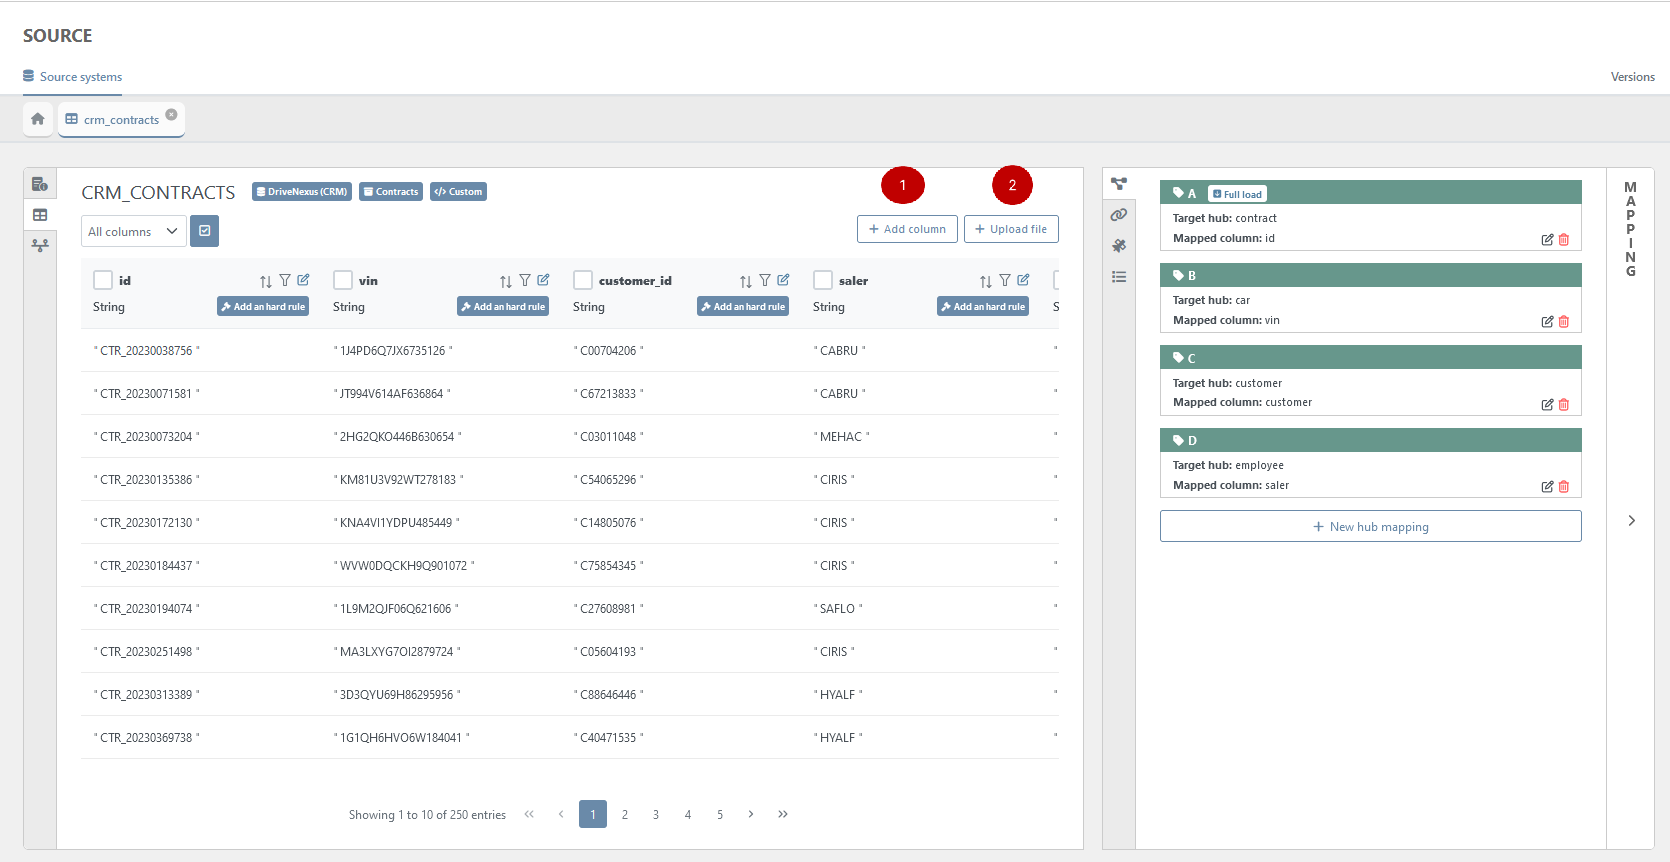
The staging table tab is divided in multiple sections:
Descriptive data : It contains the name of the staging table as well as the source it’s coming from
Side-Tab Menu: It is composed of 3 tabs (Metadata, Data, Connections). Each tab can be used to switch from one tab to another
Metadata: The metadata of the staging table’s columns in the modeling environment
Action button: Those buttons allow the users to edit the staging table or to upload data in the modeling environment
Mapping: It contains the list of mappings between the staging table and the data Vault model (For Hubs, Links, Satellites, and Referential)
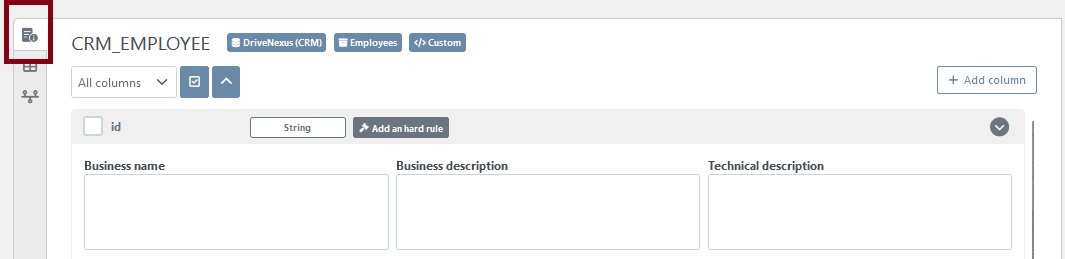
Metadata Tab
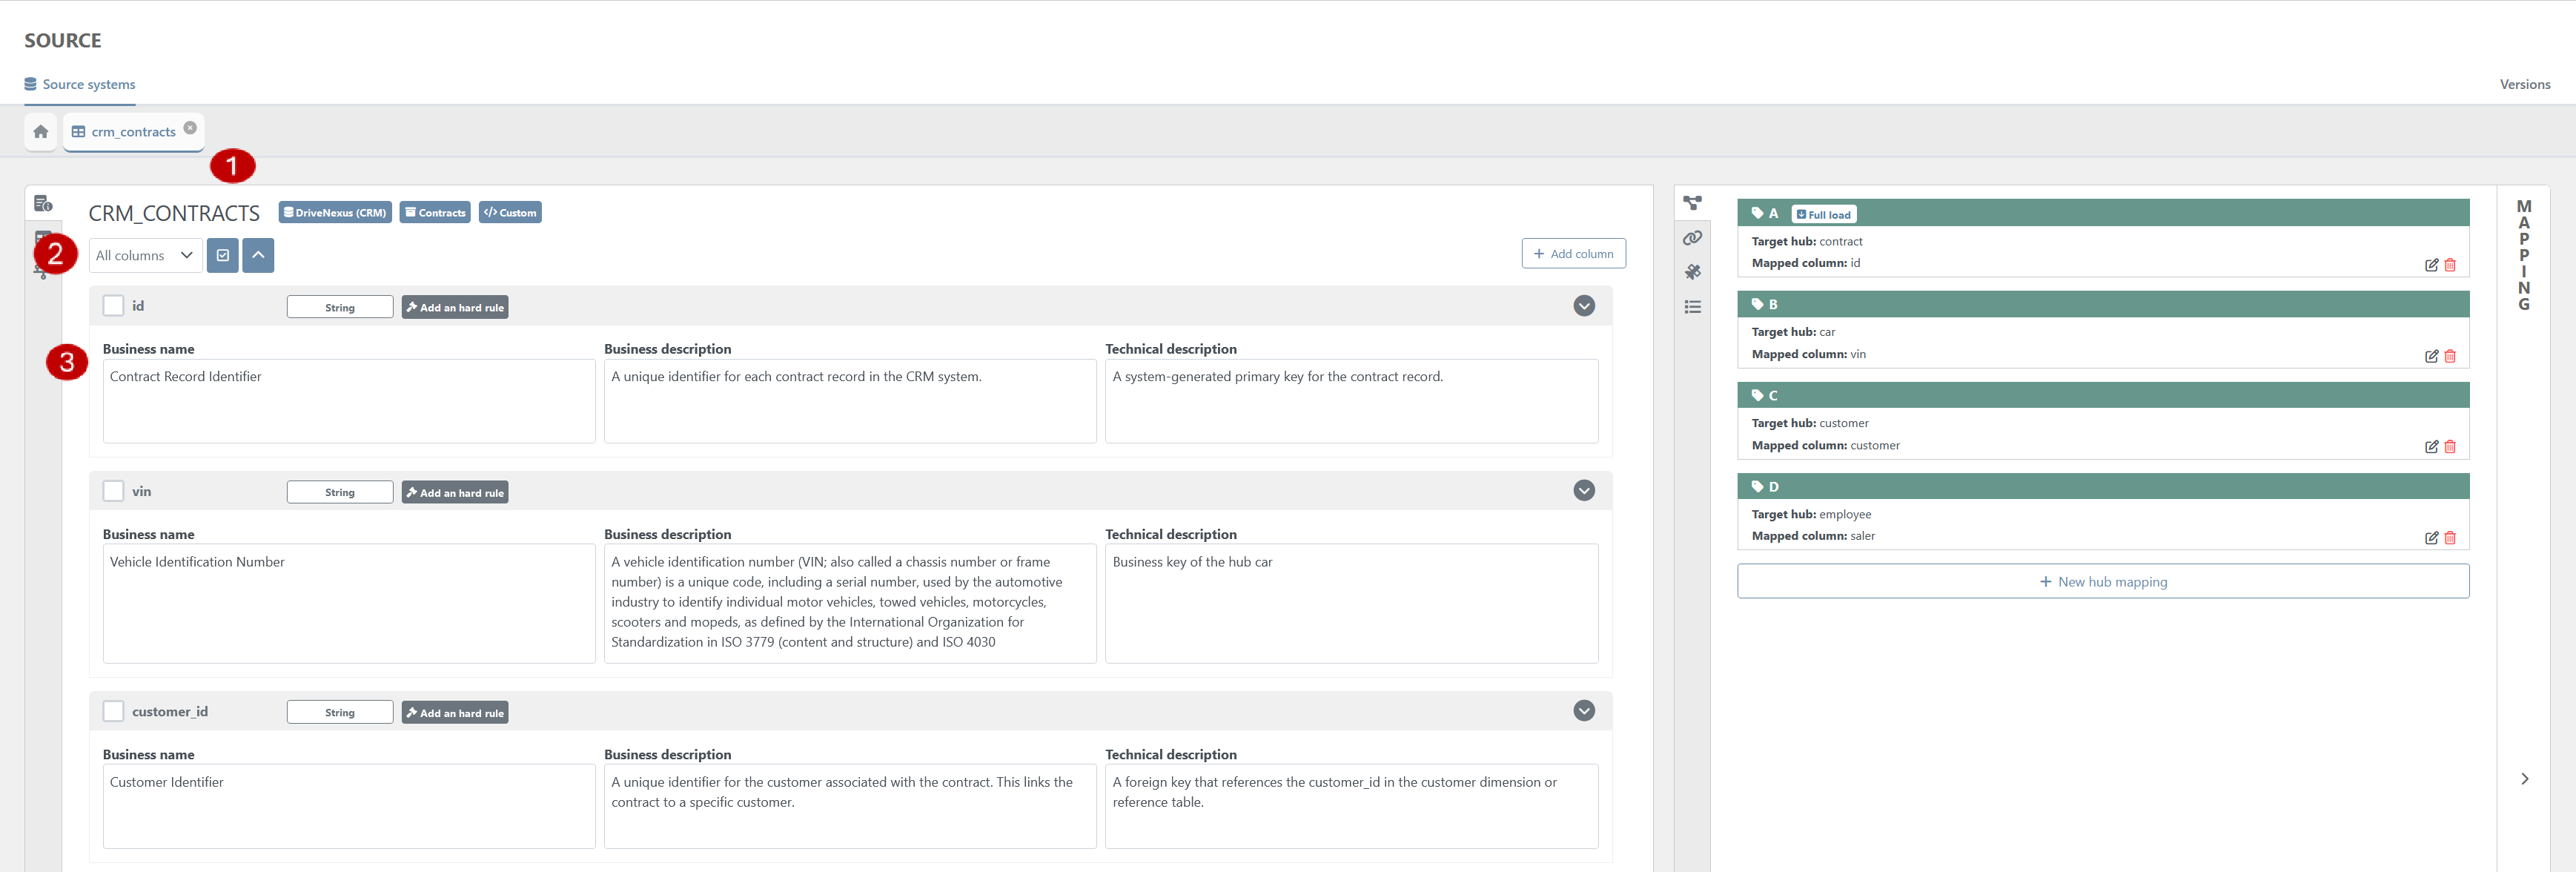
The metadata tab of the staging tables displays some information:
Descriptive data: It contains the name of the staging table as well as the source it’s coming from
A multi-select: It allows users to select one/several columns to display
Columns Metadata: The metadata of the staging table’s columns in the modeling environment
Business Name: Usual name of the column. Does not need to follow some formatting rules
Business Description: Description for the business users
Technical Description: Description for the technical users
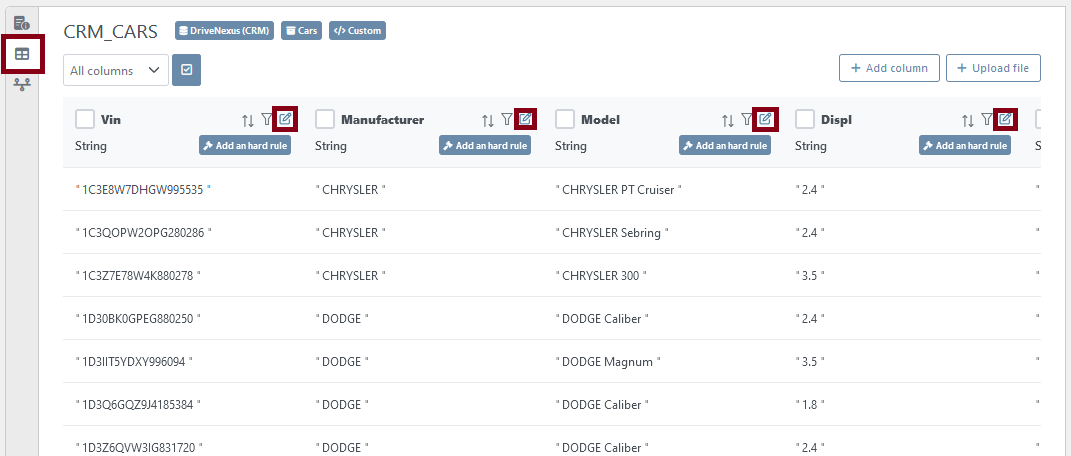
Data Tab

The data tab of the staging tables displays some information:
Descriptive data: It contains the name of the staging table as well as the source it’s coming from
A multi-select: It allows users to select one/several columns to display
Data Columns: The data stored in the different columns of the staging table
Editing Buttons: Specific button for editing
Add Column: Add a column to the staging table (not available for tables created from SQL script)
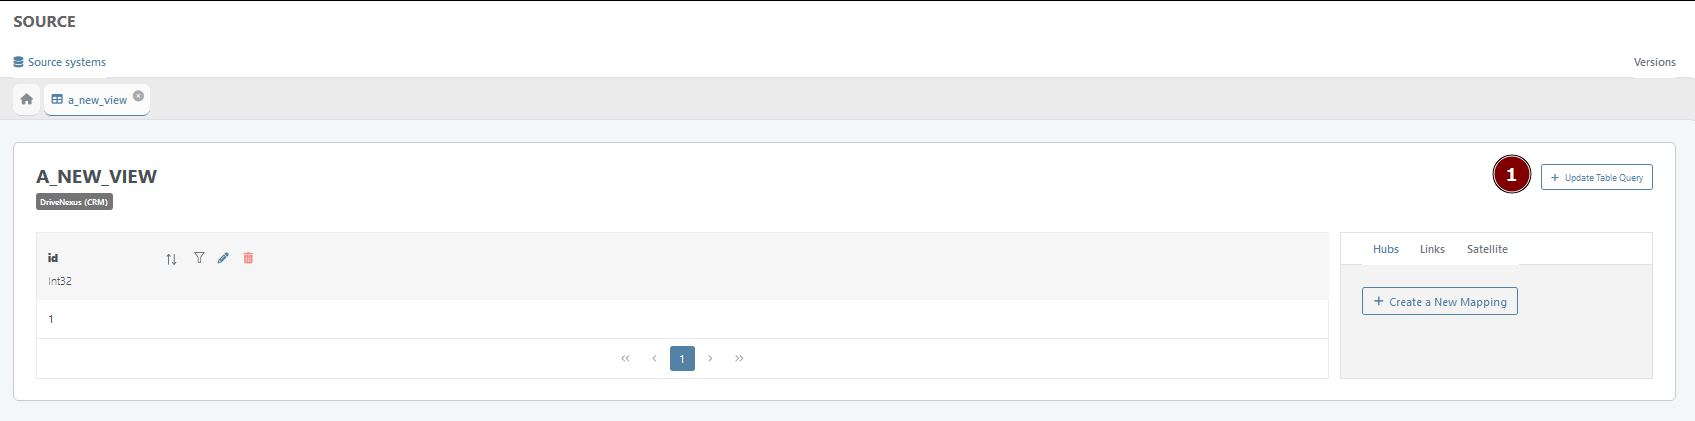
Update Table Query: Allows the user to modify the SQL script to create the table or the view. (only available for table created from a SQL script. CFR staging table creation)
Connections Tab
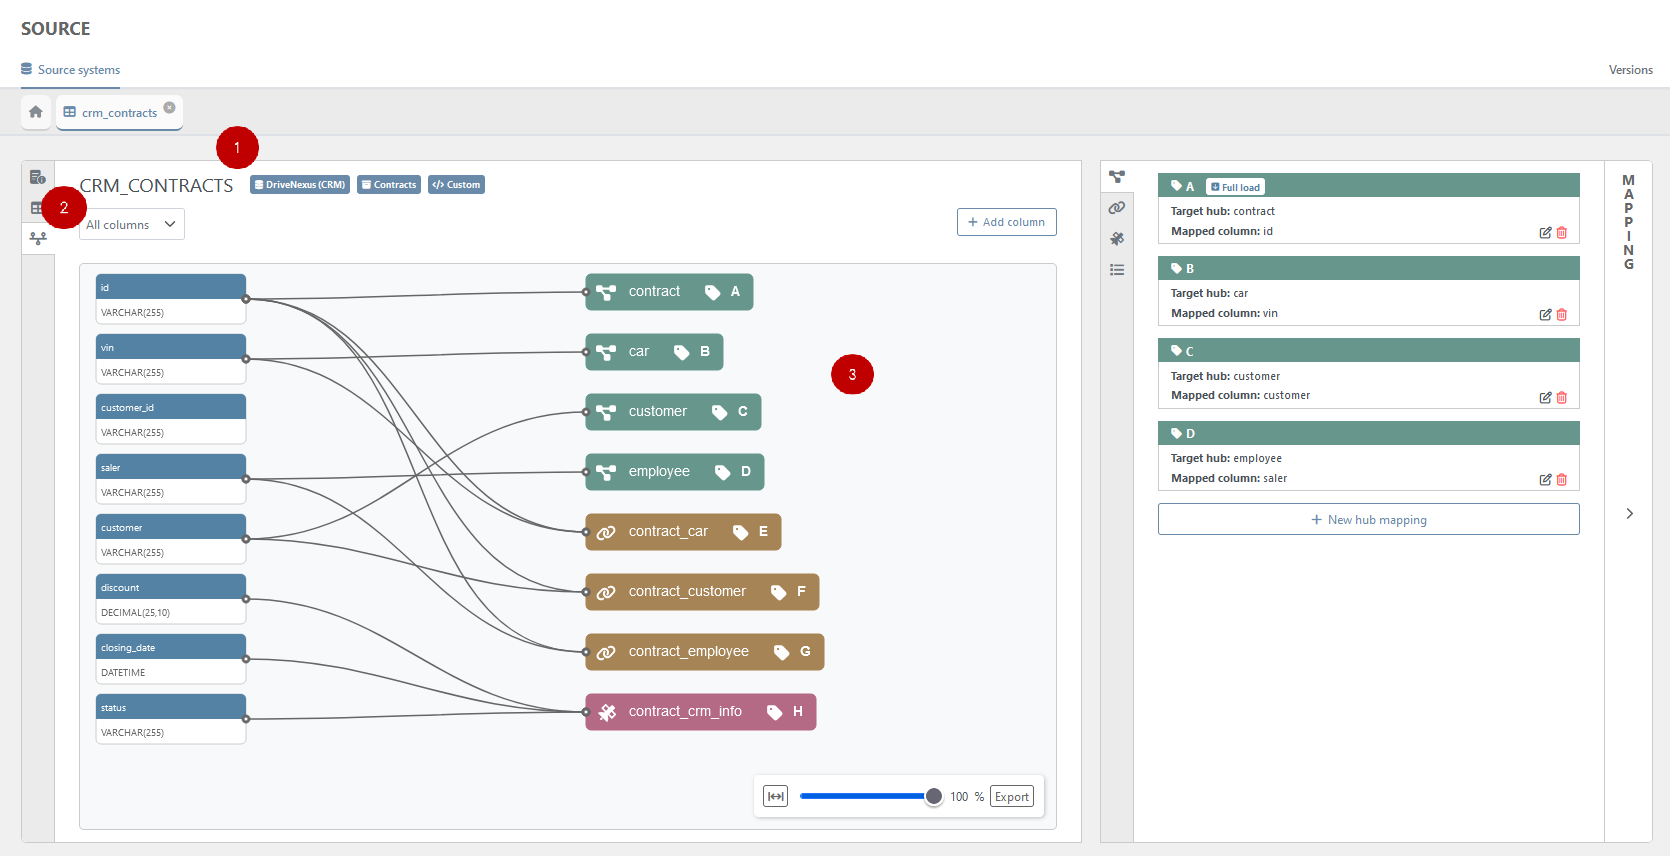
The connections tab of the staging tables displays some information:
Descriptive data: It contains the name of the staging table as well as the source it’s coming from
A multi-select: It allows users to select one/several columns to display
Data Lineage Graph: The graph representing the mapping of the different entities (each kind of entities defined by a specific color) within the staging table
Edit the staging table
In the top-right corner of the tab, the users can find some action buttons depending on the type of staging table it is.
Upload file : Allows the user to upload the data from either an Excel file or a CSV file into the staging table (not available for views)
Add Column : Add a column to the staging table (not available for tables created from SQL script)
Update Table Query: Allows the user to modify the SQL script to create the table or the view. (only available for table created from a SQL script. CFR staging table creation)
Add a column
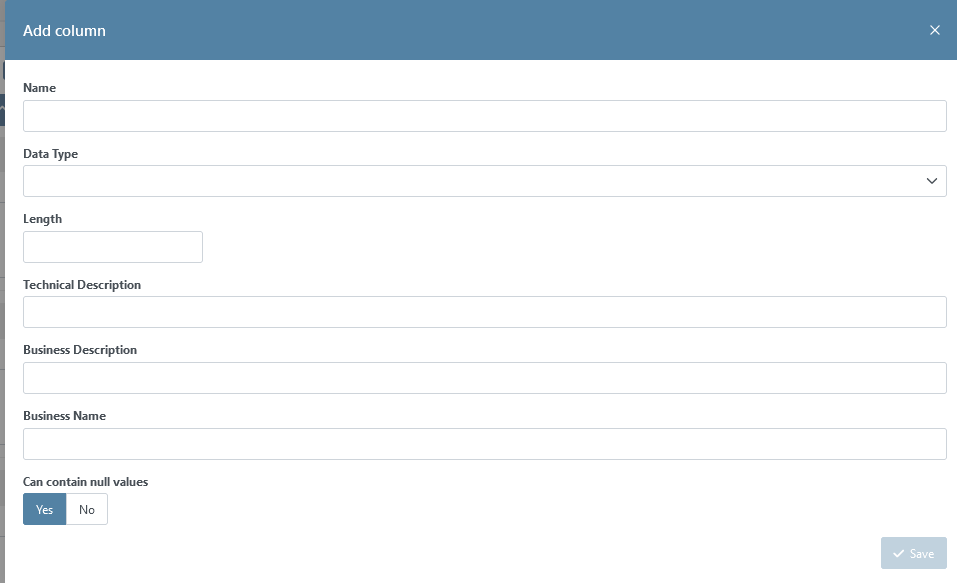
The users can add a new column to the staging table by clicking on the “Add column” button. It opens a modal with the descriptive information the users need to fill in.
Name: MANDATORY — The name of the column. This name will be used in the database and therefore must comply with the type of the database of the environments of the project.
Data Type: — the type of the column in the database
 additional information may be required based on the type selected (e.g., Length for the String like in the screenshot below)
Database types: Data Type correspondence
Technical description: — description for the technical users
Business Description: — description for the business users
Business name: — Usual name of the column. Does not need to follow some formatting rules.
Required: — Option to specify whether the column accepts null value or not
This option cannot be checked if there is already some data in the modeling environment
Upload a file
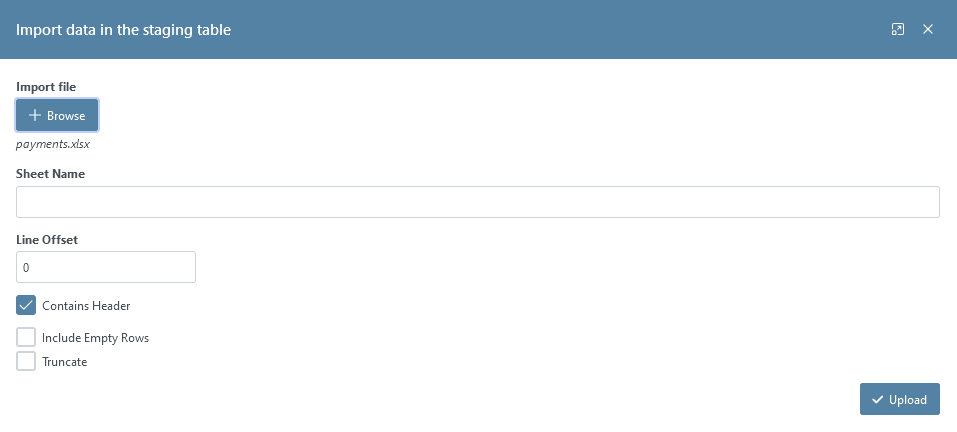
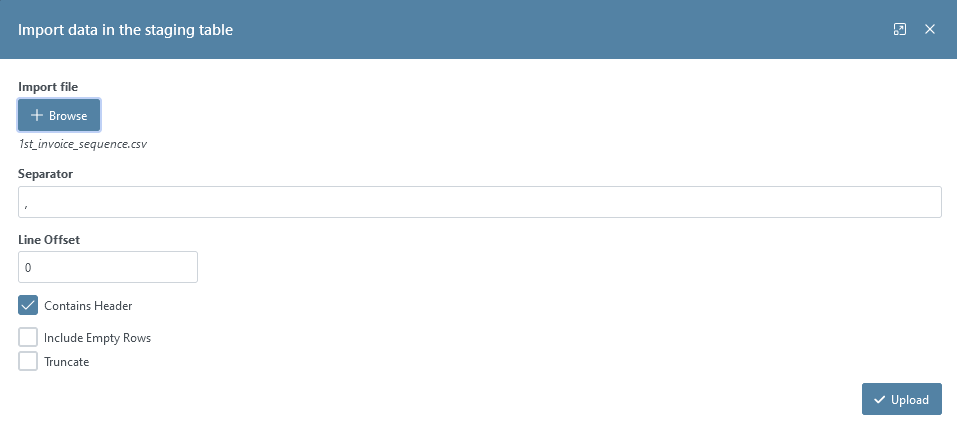
Clicking on the “Import File” button will open a modal where the users can upload a file (CSV, XLSX, XLS). The available option will then depend on the type of file uploaded.
XLSX, XLS
When uploading an XLS or XLSX file, the users need to specify
Sheet name: MANDATORY — Name of a specific tab in your file.
Line offset: OPTIONAL — Option that allows you to skip a certain number of rows at the beginning of the sheet.
Contains Header: MANDATORY — Option that specifies whether the first row of the sheet, or the first row after the line offset, should be used as column headers in the created staging table. If this option is not selected, the Excel column names (A, B, C, etc.) will be used as the column headers.
Include empty rows: MANDATORY — option that allows you to choose whether to include empty rows found at the end of the sheet in the imported data. This option is set to false by default.
Truncate: MANDATORY — option to truncate the table before inserting the new data. Checking this option will erase all the data from the staging table
CSV
When uploading a CSV, the users need to specify
Separator: MANDATORY — The separator field allows you to specify the character that is used to separate values in the CSV file. The default separator is a comma.
Contains Header: MANDATORY — Option that specifies whether the first row of the sheet, or the first row after the line offset, should be used as column headers in the created staging table.
Truncate: MANDATORY — option to truncate the table before inserting the new data. Checking this option will erase all the data from the staging table
Edit a column
To edit a column, the users need to click on the edit button of the column they want to change in the Data Tab or directly in the Metadata Tab.
Metadata Tab
Data Tab
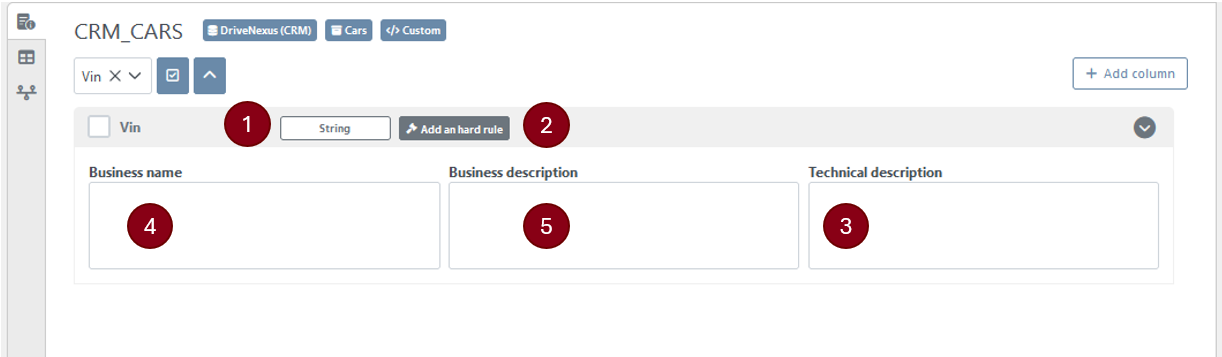
Data Type in staging: It is the type of column directly in the staging. This field cannot be updated.
Add a Hard Rule: Button to define a hard rule for the field
Technical description: description for the technical users
Business name: Usual name of the column. Does not need to follow some formatting rules.
Business Description: description for the business users
When You click on the button “Add a hard rule”, you will open a window that will allow you to define the hard rule you want:

Hard Rule: SQL script to be applied on the column before being loaded in the data model. Hard rules should exclusively be used for formatting and casting the column to another type.
Example of hard rules in PostgreSQL:NULLIF(name,'')
is_valid::bool
(CASE WHEN is_valid = ‘Yes’ THEN TRUE WHEN is_valid = ‘No’ THEN FALSE ELSE NULL END)::bool
to_date(start_date, ‘YYYY/MM/DD’)
price::decimal(25,10)
Hard rule output type: destination type of the column. This type will be used as the type for the column’s satellite.
Hard rule output type options: options depending on the type selected for the output of the hard rule
Delete a column
To delete a column, the user can use the trash can button of the column to be removed that will appear once he has selected the column.
![]() The column cannot be deleted if the staging table is a view or if the column is already mapped.
The column cannot be deleted if the staging table is a view or if the column is already mapped.
Mapping
The mapping is used to make the link between the staging table and the data model created in the “Build” module.
Hub mapping
The new mapping of a hub can be done in the ‘Source’ module after choosing the staging table that needs a mapping.
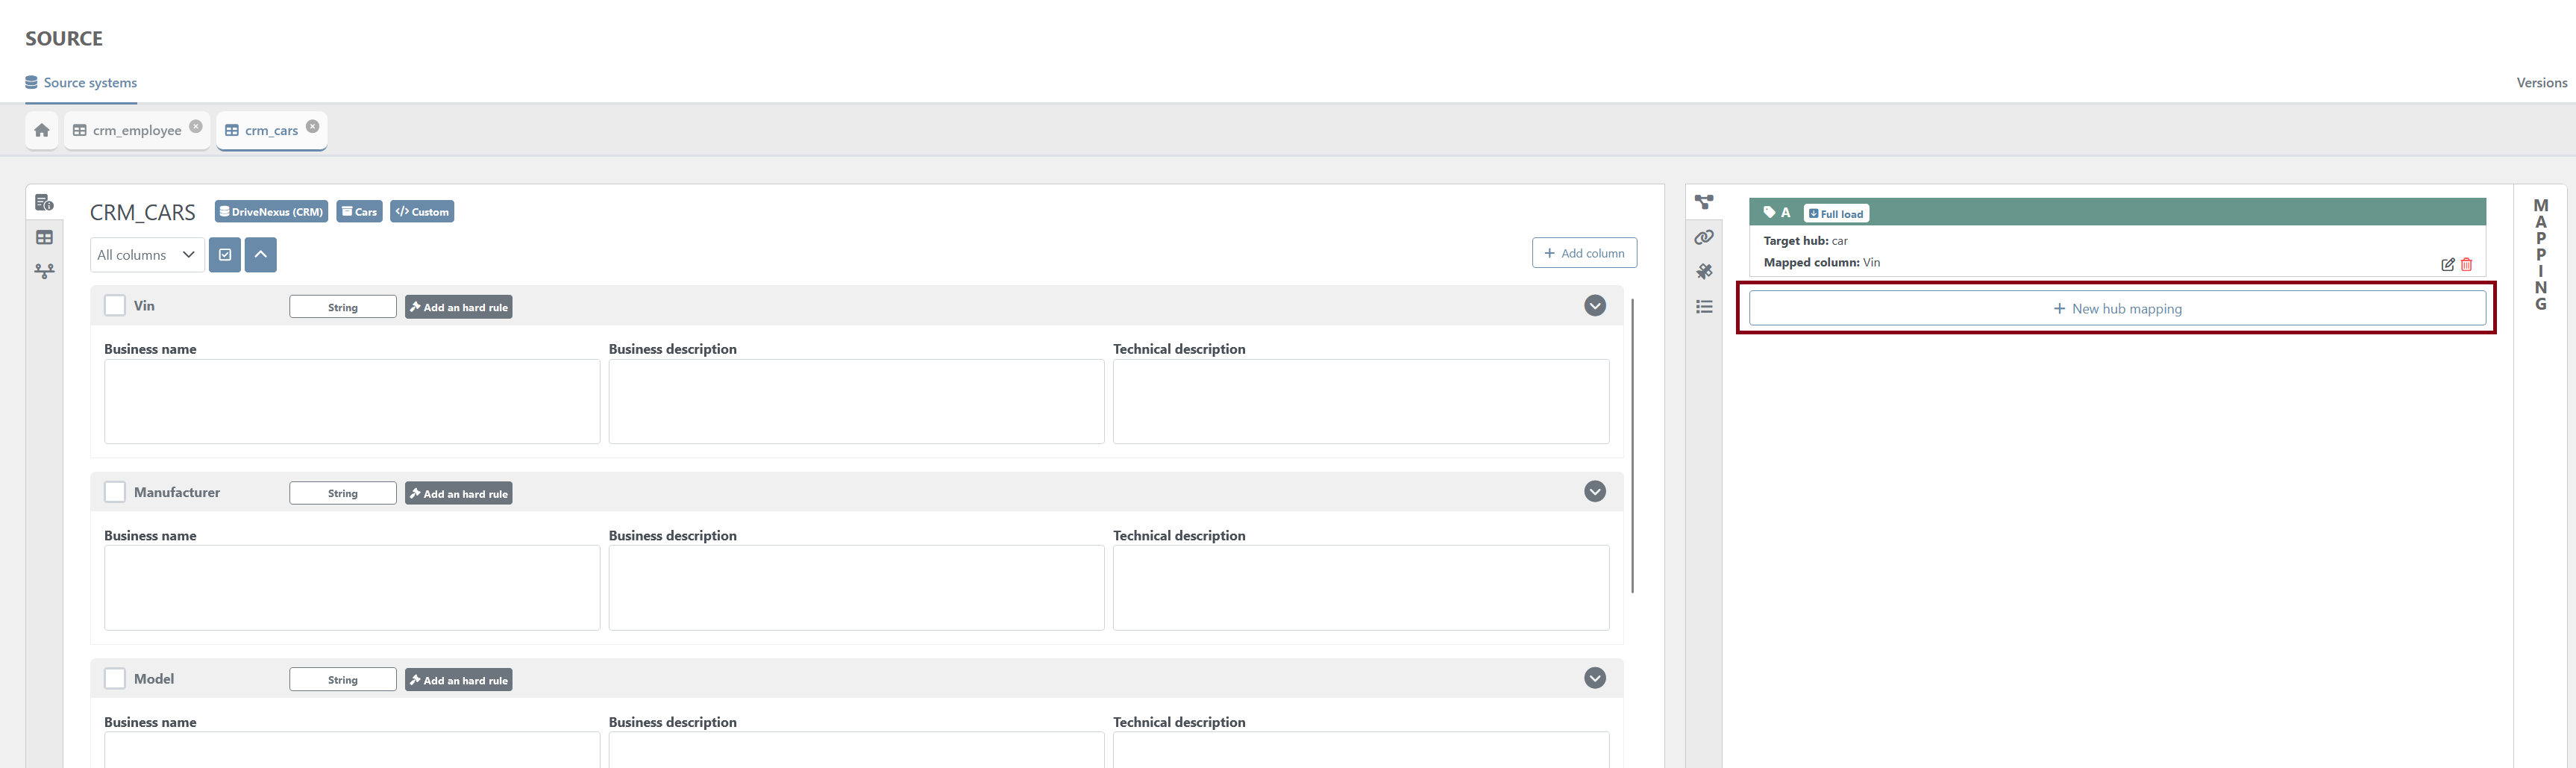
Then the creation hub mapping page will appear.
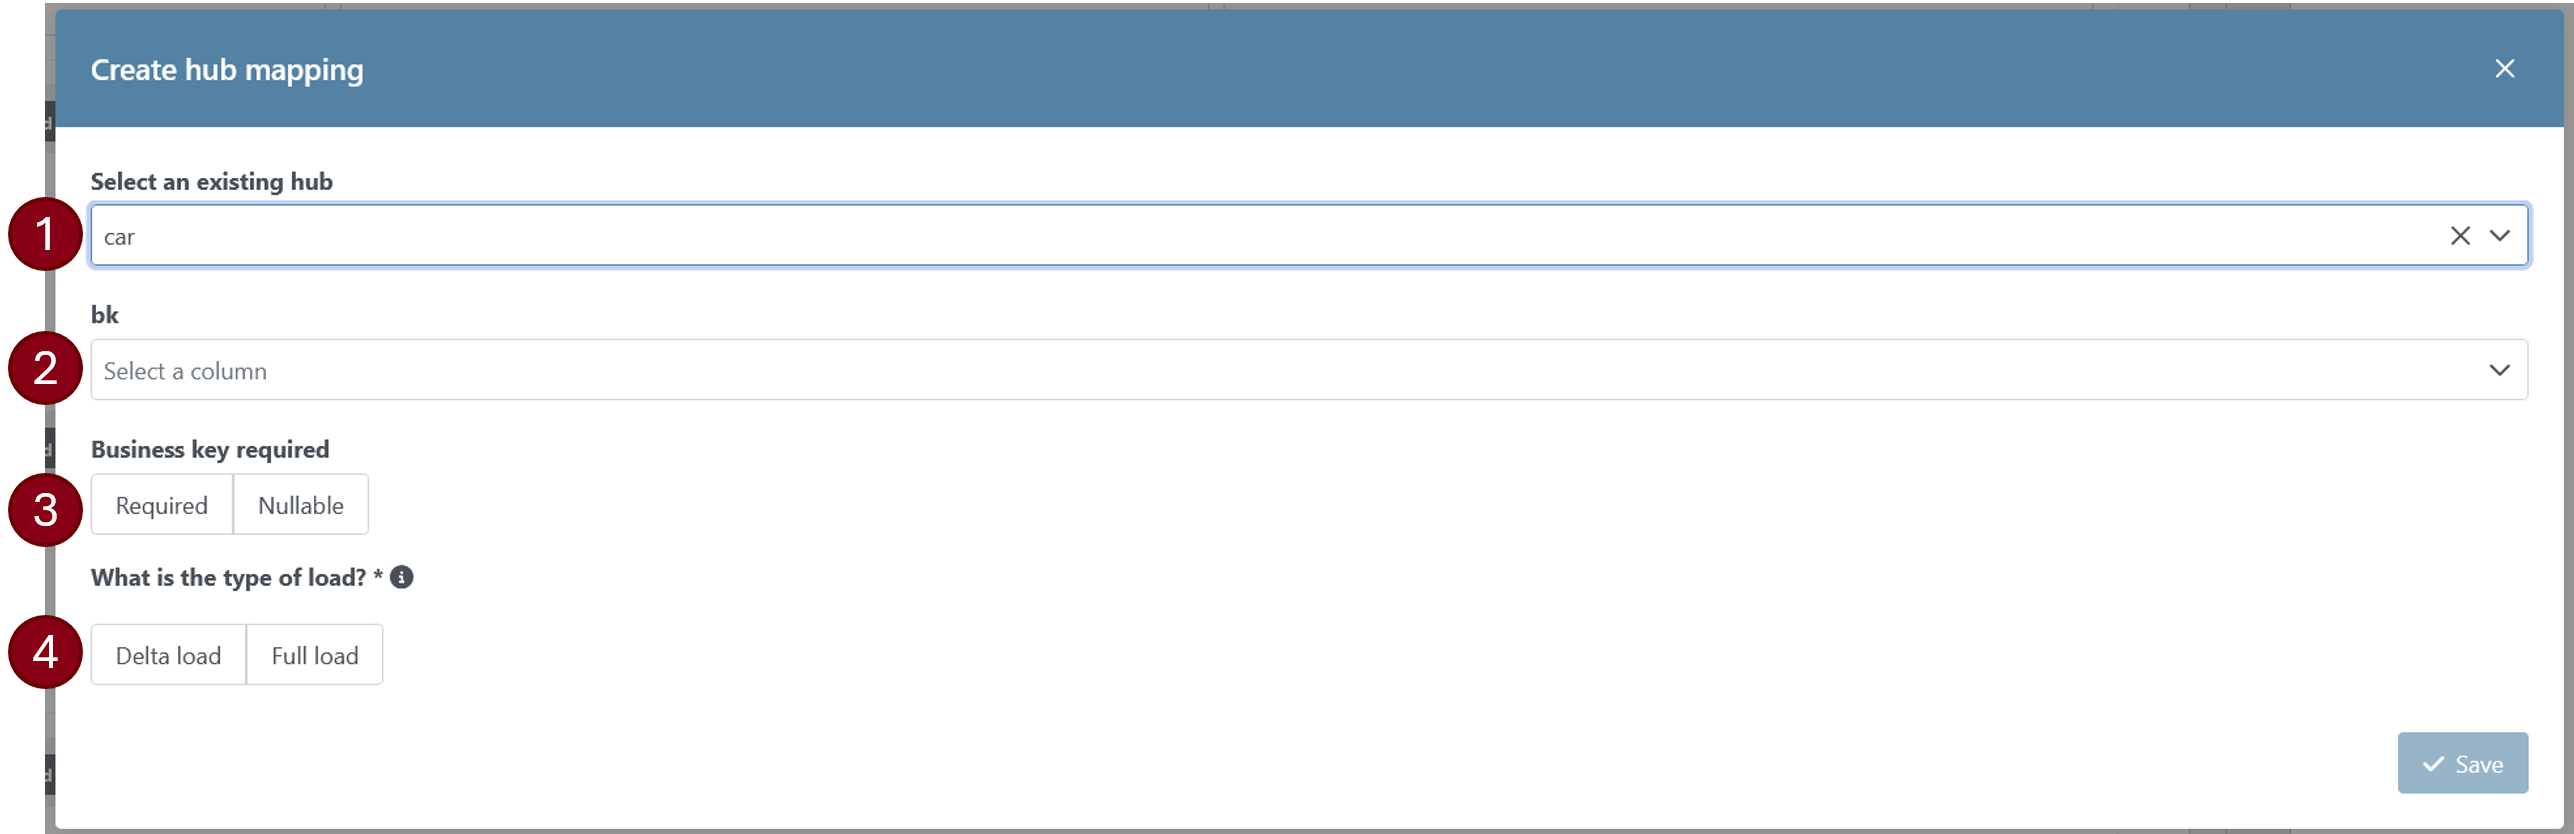
From this page, the user must provide
Select an existing hub: MANDATORY — select a hub in the dropdown list.
bk [string]: MANDATORY — Column that contains the business
Expect null business key: — May the column contain NULL values in a business standpoint? This information will determine which ghost record to apply in related link.
Type of load: MANDATORY — Define if this staging table is a delta load (only a sub-set of objects) or if it as full load (all objects) for the mapped hub in the current source.
In case of a full load, an effectivity satellite will be created to track the presence of records in each load.
You can only set one mapping as a full load per hub and per source
Link mapping
The new mapping of a link can be done in the ‘Source’ module after choosing the staging table that needs a mapping.
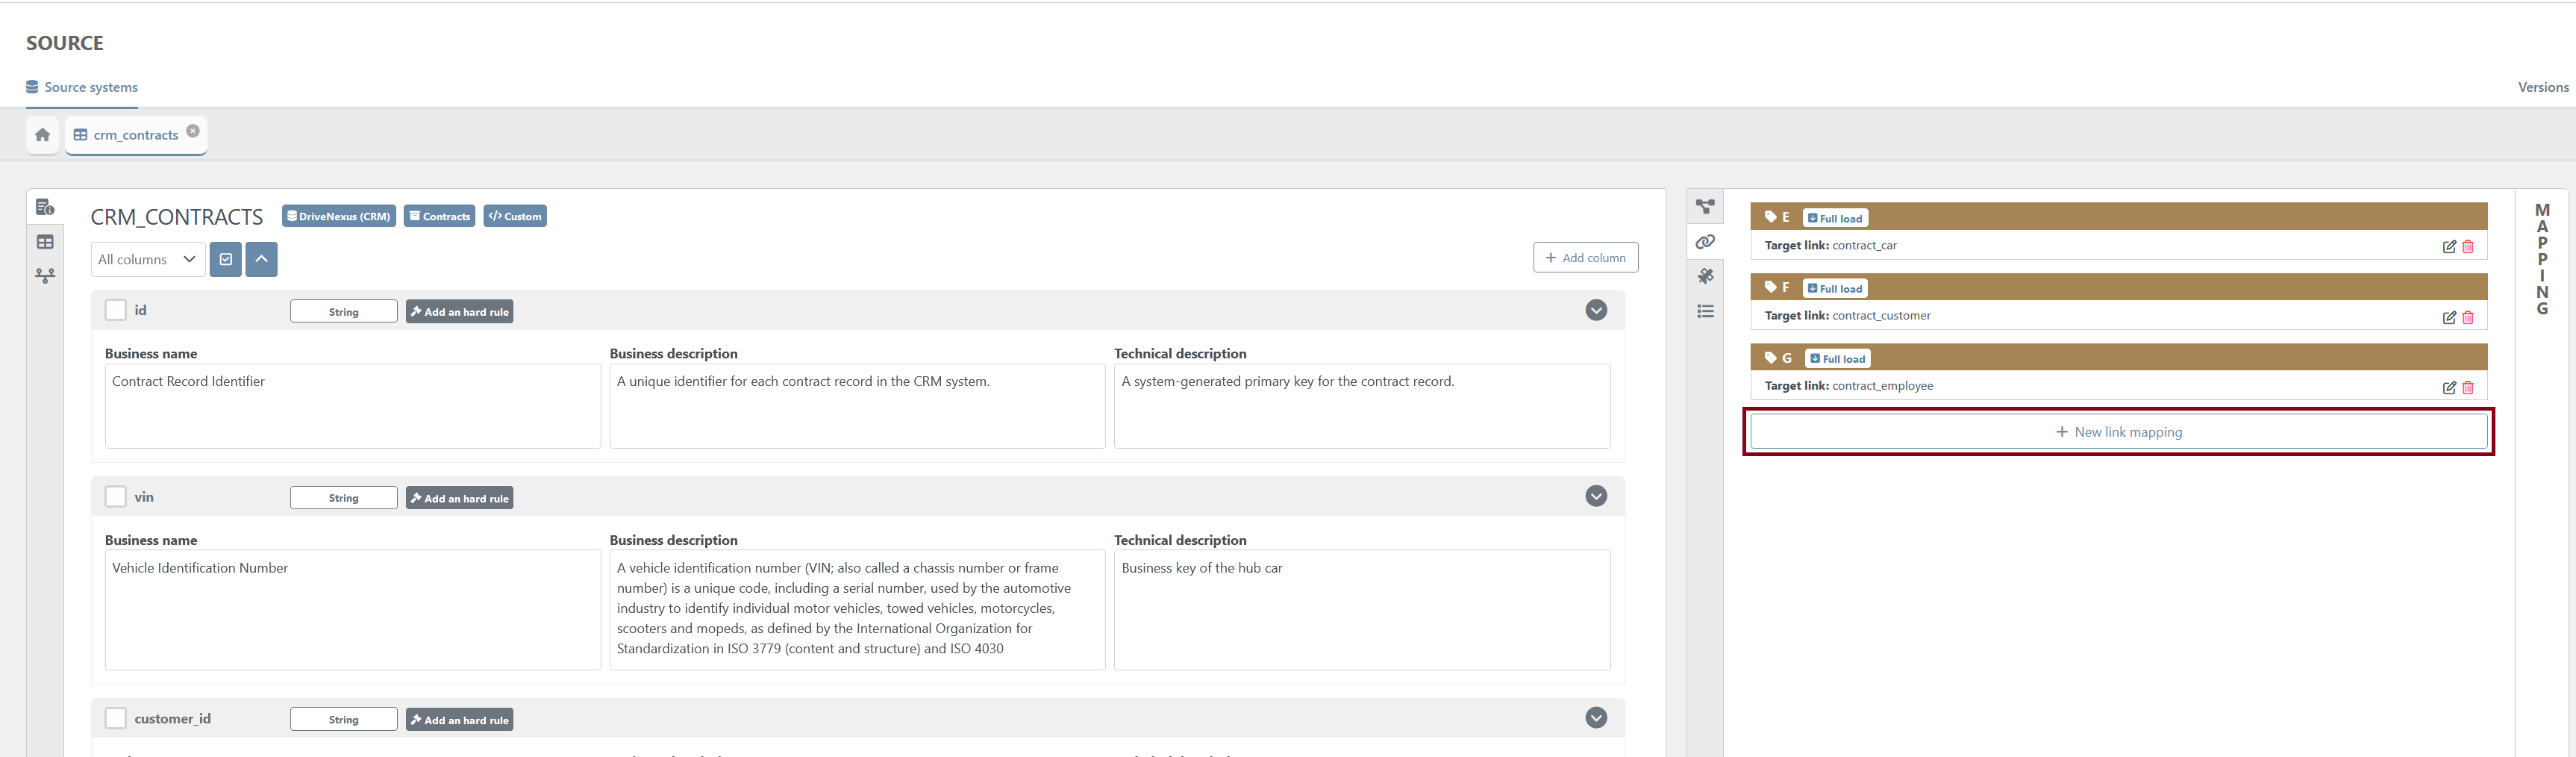
Then the creation link mapping page will appear.
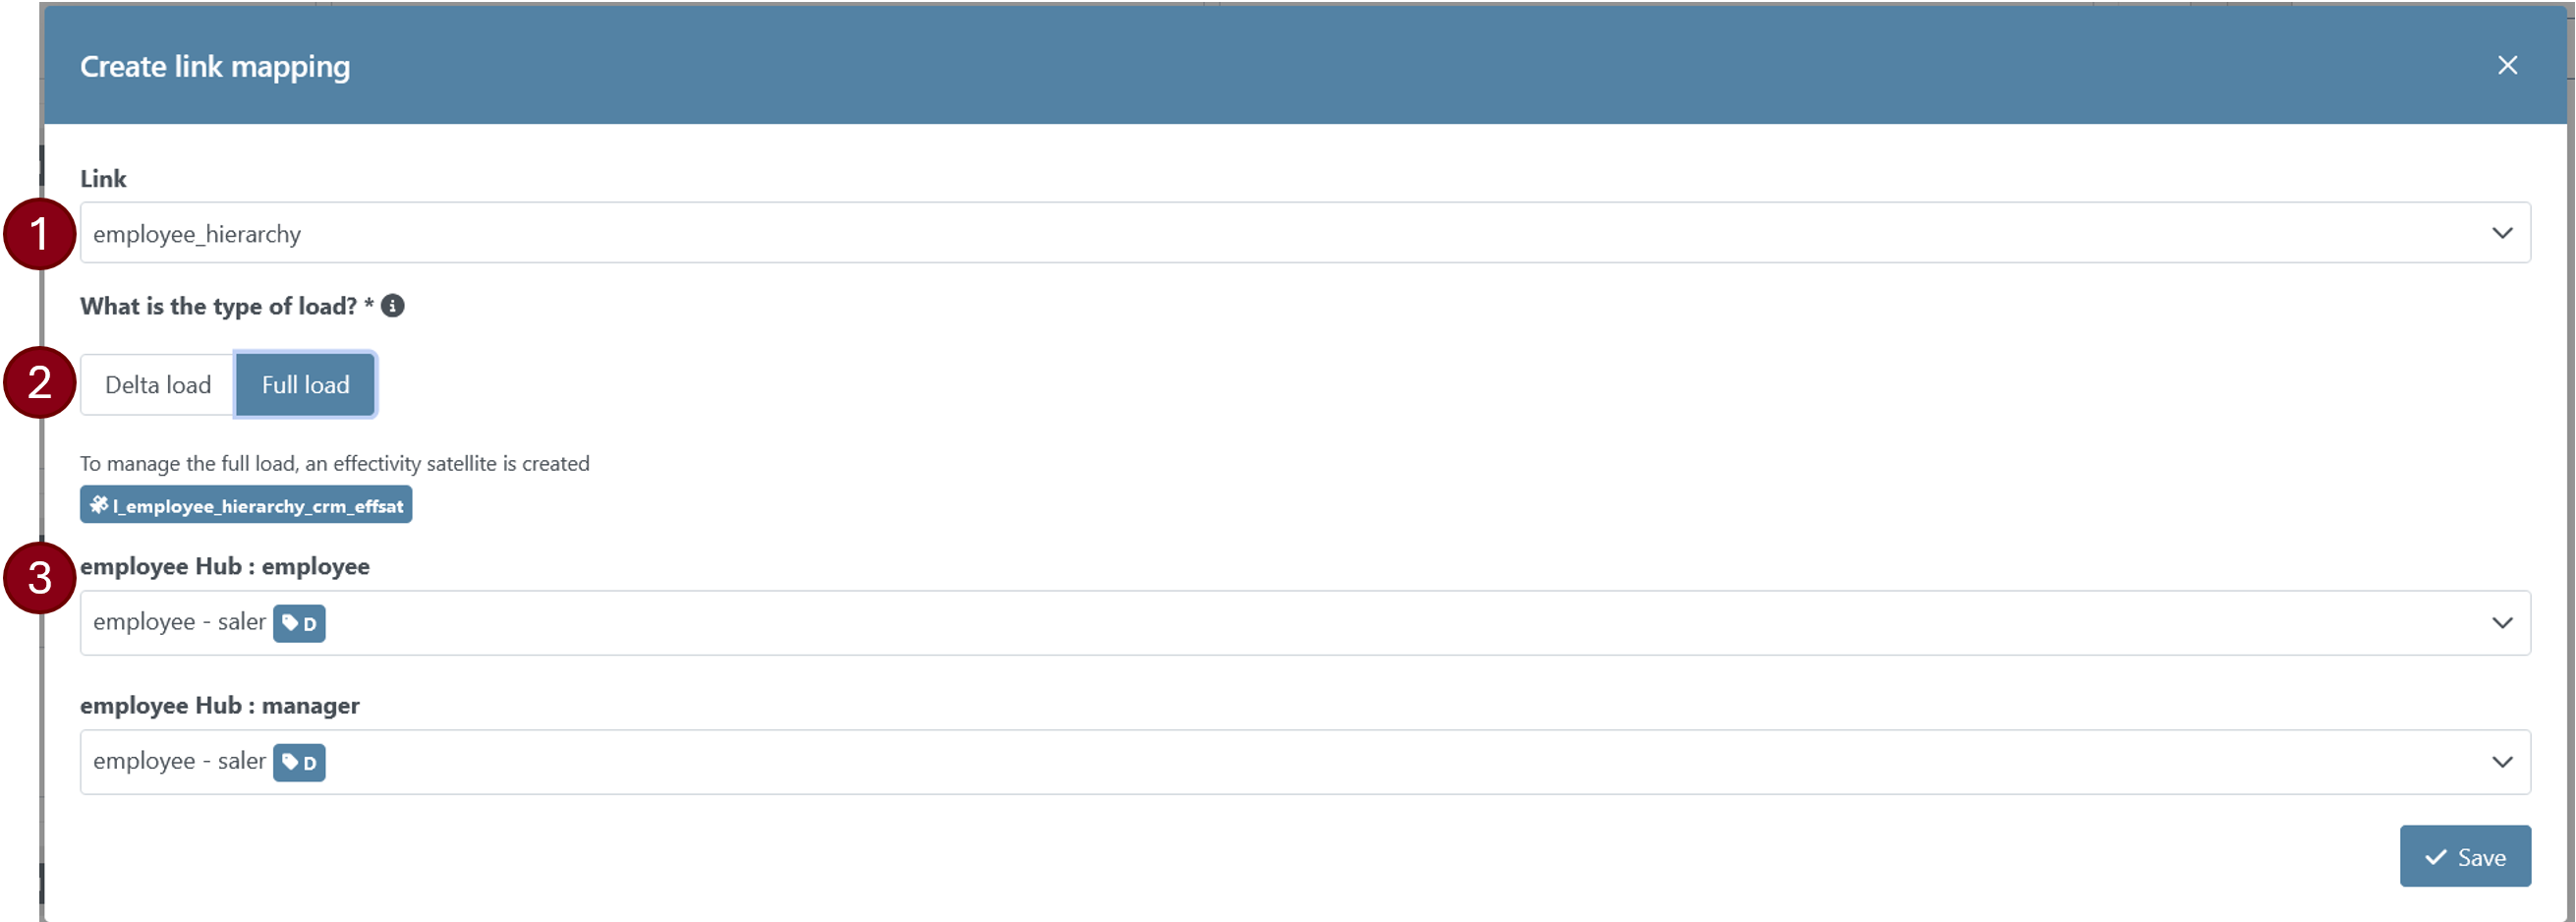
To create a link mapping, the users will need to provide the following information:
Link: MANDATORY — Select an existing link.
Type of load: MANDATORY — Define if this staging table is a delta load (only a sub-set of objects) or if it as full load (all objects) for the mapped link in the current source.
In case of a full load, an effectivity satellite will be created to track the presence of records in each load.
You can only set one mapping as a full load per link and per source
Hub references and dependent children: MANDATORY — Select the mappings of the hub for each hub reference and the column to map to the dependent children
Satellite mapping
Since the satellite are always source related, they can only be created from these staging table tabs.
Then the creation link mapping page will appear.
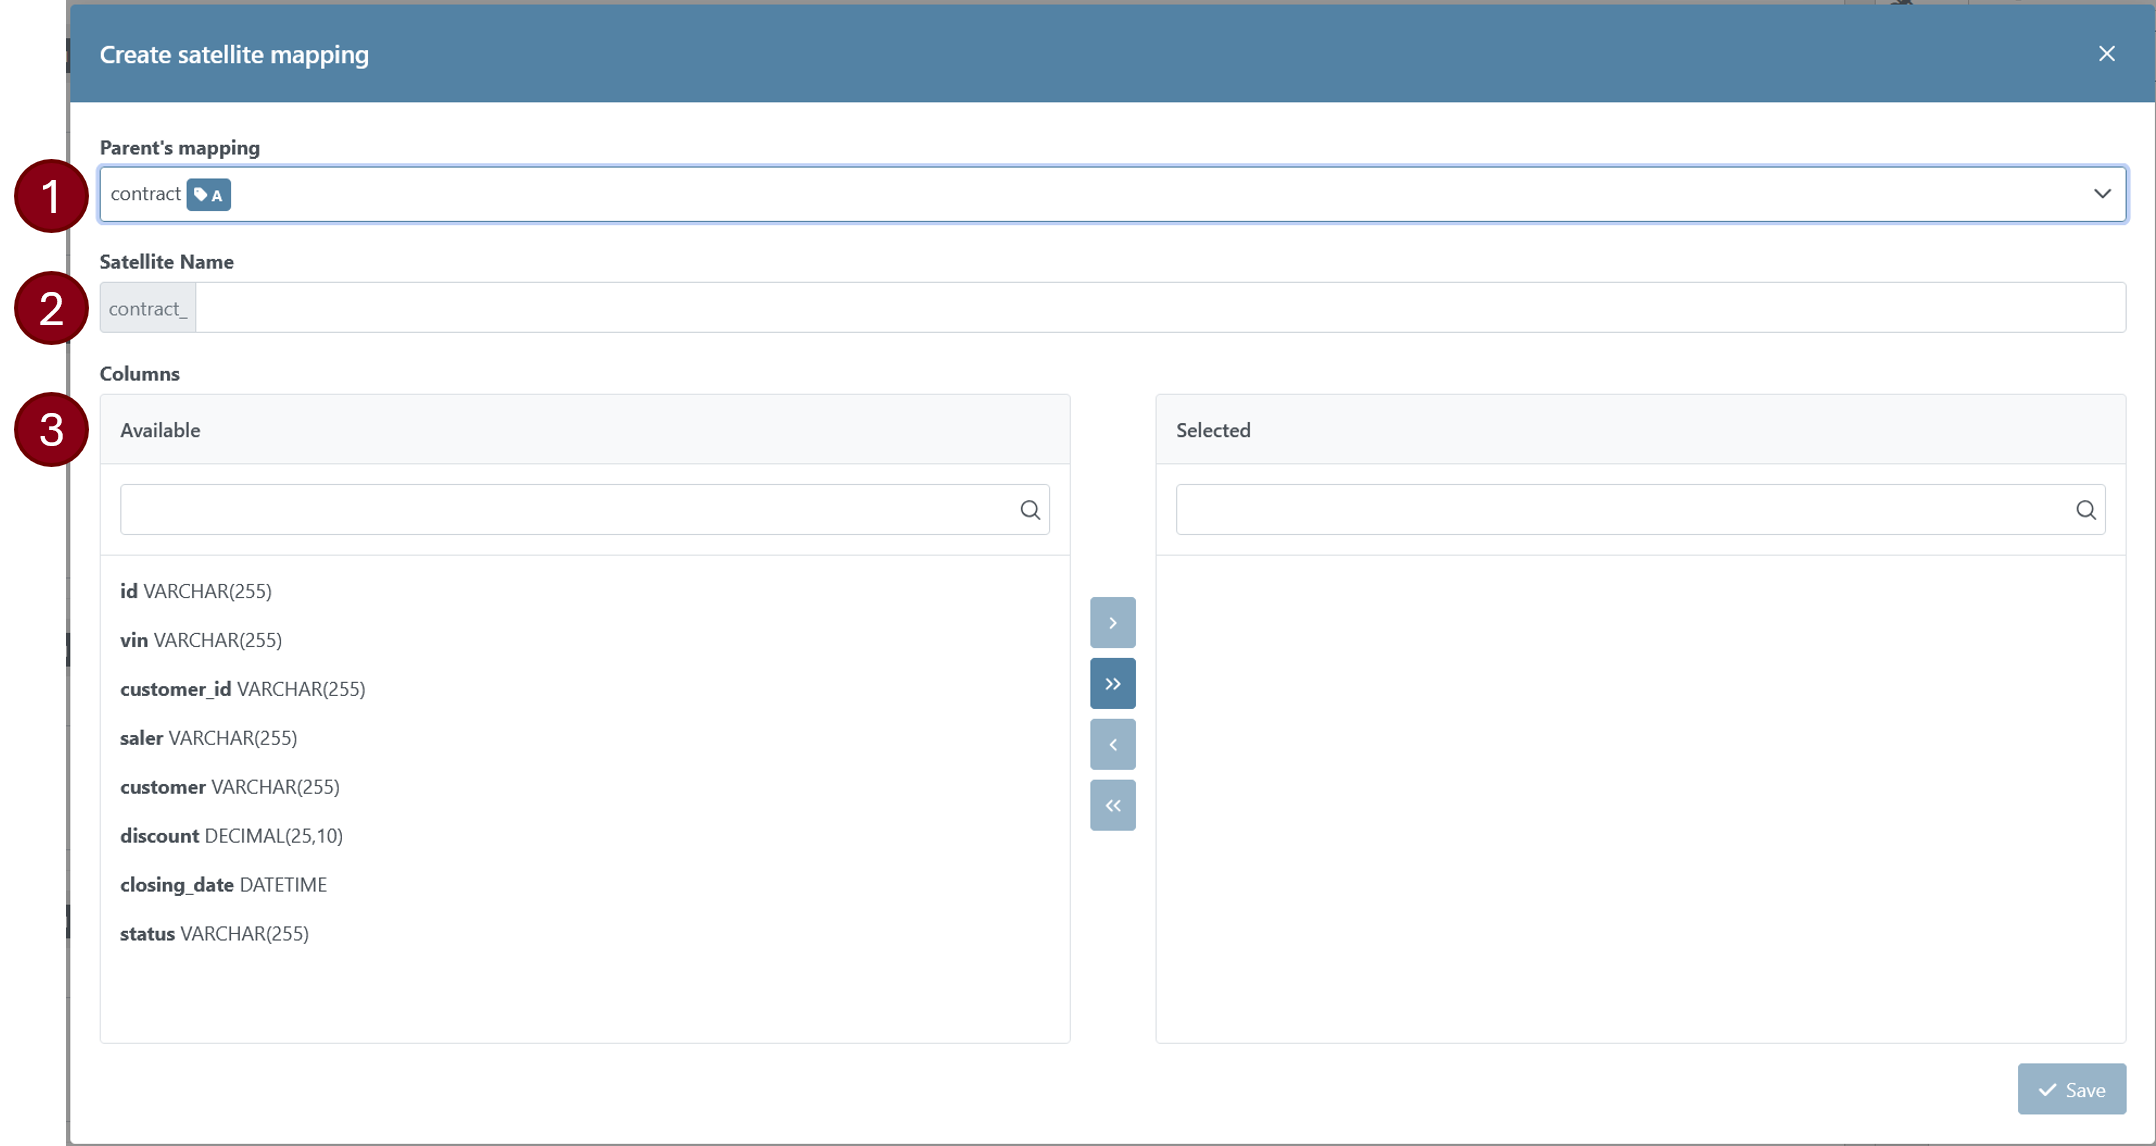
To create a satellite, the users will need to provide the following information:
Parent’s mapping: MANDATORY — Select a mapping from the selection available in the dropdown list. The satellite will be attached to the entity of the selected mapping.
Satellite Name: MANDATORY — Name of the satellite. To avoid conflict with other satellites from other sources, we recommend prefixing them with the source name
the satellite’s table will be prefixed by its parent’s name. Therefore, there is no need to add it. Columns Selection: MANDATORY — Select the column(s) of the staging table that you want to display in the satellite
Reference Table mapping
The new mapping of a reference table can be done in the ‘Source’ module after choosing the staging table that needs a mapping.
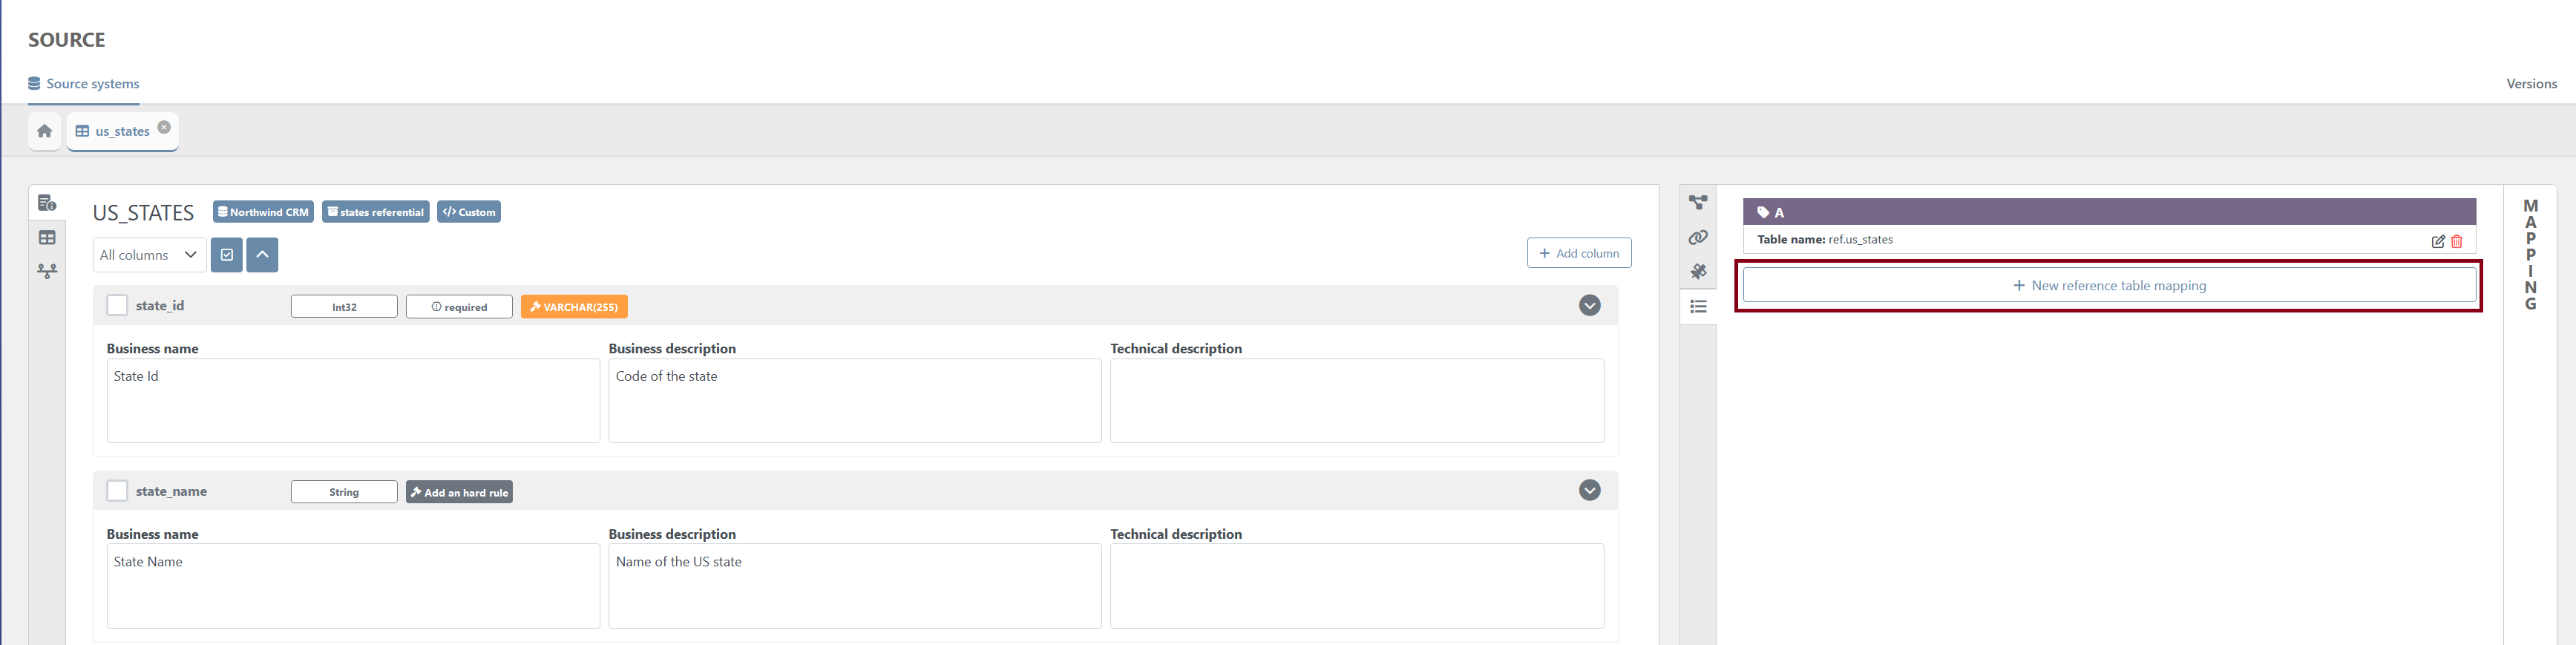
The creation page for the reference table will appear.
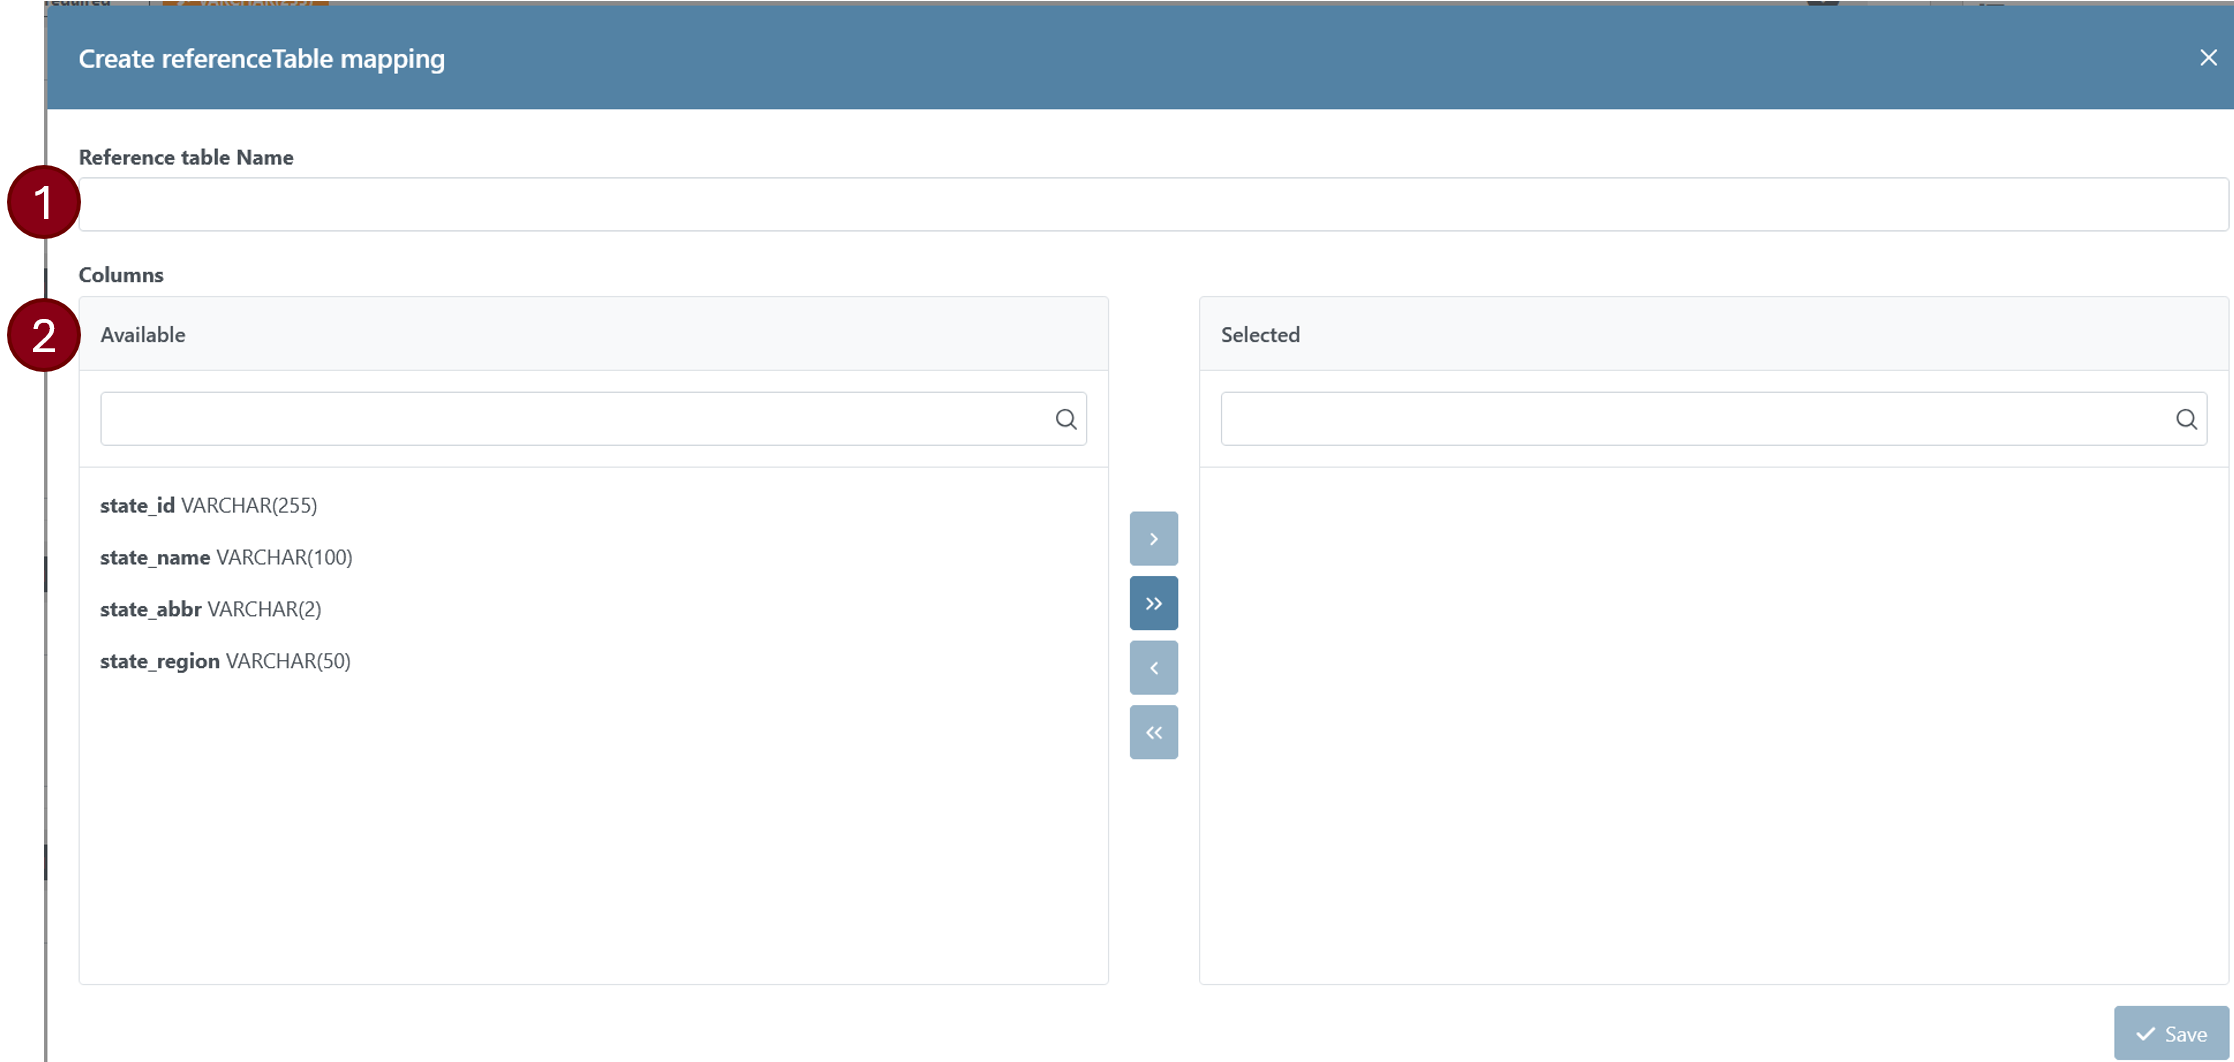
To create a reference table, the users will need to provide the following information:
Reference Table Name: MANDATORY — Name of the reference table
Columns Selection: MANDATORY — Select the column(s) of the staging table that you want to display in the reference table
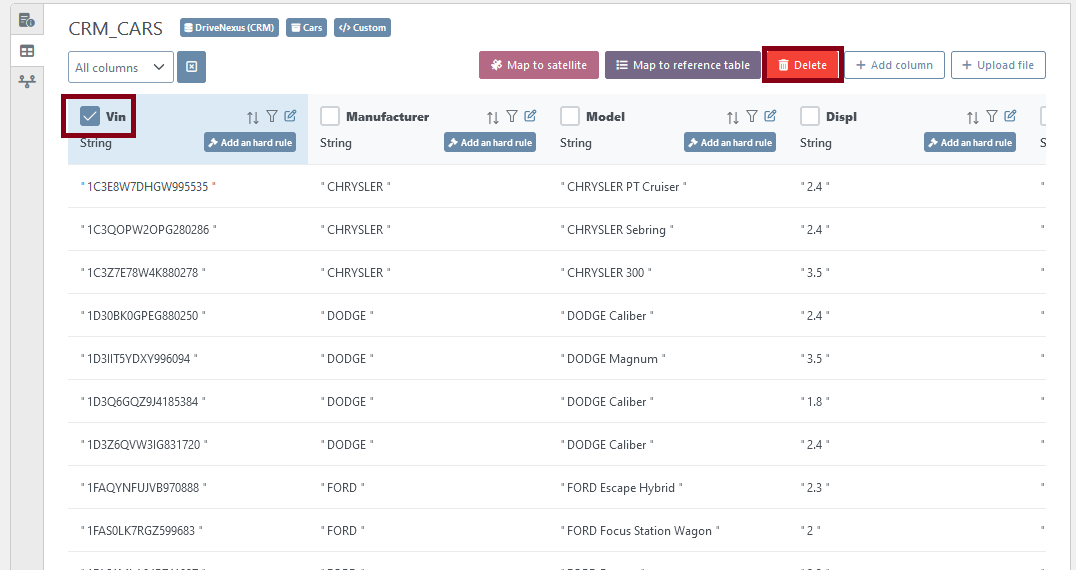
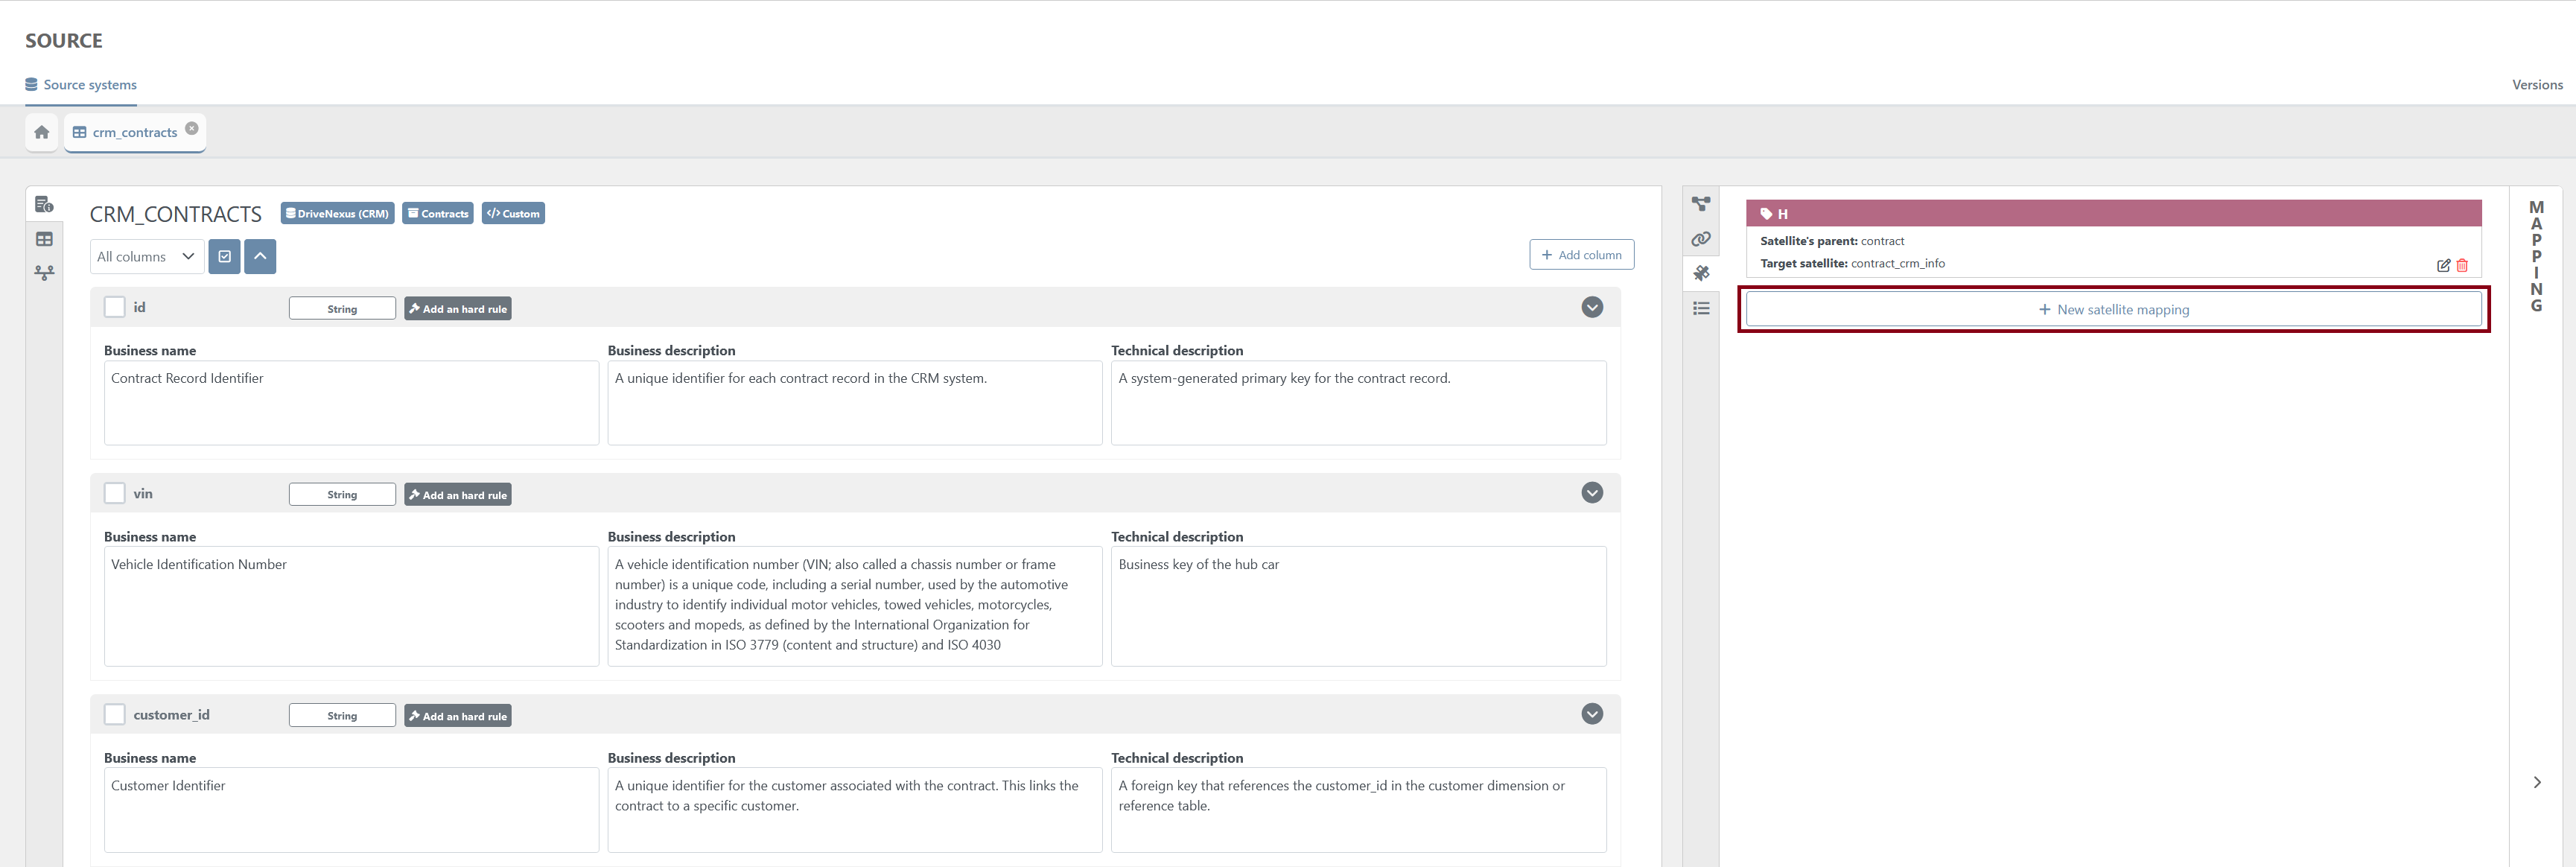
Reference table / Satellite mappings
Users can also initiate the mapping of a satellite or reference table by selecting columns from the staging tables.
When columns are selected, two new buttons appear in the upper right of the panel:
Map to satellite
Map to reference table
Clicking one of these buttons opens a pop-up wizard, which includes a pre-selection of columns based on the user’s earlier selection.
