Source Systems
The “Source Systems” submodules allows users to manage the metadata about the source systems and map the data from the staging area to the data model.
The metadata is organized in a tree with the following structure:
Sources > Data Packages > Staging Tables
Source Systems
This section allows users to add, edit, and delete the source systems that provide data for the application.
Create a Source
To create a new source, click on the “Create a new source” button in the top-right corner of the interface. A pop-up wizard will appear, requiring you to enter several required and optional attributes.
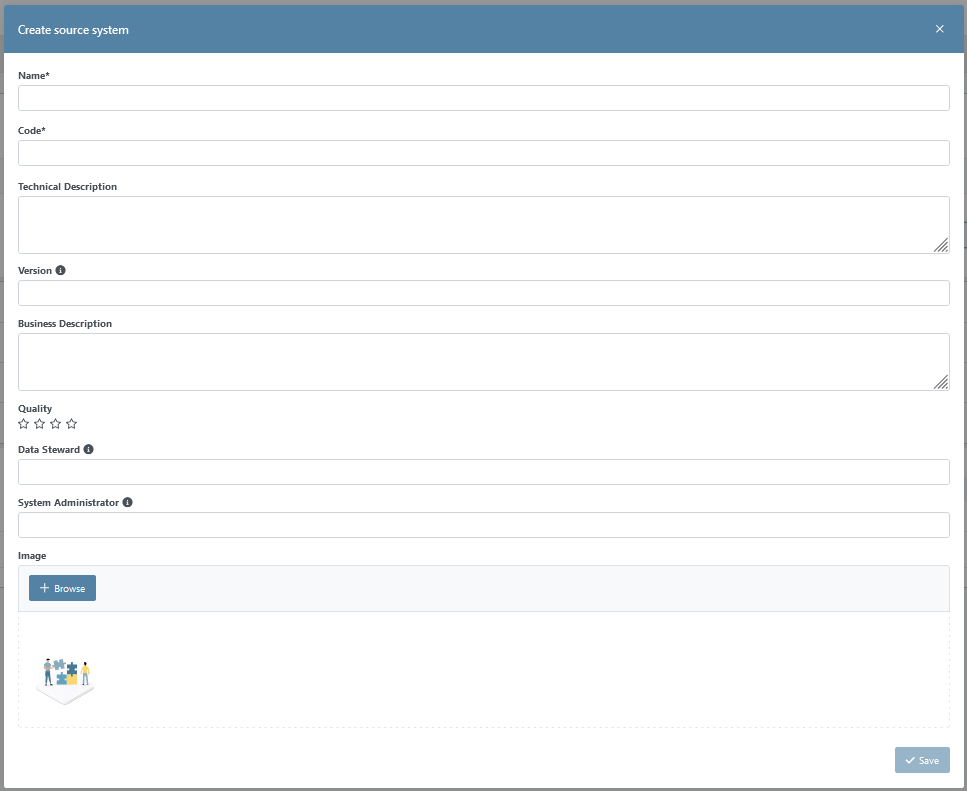
Specifically, you must provide:
Name: MANDATORY — The name of the source.
Code: MANDATORY — A unique technical identifier for the source system, used for metadata and documentation purposes.
Technical Description: OPTIONAL — A description of the source system in text format.
Business Description: OPTIONAL — Detailed information about the source system from a business perspective.
Version: OPTIONAL — The current version of the source system.
Data Steward: OPTIONAL — The name or contact information for the person responsible for managing the data elements of the source system.
System Administrator: OPTIONAL — The name or contact information for the person in charge of administering the system.
Quality Type: OPTIONAL — A description of the quality of the source system in text format (options include “None”, “Bad”, “Poor”, “Fair”, “Good”, and “Excellent”).
An image: OPTIONAL — A picture to illustrate and highlight your source systems in the homepage of the module
Once you have entered this information, click the “Save” button to create the new source.
If the source system is successfully created, it will appear in the list of source systems.
If you would rather not create the source system, click the “x” button on the top right of the pop-up.
Modify an Existing Source
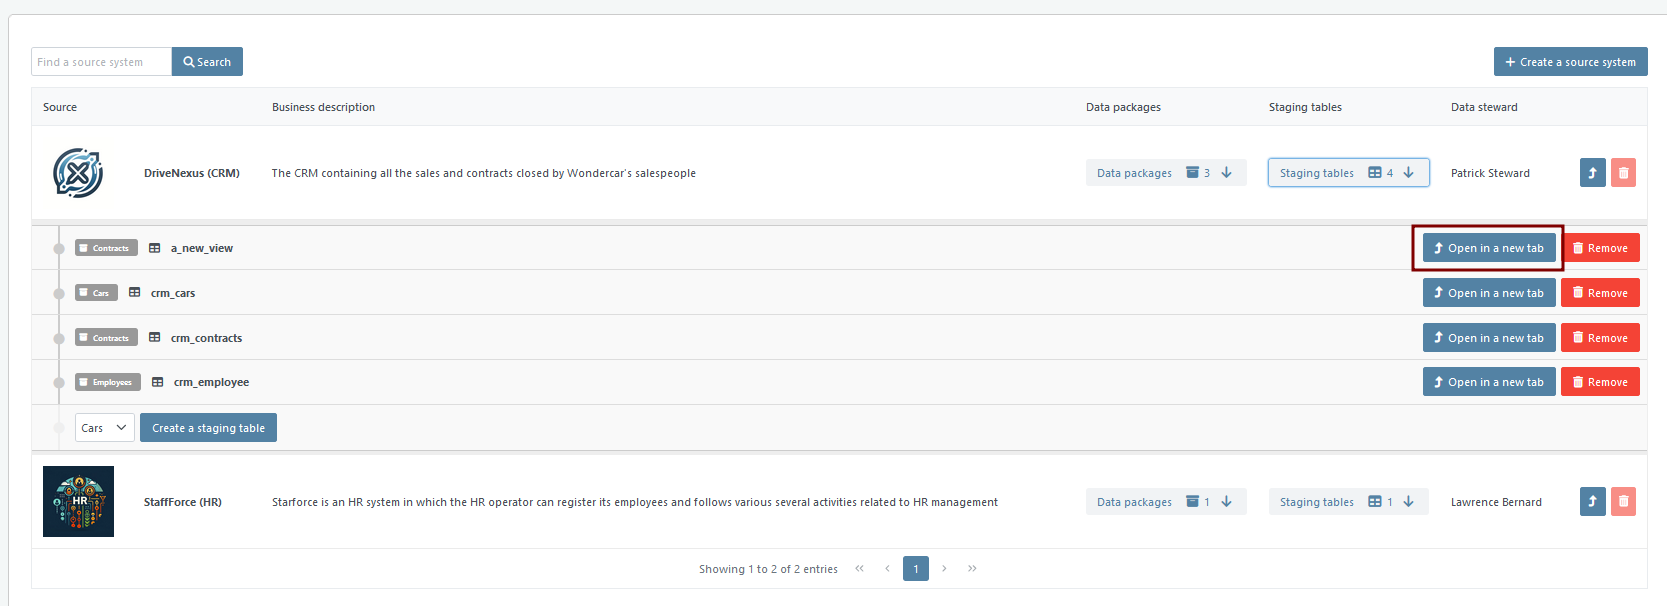
To modify an existing source, click the “Open in a new tab” button for the corresponding source system.

A tab will appear, allowing you to edit the required and optional attributes (refer to the instructions for creating a source system for more information) in a first section “Source sytem metadata”.
Once you have made your changes, click the “Save” button to apply them. If you would rather not save your changes, close the tab without saving, and they will be discarded.
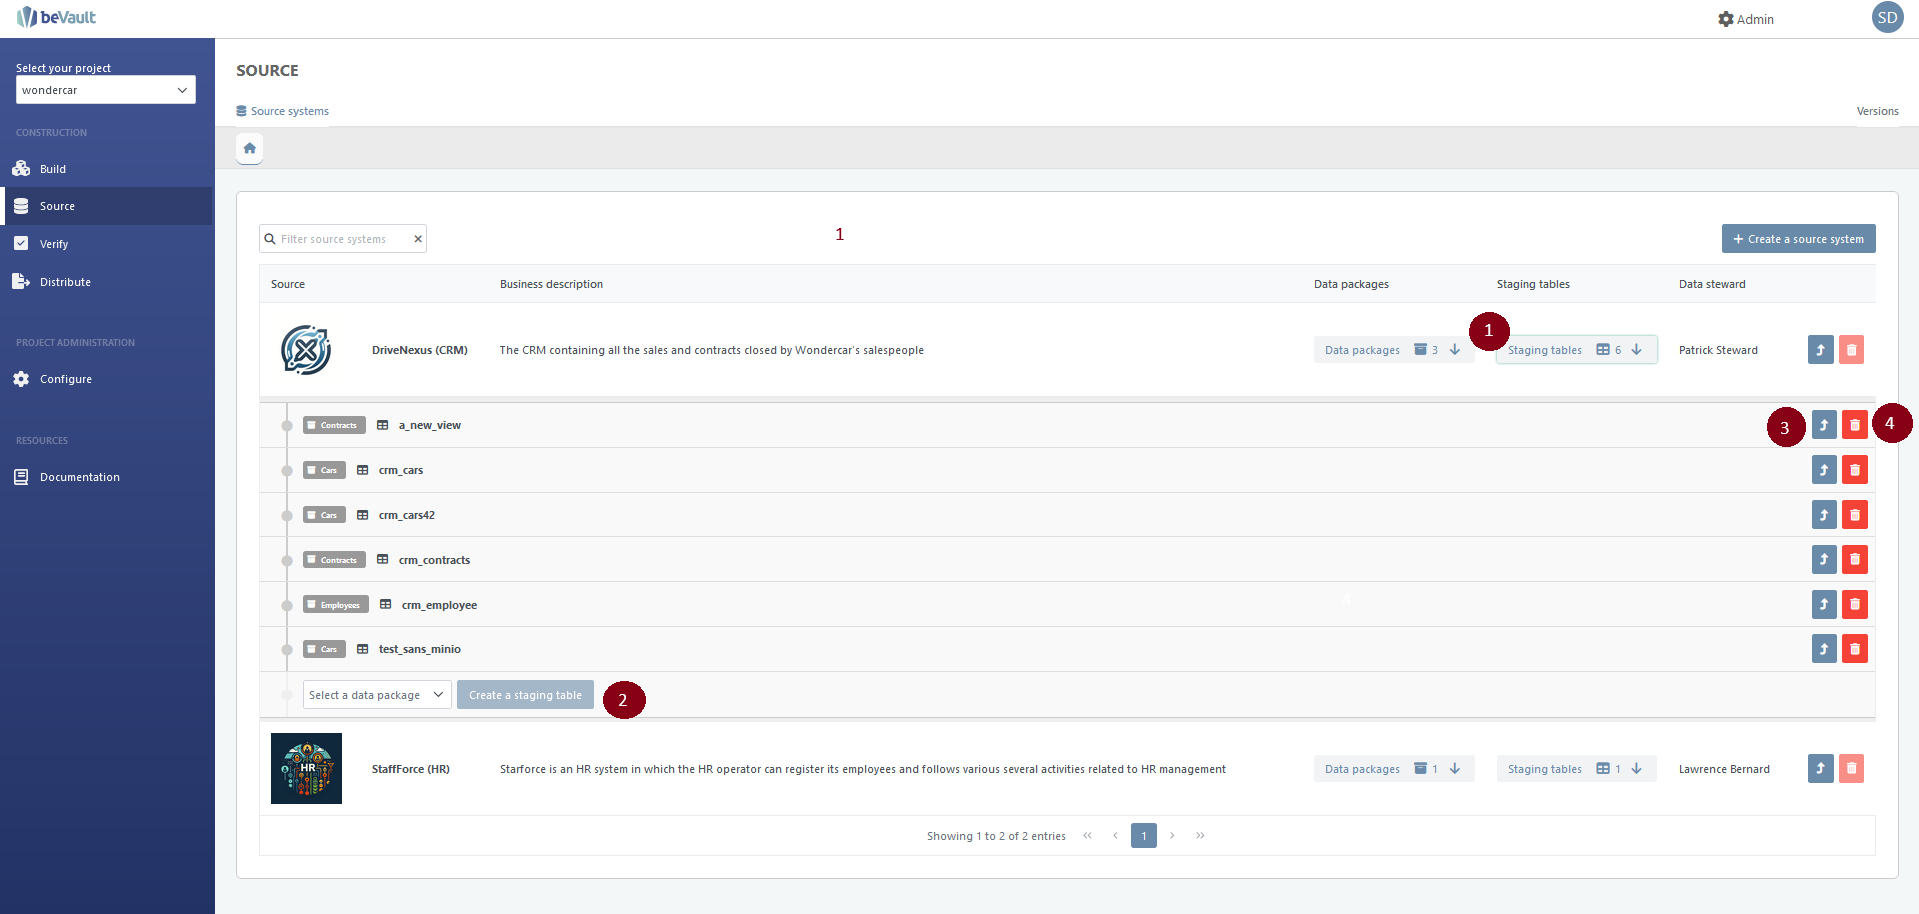
Note that, by clicking on the second button on the vertical menu on the left, a list of the data package created under the source system is displayed with the possibility to create, display in a new tab and edit or delete a staging table.
Same goes for the staging tables. However, in order to create a new one from this tab, you will need to select the data package under which the staging table must be created thanks to a dropdown list above the list of staging tables

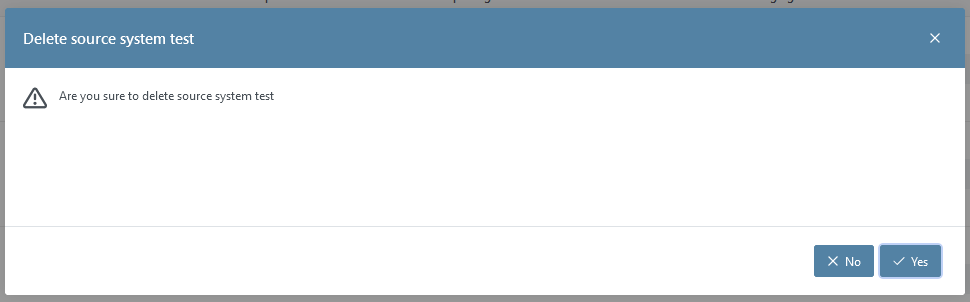
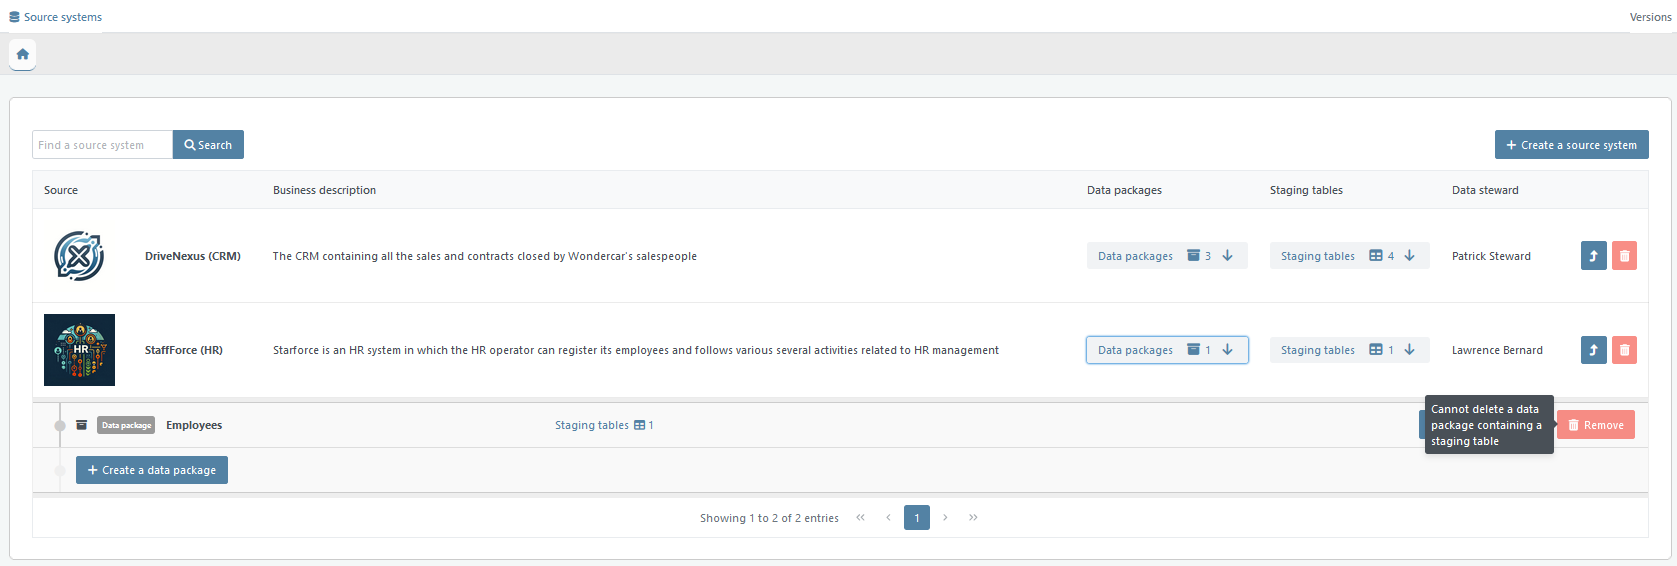
Delete a System Source
To delete a source system, click the trash icon on the corresponding line. Please note that you cannot delete a source system if it is linked to any data packages.
Data Packages
After creating a source system, you can create one or more data packages that are linked to the source. Some source systems provide data in separate batches, and the data delivery schedule for these batches can be defined using data packages.
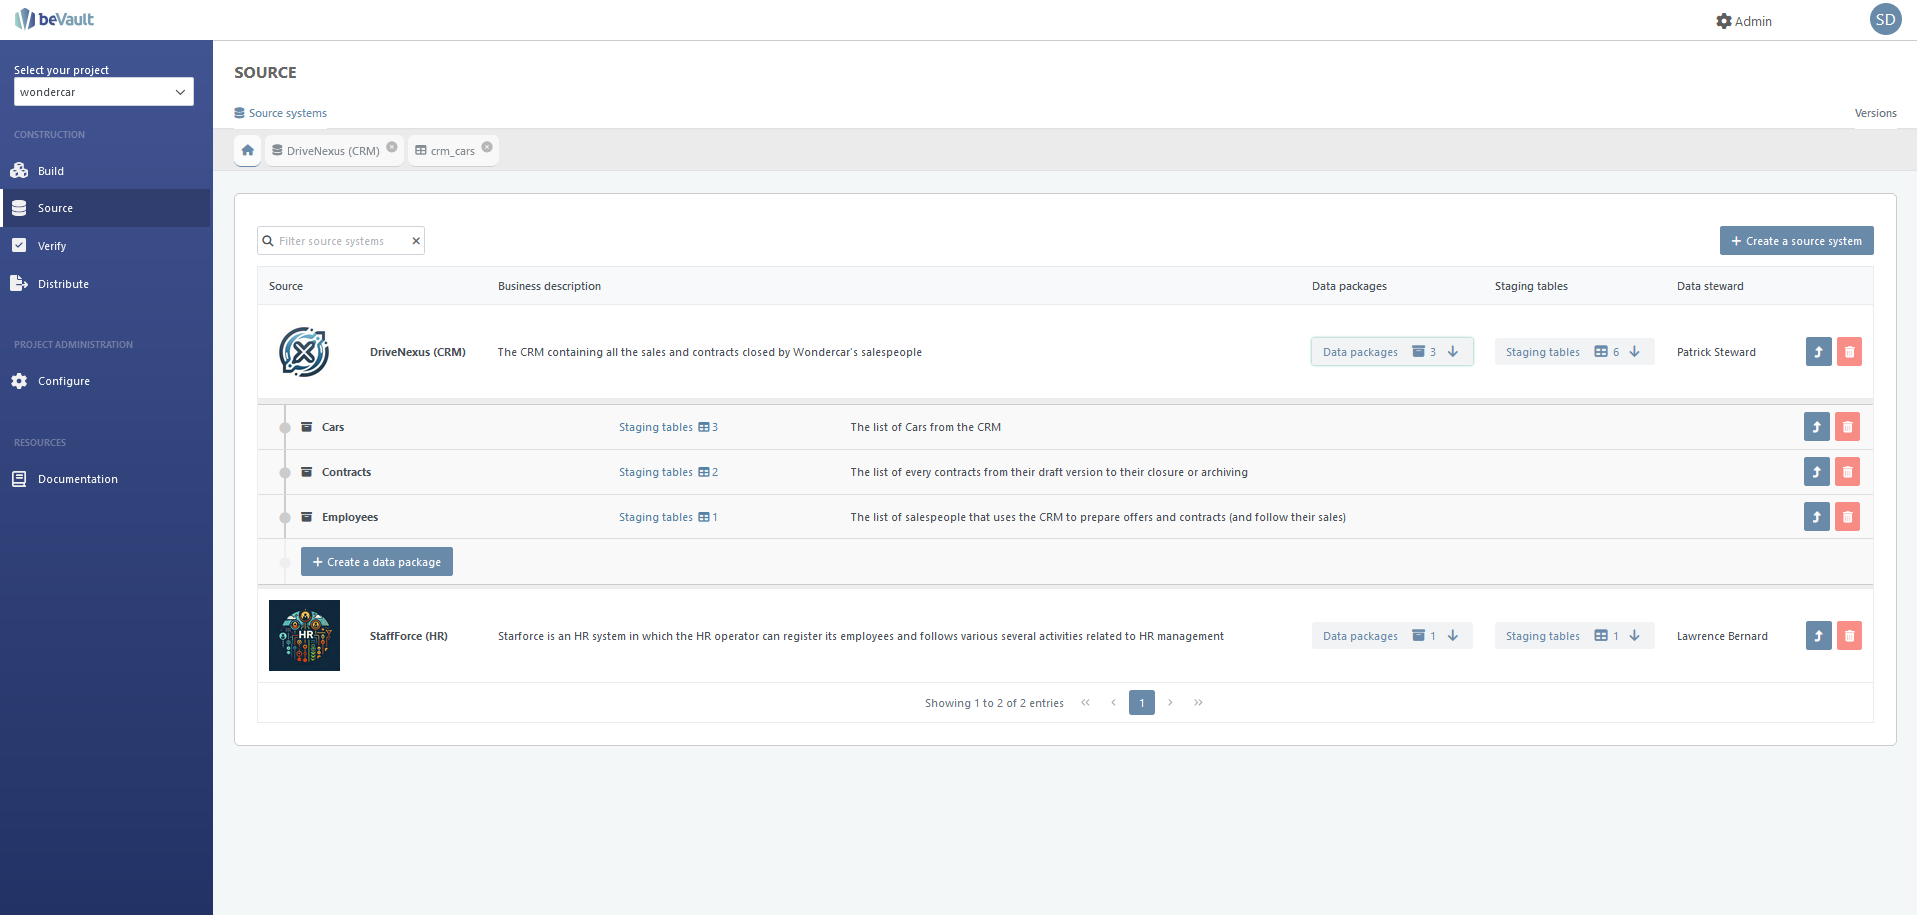
In order to display the data packages, click the button ‘Data packages’ under the column with the same name for the source system that you wish to explore and/or edit.
The following buttons are available for managing data packages:
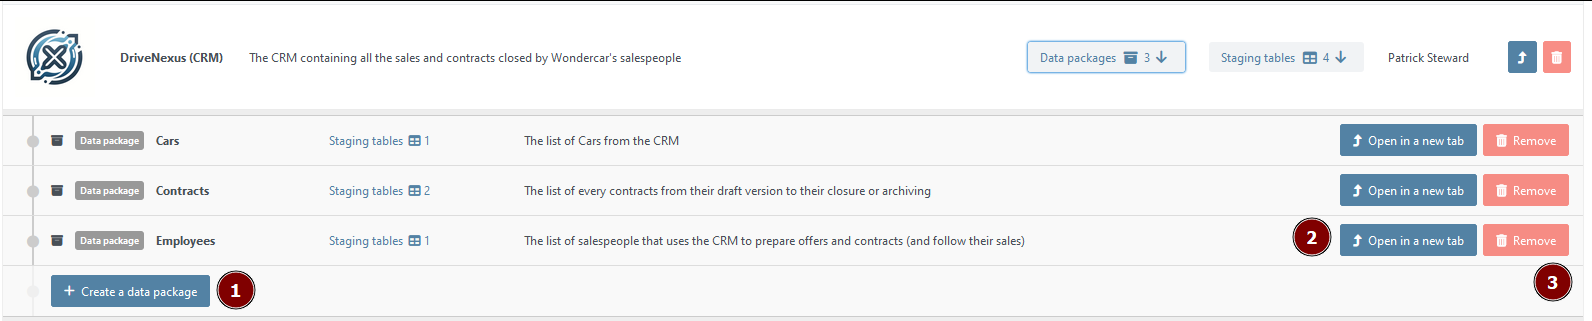
Create a new data package
Modify an existing data package
Delete an existing data package
Create a Data Package
To create a new data package linked to a source system, click the “Create a new Data Package” button (refer to the instructions for managing data packages).
A pop-up wizard will appear, requiring you to enter several required and optional attributes.
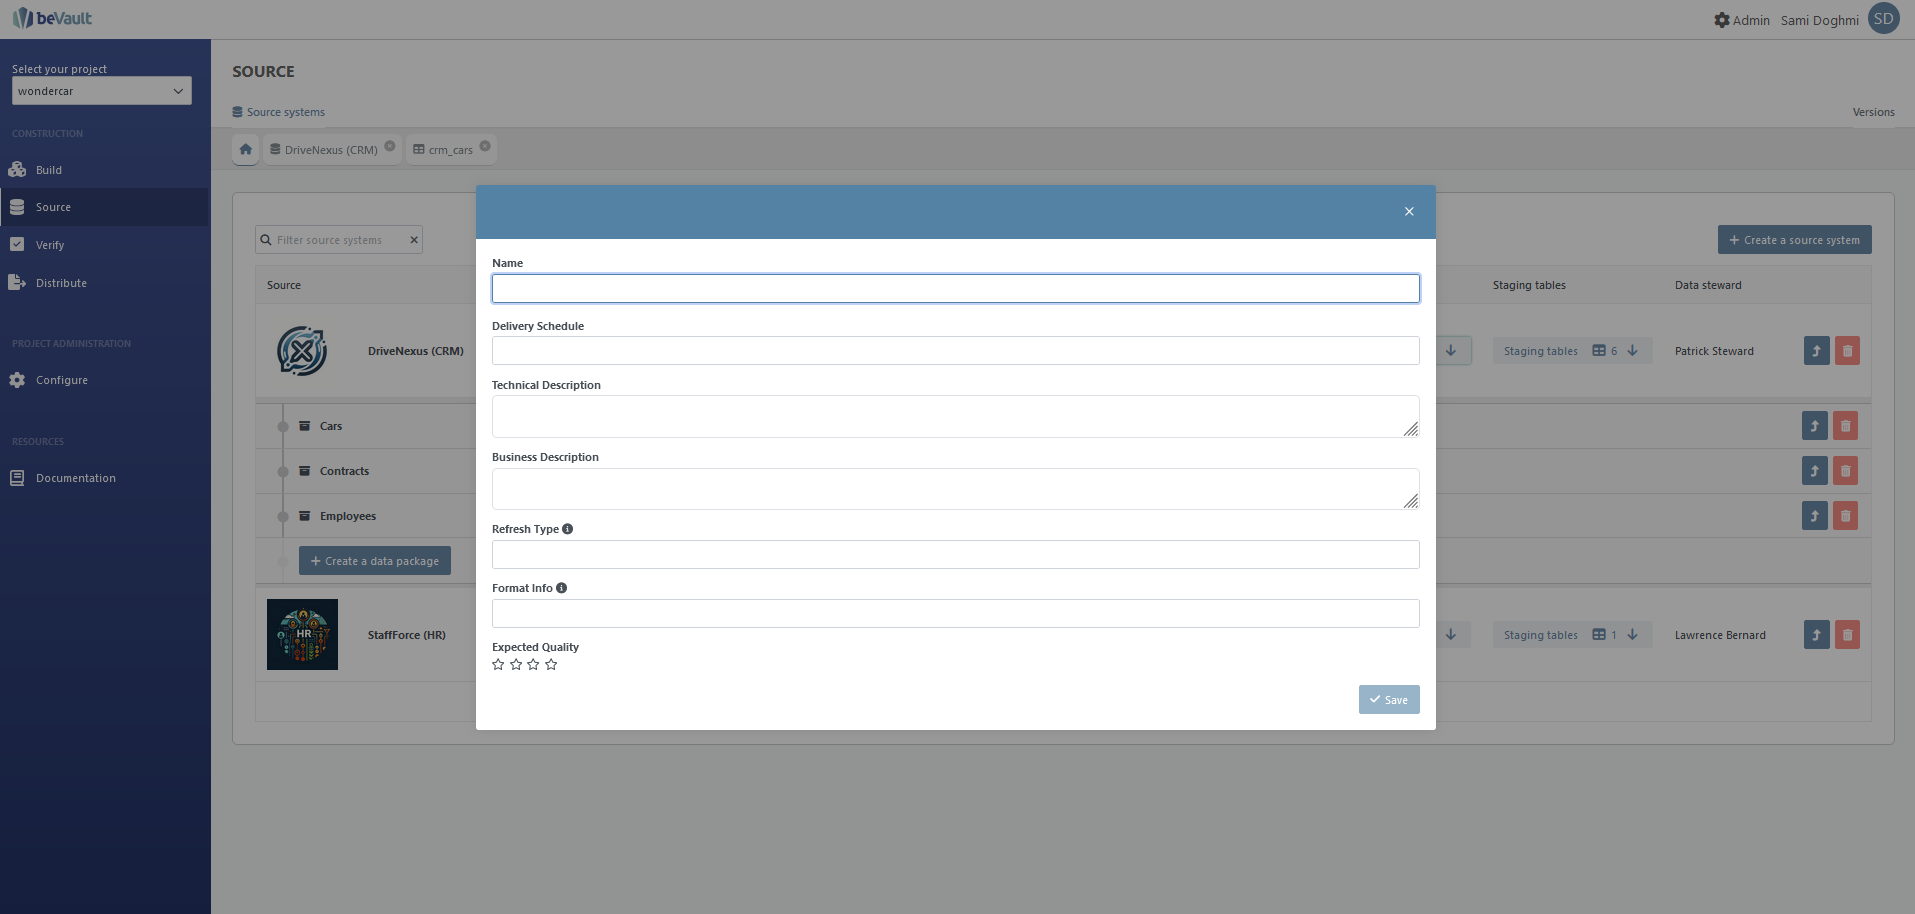
Specifically, you must provide:
Name: MANDATORY — The name of the data package. This name must be unique within the source system, meaning that a single source system cannot have two data packages with the same name.
Delivery Schedule: OPTIONAL — A description of when the data is provided to the Data Vault in text format.
Technical Description: OPTIONAL — A description of the data package in text format.
Business Description: OPTIONAL — Detailed information about the data package from a business perspective.
Refresh Type: OPTIONAL — A description of the frequency with which the content of the data package is refreshed.
Format Info: OPTIONAL — A description of the format of the file that will be sent to the Data Vault, such as CSV or XML, in text format.
Expected Quality: OPTIONAL — A description of the quality of the data package.
After filling out the required and optional attributes for the data package, click the “Save” button to create it. If the data package is successfully created, it will appear in the list of data packages. You can then proceed to manage staging tables (see the instructions for “Staging Tables”).
Modify an Existing Data Package
To modify an existing data package, click the “Open in a new tab” button for the corresponding data package. The process is similar to creating a new data package, with the same fields and rules. The fields that are already set will be pre-filled (refer to the instructions for creating a data package for more information).
A new tab in the module will appear, allowing you to edit the required and optional attributes for the data package (refer to see the “Create a Data Package” subsection for more information).
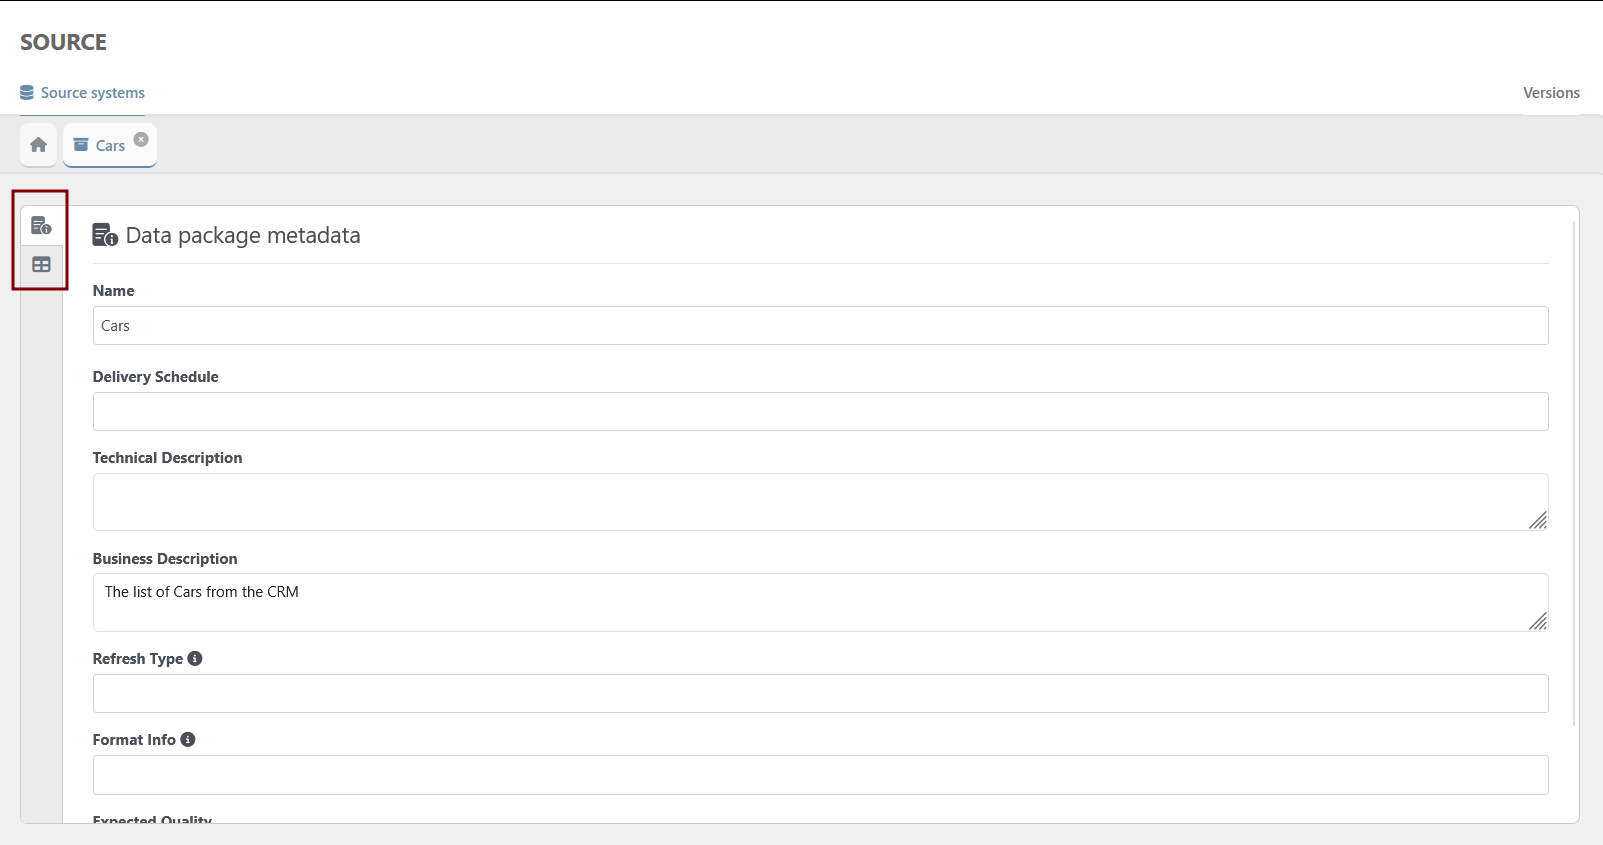
Once you have made your changes, click the “Save” button to apply them.
Please know that, by clicking on the second button on the vertical menu on the left, a list of the staging tables created under the package is displayed with the possibility to create, display in a new tab and edit or delete a staging table
Delete a Data Package
To delete a data package, click the ‘Remove’ button with the trash icon on the corresponding line. Please note that you cannot delete a data package if it has associated tables.
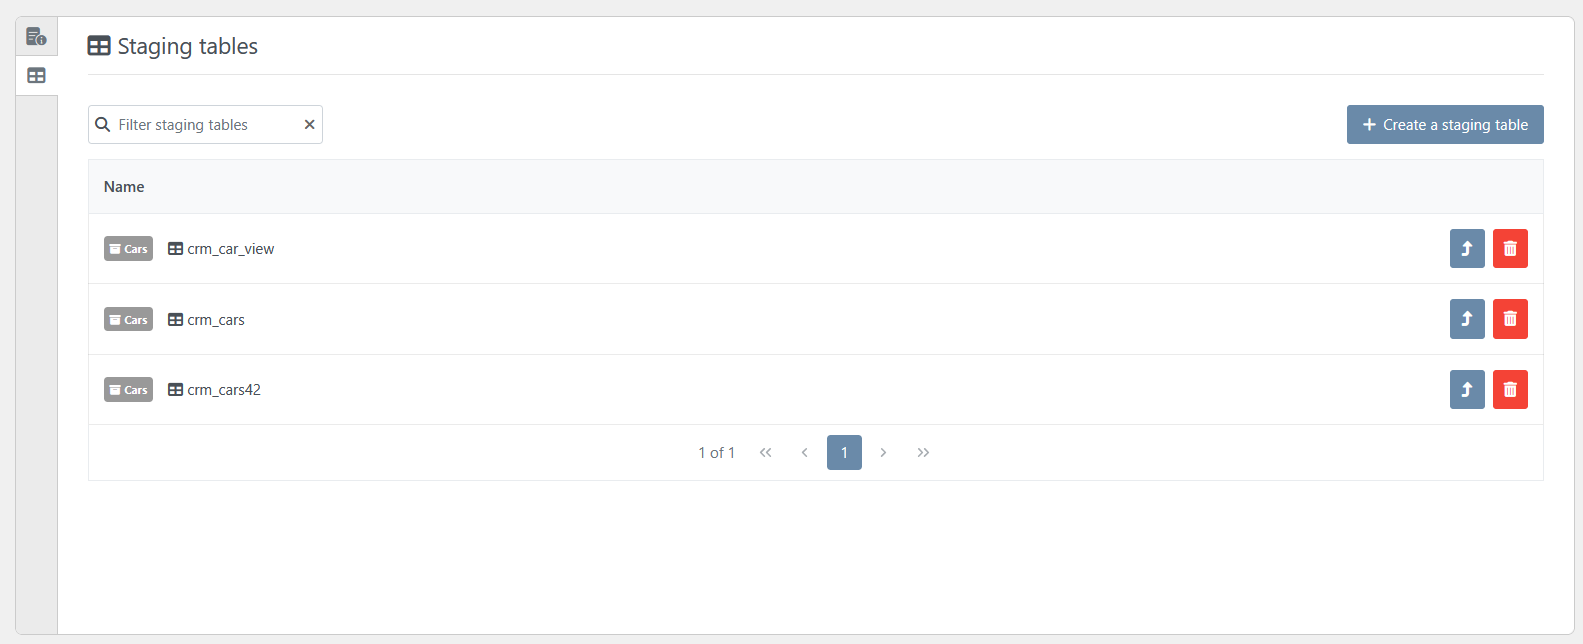
Staging Table
Staging tables are used to store data temporarily while it is being imported into the Data Vault. Each staging table is associated with a single data package.
To manage the staging tables for a particular data package, follow these steps:
Click the button ‘Staging tables’ under the column with the same name for the source system that you wish to explore and/or edit.
The following buttons are available for managing the staging tables:
Create a new staging table (provided that you selected the data package under which the staging table must be created (2).
Edit an existing staging table (3).
Delete a staging table (4).
Create a staging table
When you click the “Create a new Staging Table” button, a pop-up window will appear.
This window includes the following options:
Create a new table: This option allows you to create a new staging table if it does not already exist in the stg schema of the modeling environment's database.
Use an existing table: This option can be used if the table already exists in the stg schema of the modeling environment's database, but is not yet mapped to any data package.
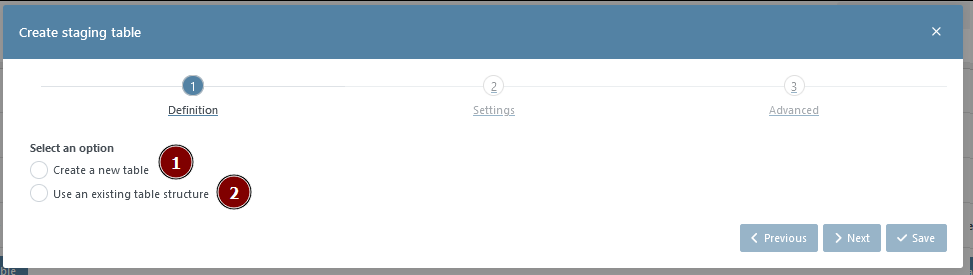
If you choose the “Create a new table” option, you will see the following options for creating the table:
Create table with SQL: This radio button allows you to create a table directly by writing a SQL statement or by importing one.
Import table from file: This button allows you to create a table by importing a CSV or Excel file.
Create table with wizard: This button allows you to use a wizard to create the table.
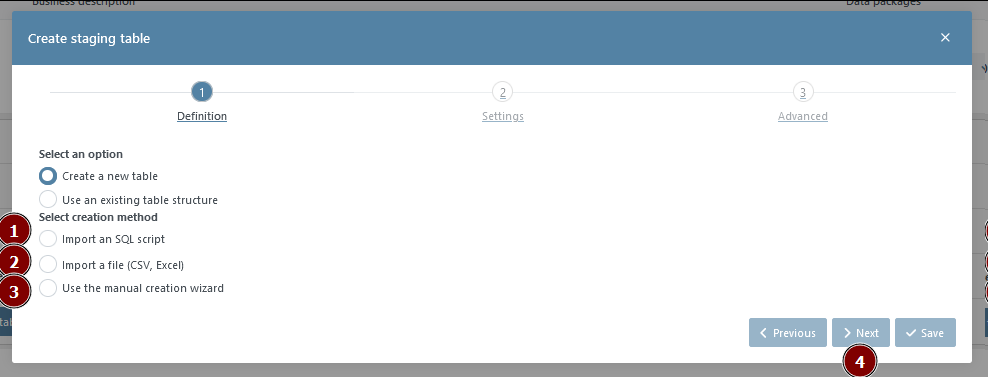
Once you have chosen how to create the staging table, the next button (4) will become enabled and allow you to proceed to the next stage of the creation process.
Create a staging table by using a SQL script
When using the “Create table with SQL” option to create a staging table, you will need to provide the following information:
Table Name: MANDATORY — This field can only contain a maximum of 25 characters and a minimum of 2. The first character must be a letter or an underscore, and all subsequent characters can only be letters, numbers, or underscores.
 The staging table will be created in the “stg” schema. It should not be specified in the table name.
Creation Type: MANDATORY — This field must be set to either “Table Creation” or “View Creation”.
Query Editor: MANDATORY — This field is used to write a SQL statement using the same SQL dialect as the modeling environment.
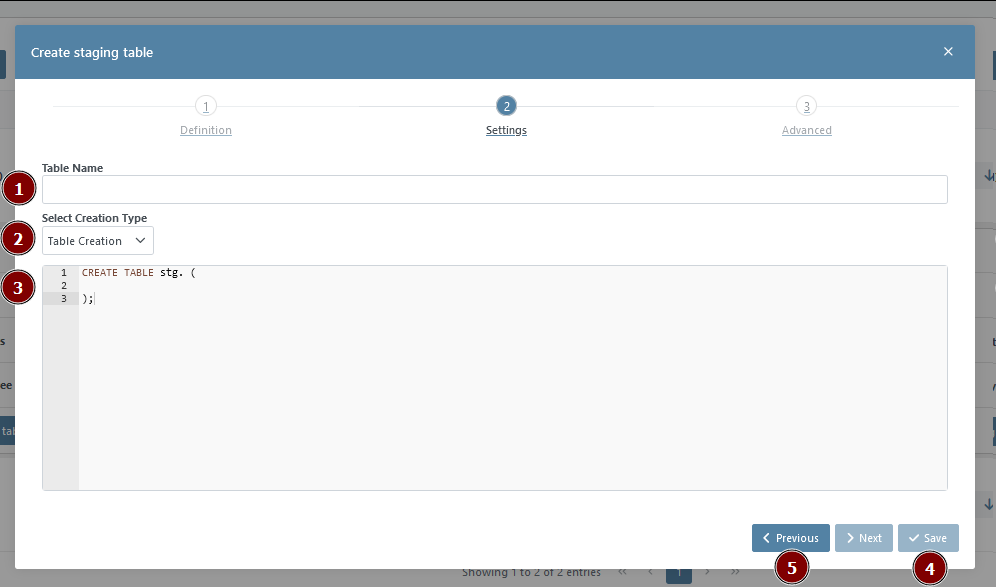
Once you have entered a valid table name and written a query, the “Save” button (4) will become enabled and allow you to create the staging table.
The “Previous” button (5) can be used to return to the previous screen and choose a different method for creating the staging table.
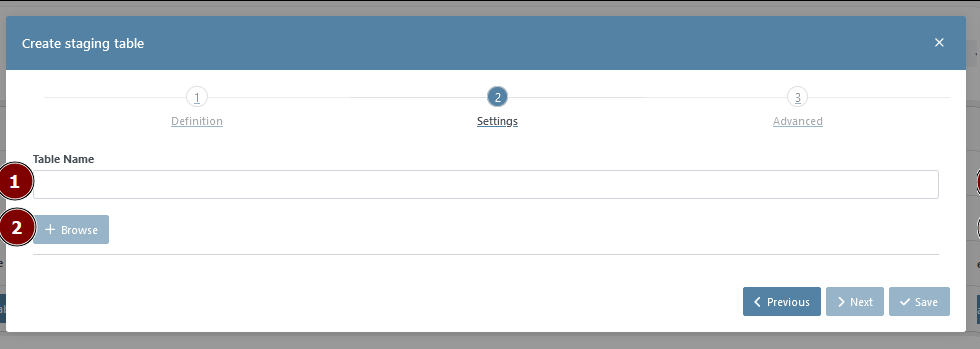
Creating a staging table by importing a file
When creating a staging table by importing a file, you will need to provide the following information:
Table Name:MANDATORY — Contains min 2 characters, max 25. The first character can only be an alphabetical character or an underscore. Every subsequent character can either be a letter, a number or an underscore.
The staging table will be created in the “stg” schema. It should not be specified in the table name.Browse: MANDATORY — allows you to search on your computer for a file to import. The file must be either an Excel file or a CSV file, and must end with one of the following suffixes: .xlsx, .csv .xls.
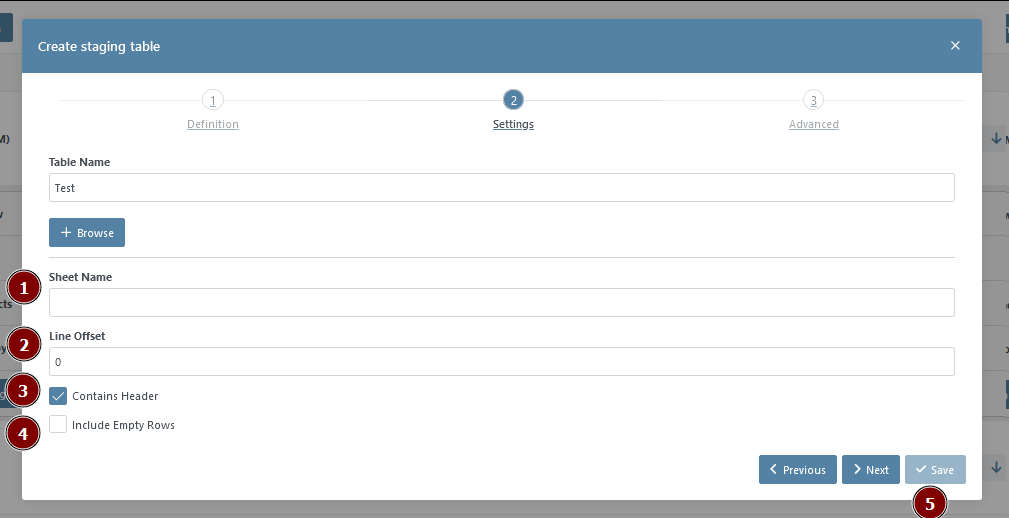
Excel file options
The Excel file options allow you to specify the sheet name, line offset, whether the file has a header row, and whether to include empty rows in the imported data.
Sheet name: MANDATORY — Name of a specific tab in your file.
Line offset: OPTIONAL — Option that allows you to skip a certain number of rows at the beginning of the sheet.
Contains Header: MANDATORY — Option that specifies whether the first row of the sheet, or the first row after the line offset, should be used as column headers in the created staging table. If this option is not selected, the Excel column names (A, B, C, etc.) will be used as the column headers.
Include empty rows: MANDATORY — option that allows you to choose whether to include empty rows found at the end of the sheet in the imported data. This option is set to false by default.
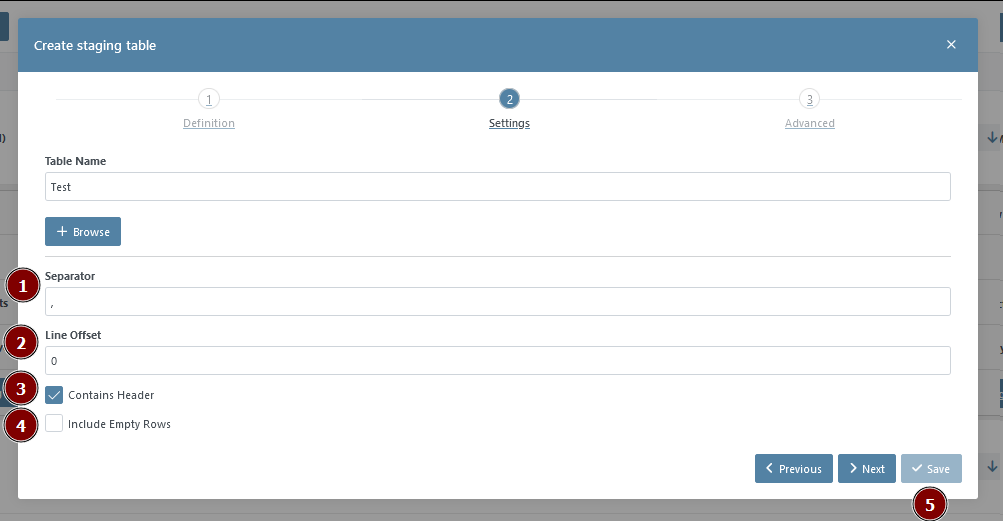
CSV file option
The CSV file options allow you to specify .
Separator: MANDATORY — Character that is used to separate values in the CSV file. The default separator is a comma.
Line offset: OPTIONAL — Option that allows you to skip a certain number of rows at the beginning of the sheet.
Contains Header: MANDATORY — Option that specifies whether the first row of the sheet, or the first row after the line offset, should be used as column headers in the created staging table. If this option is not selected, the Excel column names (A, B, C, etc.) will be used as the column headers.
Include empty rows: MANDATORY — option that allows you to choose whether to include empty rows found at the end of the sheet in the imported data. This option is set to false by default.
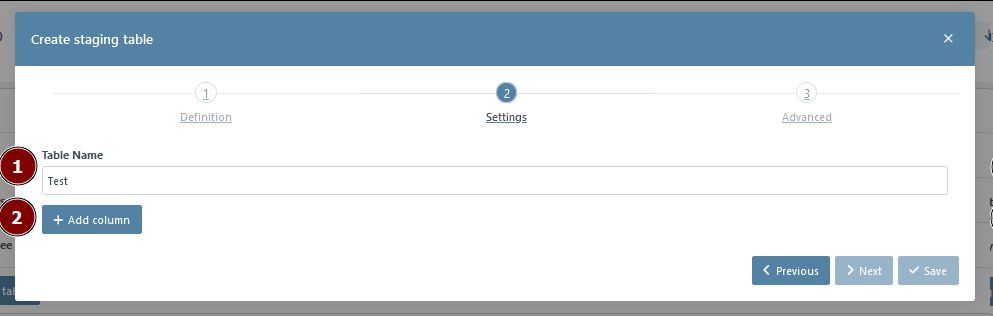
Creating a staging table using the manual creation wizard
The manual creation wizard for creating a staging table allows you to specify the table name and add columns to the table.
Table name: MANDATORY — must be at least two characters long and no more than 25 characters long. The first character must be an alphabetical character or an underscore, and every subsequent character can be a letter, number, or underscore.
Add Column: OPTIONAL — option allows you to add columns to the staging table.
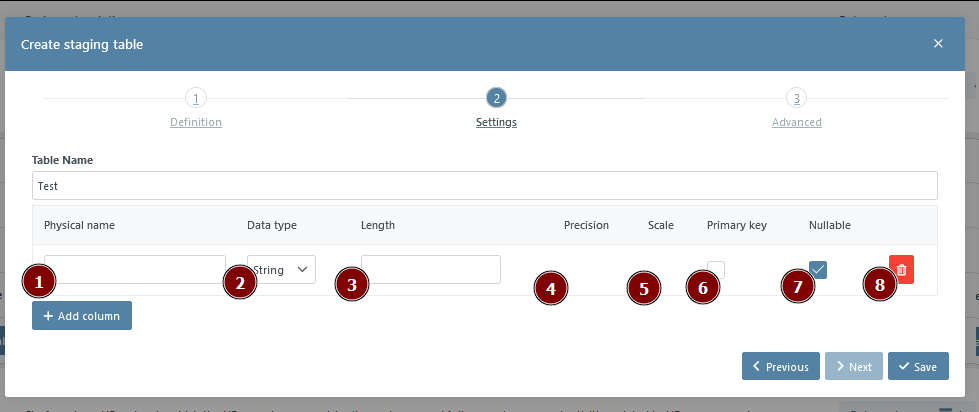
After adding a column, you can specify:
Physical Name: MANDATORY — Specifies the name of the staging column, which has a maximum length of 60 characters.
Data Type: MANDATORY — The data type of the column. If the type is a text type. Database types: Data Type correspondence
The length of the column: OPTIONNAL — This field will only be settable if the data type is a text type.
The precision of the column: OPTIONNAL: — This field will only be settable is the data type is a number type
The scale of the column: OPTIONNAL: — This field will only be settable is the data type is a number type
The Primary key: OPTIONNAL: — if this column is a primary key.
Nullable OPTIONNAL: — if the column is nullable. Note that a column set as a primary key cannot be nullable.
Delete button: OPTIONNAL: — deletes the temporary column
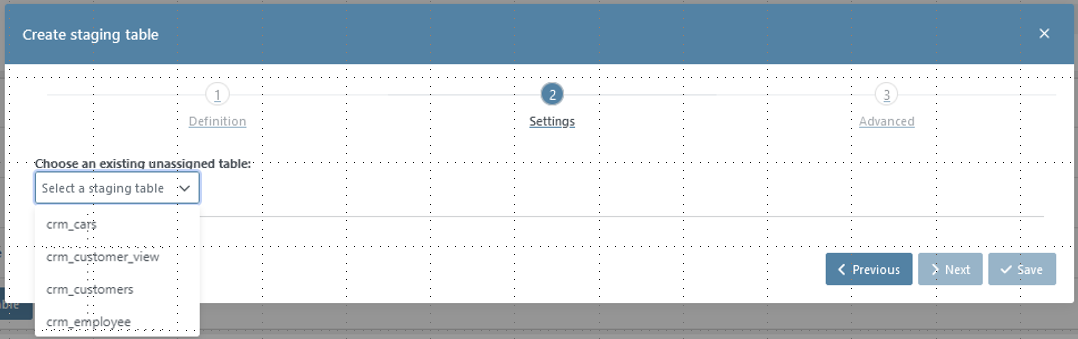
Creating a staging table by using an existing table structure
The option to create a staging table by using an existing table structure allows you to select a table from a dropdown list of all the tables present in the “stg” schema of the modeling environment databases. This will create a new staging table using the structure of the selected table.
![]() The read-only user (CFR Metavault Configuration | Configuration ) used for the database of the modeling environment needs to be able to perform SELECT queries on the existing table.
The read-only user (CFR Metavault Configuration | Configuration ) used for the database of the modeling environment needs to be able to perform SELECT queries on the existing table.
Delete a staging table
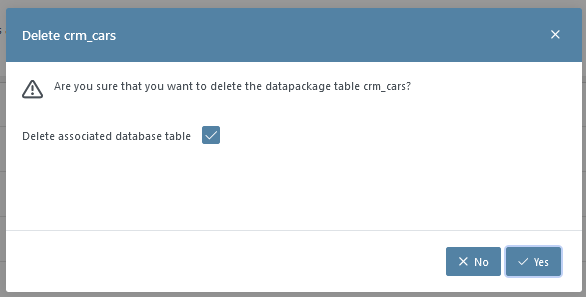
Please note that it is only possible to delete a staging table if none of its columns are mapped to a Data Vault entity. If any of the columns are mapped, the staging table cannot be deleted.
The option to delete a staging table also allows you to delete the corresponding table in the “stg” schema in the modeling environment database. If this option is not selected, only the reference to the table in the Meta Vault will be deleted, and the actual table in the database will remain.
Edit a staging table
The edition of an existing staging table can be done in the dynamic tab of the staging table, which is covered in the next section. To open the tab of the staging table, the users can click on the ‘open in a new tab’ button next to it.