Webhooks - States
dFakto States Machine allows you to create webhooks in order to get notified in case some events happen.
You will need to fill a “Webhook URL” and define which events are interesting for you.
A webhook URL is provided by the receiving application (e.g. check here how to generate one)
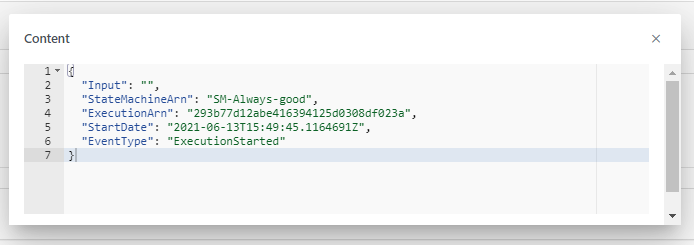
The event is sent to the webhook URL in either JSON or XML format.
Create a webhook
Go to States > Monitoring > Webhooks.
The list of the existing webhooks will be displayed.

To create a new webhook, click on the “Create a webhook” button top right, and the following pop-up wizard will appear:
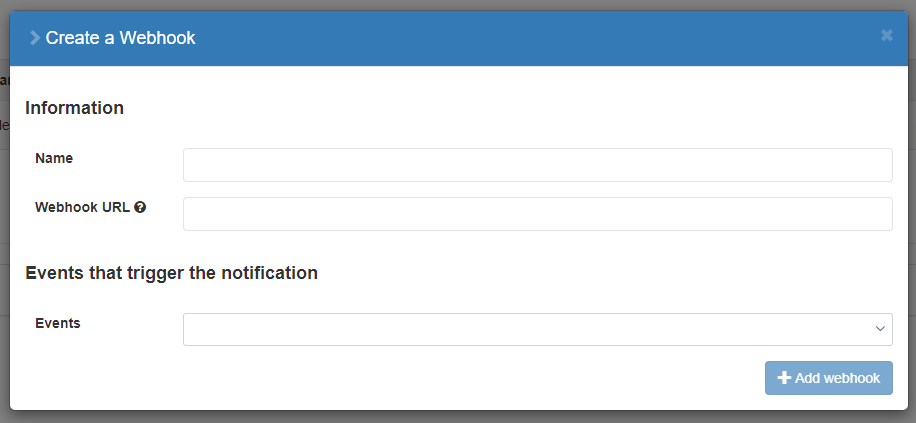
You will need to provide the following information:
Name: it is the name you want to give to this webhook. Choose something easy, that will remind you why you created that webook.
Webhook URL: you can find the Webhook URL in the receiving application (e.g. check here how to generate one)
Events that trigger the notification: you will need to choose among different events that will trigger a notification to the webhook URL. Choose wisely, as you could be spammed in case you select too many events. Currently, you can select among (one or more selections are possible):
An Execution started
A State Machine is created
A State Machine is updated
An Execution ended
A State Machine is deleted
A Task started
A Task ended
A Worker is connected
A Worker is disconnected
Additional filters: based on the events you have selected, you have now the possibility to reduce the notifications you may receive, by adding some filters (e.g. by defining only which state machines are interesting for you). Concretely:
If you select the events “An Execution started/ended”, you can add a filter “State machines” to say which States Machines are particularly interesting for you
You will not get notified of the other States Machines
If you select the event “An Execution ended”, you can add a filter “Execution Status” to say which execution status is relevant (Succeeded, Failed, TimedoOut, Aborted)
You will not get notified of the other execution status
If you select the events “A Task started”/ended”, you can add a filter “Activities” to say which activities are relevant
You will not get notified of the other Activities
If you select the event “A Task ended”, you can add a filter “State” to say which state is relevant (Success/Failed)
You will not get notified of another state status
If you select the event “A Worker is connected/disconnected”, you can type the Worker name
Once this is done, do not forget to click on the “Add webhook” button.
The created webhook will appear in the webhook list view, and it will be “enabled” automatically.
If the webhook fails more than 3 times, the webhook will be automatically disabled.
Modify a webhook
To modify an existing webhook, go to States > Monitoring > Webhooks.
Find the webhook that you want to modify:
If you wish to enable/disable it, directly click on the “Enabled” checkbox.
If a webhook fails more than 3 times, the webhook will be automatically disabled.
If you wish to modify the parameters, click on the corresponding “Edit” button.
A pop-up wizard will appear, and you can update the information.
Once this is done, do not forget to click on the “Update webhook” button.
Delete a webhook
To delete an existing webhook, go to States > Monitoring > Webhooks and find the webhook you wish to delete.
Then, click on the “Delete” button. The webhook will be immediately deleted.
Check the logs of a webhook
If you want to see if the event has been triggered and the webhook interfaced (or not), go to States > Monitoring > Webhooks and find the webhook you wish to track.
Then, click on it, and the list of logs will appear.
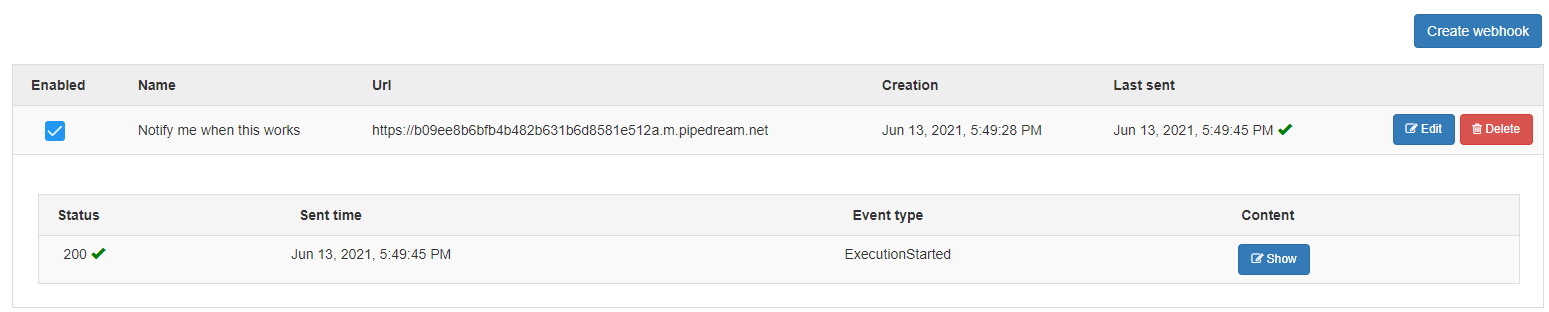
The status will tell you whether the event and webhook have been correctly interfaced.
If you wish to follow the content sent to the URL endpoint, click on the “Show” button.